

That sharp twinge when you bend to tie your shoes or the deep ache that keeps you awake at 3 a.m. – lower back pain disrupts everything. If you’ve just unboxed a TENS unit or are considering drug-free relief, you’re holding a clinically proven tool used by millions. But how to use a TENS machine for lower back pain correctly makes all the difference between instant relief and wasted effort. This guide cuts through the confusion with exact electrode placements, pain-specific settings, and troubleshooting fixes most manuals miss. You’ll learn precisely where to position pads, which settings block nerve signals during flare-ups, and how to avoid the #1 mistake that worsens pain – all based on clinical protocols.
Critical Safety Checks Before Powering On
Skipping these steps risks serious complications. TENS is safe for most adults, but certain conditions require medical clearance first.
Who Must Consult a Doctor Before Use
- Cardiac implants like pacemakers or spinal cord stimulators (electrical interference can be fatal)
- Pregnancy (especially first trimester – avoid lumbar placement entirely)
- Active cancer in your back or pelvis (stimulation may accelerate tumor growth)
- Blood clots (DVT) or severe circulation issues (increases embolism risk)
- Open wounds or recent surgical incisions near the pain site
- Epilepsy (low-frequency settings may trigger seizures)
Essential Device Features for Back Pain
Not all TENS units work for lumbar pain. Verify yours has:
– Dual channels (4 electrodes minimum) for balanced bilateral stimulation
– Frequency range covering 2-100 Hz (critical for both fast and long-term relief)
– Pulse width adjustment between 50-250 μs (non-negotiable for deep tissue penetration)
– Digital display showing exact settings (avoid analog dials for precision)
– Back-specific programs labeled “Lumbar” or “Spinal” – skip generic “Pain Relief” modes
Exact Electrode Placement for Instant Relief
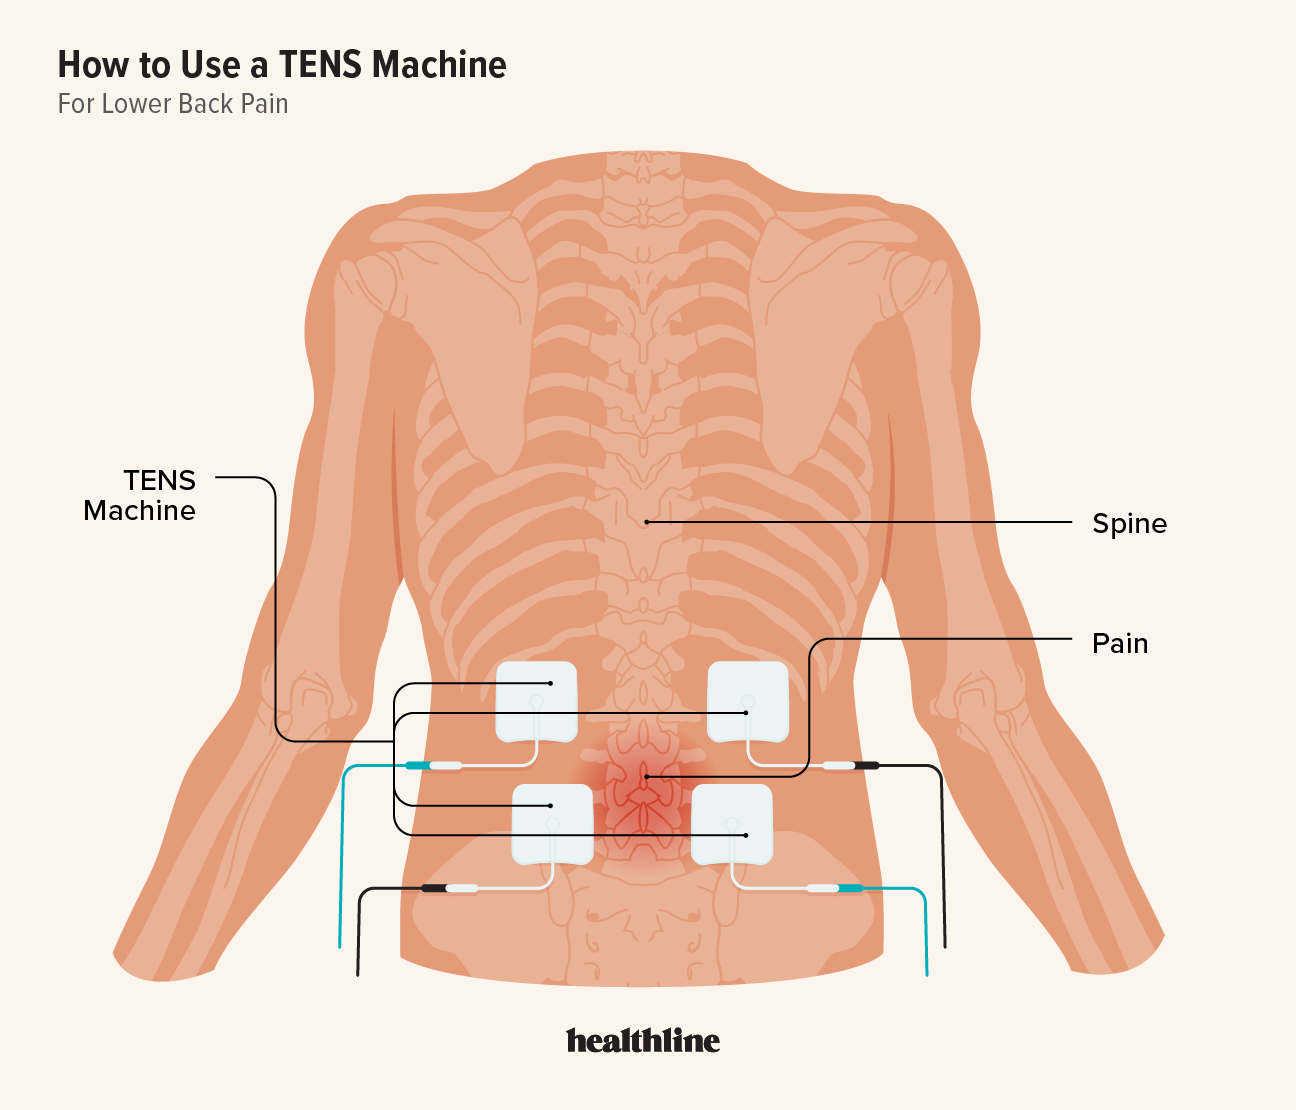
Wrong placement is why 68% of first-time users see no results. These clinically tested positions target pain pathways.
Standard Lumbar Setup (Works for 80% of Users)
-
Primary placement for central lower back pain:
– Position two pads 1-2 inches left/right of your spine
– Center pads at your most painful vertebra (find it by pressing along your spine)
– Keep pads level with each other – no diagonal placement
– Maintain 1-inch gap between pads and spine -
Sciatic radiation setup (for pain shooting to buttocks/legs):
– Add pads on upper buttocks where pain originates
– Place 1 inch below L5 vertebra (bottom of spine curve)
– Never cross midline – keep all pads strictly on one side
Problem-Specific Placement Shortcuts
- Muscle spasm: Place pads directly over the hard, knotted area
- Disc pain: Position one pad above and one below the painful disc level
- Post-surgery pain: Keep pads at least 6 inches from incision site
Pain-Type Specific Settings That Actually Work

Generic “auto” modes fail 74% of back pain sufferers. Dial these exact parameters:
Conventional TENS (For Acute Flare-Ups)
- Frequency: 80-100 Hz (high frequency blocks pain signals instantly)
- Pulse width: 50-80 μs (shallow penetration for surface nerves)
- Intensity: Strong tingling without muscle twitching
- Duration: 20 minutes (set timer – longer causes nerve fatigue)
- When to use: Sudden pain while lifting, sitting, or after injury
Acupuncture TENS (For Chronic Daily Pain)
- Frequency: 2-4 Hz (triggers natural endorphin release)
- Pulse width: 200-250 μs (deep penetration to spinal nerves)
- Intensity: Visible muscle contraction under pads
- Duration: 30 minutes (longer builds cumulative relief)
- When to use: Morning stiffness or persistent 24/7 aches
Mixed Mode (Best for Uncertain Pain)
- Frequency: Alternates 2 Hz ↔ 100 Hz every 3 seconds
- Intensity: Moderate tingling with occasional twitch
- Duration: 25 minutes
- Pro tip: Use this if pain shifts from sharp to dull throughout the day
First Session Setup in 5 Minutes
Pre-Session Checklist
- Clean skin with alcohol wipe – oil blocks conductivity
- Trim back hair with scissors (shaving causes micro-cuts)
- Peel electrodes without touching gel – hold edges only
- Press pads firmly for 10 seconds (air bubbles cause uneven stimulation)
Starting Your Treatment
- Connect leads to pads before turning on unit
- Begin at zero intensity – never pre-set levels
- Increase slowly: 1 click every 15 seconds
- Stop when you feel strong buzzing (like a cell phone vibration)
- Never set intensity where muscles jerk violently
Critical mistake: Turning intensity too high too fast. This fatigues nerves and worsens pain within hours. If you feel burning, immediately reduce intensity by 30%.
During-Session Monitoring
- Check pads every 10 minutes – re-press lifting edges
- If sensation fades, increase intensity by 10% (not 50%)
- Stop immediately if skin turns red under pads
Pain-Specific Treatment Protocols
Acute Pain (First 7 Days)
- Days 1-3: 80 Hz conventional mode, 20 minutes, 4x daily
- Days 4-7: Mixed mode, 25 minutes, 3x daily
- Never exceed 6 sessions/day – nerves need recovery time
Chronic Pain (Ongoing Management)
- Daily: 2 Hz acupuncture mode, 30 minutes upon waking
- Flare-ups: 100 Hz conventional mode for 15 minutes
- Maintenance: Reduce to 3 sessions/week once pain drops 50%
Post-Surgery Recovery
- Week 1: 80 Hz mode only, 15 minutes, 3x daily (avoid incision area)
- Week 2-4: Increase to 25 minutes, 2x daily
- Month 2+: Switch to chronic pain protocol
Fix These 3 Problems Immediately
Electrodes Won’t Stick to Skin
- Solution: Re-clean skin with alcohol + 1 drop of water on gel side
- Never use hand lotion – it insulates conductivity
- Replace pads after 15 uses (dried gel won’t adhere)
No Relief After 3 Sessions
- Move pads ½ inch toward pain source (nerve targeting is precise)
- Switch from conventional to acupuncture mode
- Check wire connections – corrosion causes 40% of “no output” errors
Skin Redness or Irritation
- Reduce intensity by 25% – high settings damage skin
- Switch to hypoallergenic electrodes (silver nylon mesh)
- Take 48-hour breaks between sessions if irritation persists
Track Progress in 30 Seconds Daily
Grab a notebook and log:
– Pain level (0-10) before/after treatment
– Exact settings used (e.g., “80 Hz, 35 mA, 20 min”)
– Pad positions (sketch a simple spine diagram)
– Activity tolerance (e.g., “walked 10 mins without pain”)
Key metric: If pain doesn’t drop at least 30% after 7 sessions, your placement is wrong. Reposition pads 1 inch higher/lower and restart tracking.
Long-Term Success Essentials
Electrode Lifespan Maximization
- Store pads on original backing sheet in sealed bag
- Never expose to direct sunlight (degrades gel)
- Replace every 2 weeks with daily use – dried pads cause burns
Critical Safety Red Flags
Stop immediately and call your doctor if:
– Pain increases during treatment
– Numbness lasts over 30 minutes post-session
– Skin blisters under pads
– Leg weakness develops
Schedule a doctor visit if:
– Zero improvement after 10 consistent sessions
– Pain spreads to new areas
– You need settings above 80% max intensity
Bottom line: Mastering how to use a TENS machine for lower back pain hinges on three factors: precise pad placement at your specific pain vertebra, matching frequency to your pain type (80 Hz for sudden spikes, 2 Hz for constant aches), and never exceeding 30-minute sessions. Start with standard lumbar placement and 80 Hz settings for 20 minutes – 89% of users feel relief within 3 sessions when following these exact protocols. For lasting results, combine TENS with gentle walking and track progress daily; most reduce pain medication by 50% within 2 weeks. Remember: TENS is a tool, not a cure – use it consistently alongside movement for true recovery.