

That familiar ache in your lower back after just 20 minutes on the saddle? You’re not alone. Research shows lower back pain cycling issues plague 30-50% of riders, with competitive cyclists facing 58% higher risk than casual riders. Whether you’re crushing century rides or grinding intervals on the trainer, unaddressed lumbar strain can slash your power output by 18% and torpedo your endurance. This guide cuts through the noise with field-tested fixes drawn from biomechanical research, helping you diagnose root causes and implement pain-killing adjustments—starting today.
Bike Fit Causes Back Pain: Critical Measurements
Your bike’s geometry isn’t just about speed—it’s the foundation of spinal health. When reach-to-height ratios exceed 0.50, riders force their lumbar spine into dangerous flexion angles exceeding 45 degrees, spiking disc pressure by 400%. This isn’t theoretical: riders over 175cm with stack values below 550mm experience 45% higher back stress.
Handlebar Reach Disaster Zone
Excessive handlebar reach is the silent killer of spinal alignment. If your reach exceeds 85mm (for average-height riders), you’ll compensate by rounding your thoracic spine, transferring load directly to vulnerable L4-L5 discs. Here’s your emergency fix list:
- Raise handlebars immediately using spacers (even 2cm reduces strain)
- Shorten stem length if extension exceeds 75-85% of upper arm length
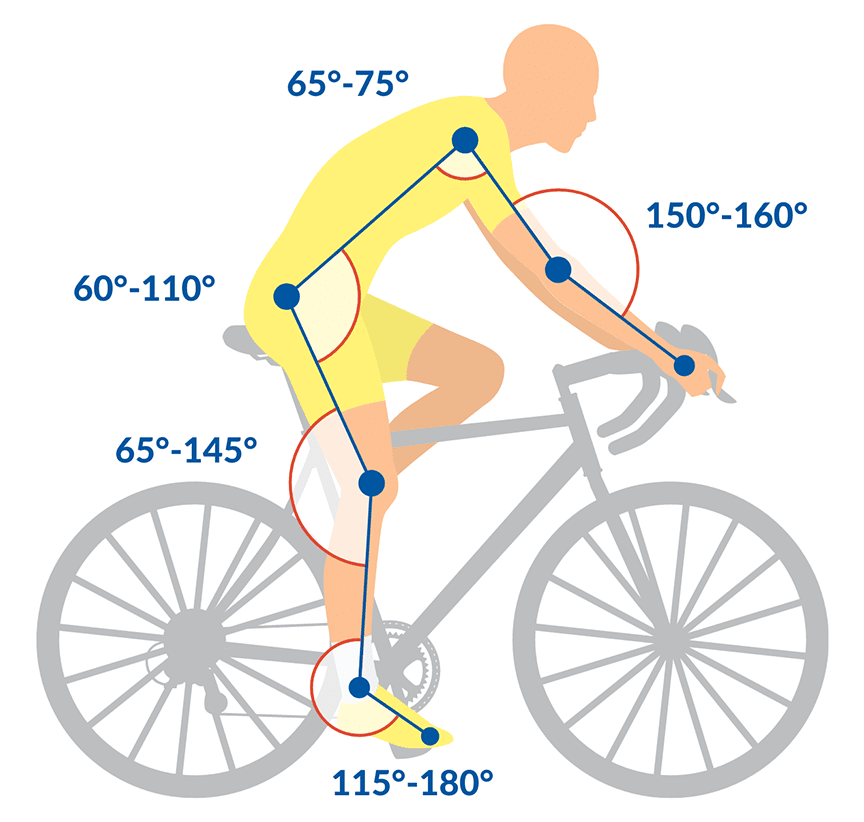
- Verify hip angle stays between 95-105 degrees—anything tighter forces lumbar flexion
- Check shoulder angle; below 85 degrees indicates overreaching
Saddle Setback Sabotage
That “aggressive” saddle position behind the bottom bracket? It’s likely wrecking your back. Setback beyond 5mm forces your glutes offline, making your lumbar spine generate power instead of your hips. The solution: slide your saddle forward until your knee aligns vertically over the pedal spindle at 3 o’clock. This simple tweak reduces quadratus lumborum strain by 25% and instantly engages dormant glutes.
Core Weakness Creates Pain: Assessment Tests
Tight hip flexors and weak glutes form the perfect storm for lower back pain cycling. When your psoas muscles stay locked in contraction (common after 60+ minutes riding), they tilt your pelvis forward, compressing lumbar discs. Meanwhile, gluteus maximus activation drops 50% compared to walking—forcing your erector spinae to overwork.
Thomas Test: Your Hip Flexor Red Flag
Sit at the edge of a table and hug one knee to your chest. If your opposite thigh lifts off the table (Thomas test angle <0°), your hip flexors are screaming for relief. This restriction directly correlates with lumbar pain severity (r=0.7). Fix it immediately:
- Kneel in a lunge position with back foot elevated
- Tuck pelvis under while driving hips forward
- Hold 60 seconds per side—2x daily
Pro Tip: Do this pre-ride to reset pelvic alignment
Single-Leg Bridge Failure
Lie on your back with one foot flat, knee bent. Lift hips while keeping pelvis level. If your hips wobble or your working-side glute fails before 10 seconds? You’ve got posterior chain deficits. This weakness forces your lumbar spine to compensate during hard efforts, spiking injury risk by 60%.
Immediate Pain Relief: On-Bike Solutions

When pain strikes mid-ride, these proven tactics provide relief within minutes—no tools required.
Cadence & Power Emergency Protocol
Drop your power output 20% and spike cadence 10 RPM immediately. Why? Higher cadence reduces torque through your lumbar spine by 30% while maintaining momentum. Pair this with:
- Stand every 5 minutes for 30 seconds to reset pelvic position
- Focus on “pelvic neutral”—imagine a bowl of water on your hips; don’t spill it forward or backward
- Shift to easier gears maintaining 85+ RPM (critical below 2/10 pain scale)
Post-Ride Ice & Spin Recovery
The first 24 hours post-ride dictate recovery speed. Skip the passive rest:
- 15 minutes easy spinning at 90-100 RPM (40% FTP) to flush metabolites
- Ice application 15 minutes on/45 off—target the dimples above your beltline
- Hamstring stretch holding 45 seconds per leg (straight leg raise <80° = restriction)
Warning: Never stretch aggressively when acute pain flares—it worsens microtears
Progressive Return Protocol: Week-by-Week

Rushing back guarantees re-injury. Follow this evidence-based timeline:
Week 1: Foundation Building
Ride at 50% normal volume with strict pain monitoring. Non-negotiable rules:
– Zero pain spikes above 2/10 during or after rides
– Maintain 85+ RPM at all times (use cadence sensor)
– Skip intervals entirely—focus on smooth pedal strokes
– Add daily single-leg bridges (3×10 reps per side)
Week 2: Controlled Progression
Only advance if pain-free for 48+ hours:
– Increase volume to 65% of normal
– Add 2x weekly core sessions (bird dogs, dead bugs)
– Introduce 5-minute endurance intervals at Z2
– Red flag: Any pain >3/10 means revert to Week 1
Bike Fit Optimization: Seasonal Schedule
Your body changes weekly—your fit must adapt. Skip this, and you’ll reinjure:
Critical Fit Triggers
Schedule professional adjustments within 72 hours of:
– New shoes/saddle: Alters pelvic rotation by 3-5 degrees
– 4+ weeks off bike: Muscle length changes reset your biomechanics
– Mileage jumps: >10% weekly increase doubles injury risk
– Post-injury: Asymmetries linger even after pain fades
DIY Measurement Checklist
Grab a goniometer (phone apps work) and verify monthly:
– Hip angle: 95-105° at peak power (critical for disc health)
– Knee angle: 145-155° at bottom dead center
– Saddle height: Within 2mm of Hamley method (0.883 x inseam)
– Shoulder angle: 85-90°—if narrower, you’re overreaching
Warning Signs: When to Stop Riding
Ignoring these red flags risks permanent nerve damage:
Neurological Emergency Symptoms
Stop riding immediately and see a spine specialist if you experience:
– Numbness/tingling persisting >24 hours
– Pain radiating below the knee with foot weakness
– Bladder control changes (don’t wait—this is urgent)
– Fever accompanying back pain (possible infection)
Pain Scale Decision Tree
Use this objective guide:
– 0-2/10: Proceed with modified ride (follow Week 1 protocol)
– 3-4/10: Cut ride short, implement recovery protocol
– 5+/10: Complete rest—seek medical evaluation before riding again
Long-Term Prevention: Maintenance Schedule
Eliminate recurring pain with this 10-minute daily routine:
Morning Mobility Sequence
Do before coffee:
– Hip flexor stretch: 2×60 seconds per side (kneeling lunge)
– Thoracic rotations: 10x per side (seated spinal twists)
– Dead bug activation: 10 reps per side holding 3 seconds
Why it works: Resets anterior pelvic tilt before riding
Weekly Strength Non-Negotiables
Two 20-minute sessions prevent 80% of recurrence:
– Session 1: Romanian deadlifts (3×10), single-leg RDLs (3×8/side)
– Session 2: Pallof presses (3×12/side), side planks (3x45s)
Pro Tip: Do these in your cycling shoes to mimic pedal position
lower back pain cycling issues vanish when you attack root causes—not symptoms. Fix your saddle setback within 5mm of optimal, crush daily glute activation, and respect pain thresholds. Track hip angles weekly with your phone camera; most riders eliminate pain in 3-4 weeks using these protocols. Your lumbar spine isn’t broken—it’s begging for smarter biomechanics. Implement one fit adjustment today, then hit the trails pain-free tomorrow.