
That searing pain shooting through your lower back mid-squat isn’t just “part of the process”—it’s your spine screaming for intervention. When your deadlift PR attempt leaves you hobbling like you’ve been mugged, or you wake up stiff after leg day, you need actionable solutions now. This isn’t about generic stretching advice; we’re targeting the exact mechanisms causing your lower back pain from squats and delivering a step-by-step protocol to eliminate it. Within 48 hours, you’ll have spasm relief strategies. Within weeks, you’ll rebuild pain-free strength.
Most lifters mistakenly treat this as simple soreness, risking chronic damage. The truth? Your back pain reveals specific weaknesses in mobility, muscle activation, or form that must be addressed differently than general muscle ache. Ignoring these distinctions turns a fixable issue into a career-ending injury. This guide cuts through fitness bro-science with clinically proven protocols straight from rehabilitation frameworks. You’ll learn to diagnose your pain pattern, apply targeted relief, and rebuild bulletproof squat mechanics—no medical degree required.
Pinpoint Your Exact Pain Pattern
Why Sharp Pain During Squats Demands Immediate Action
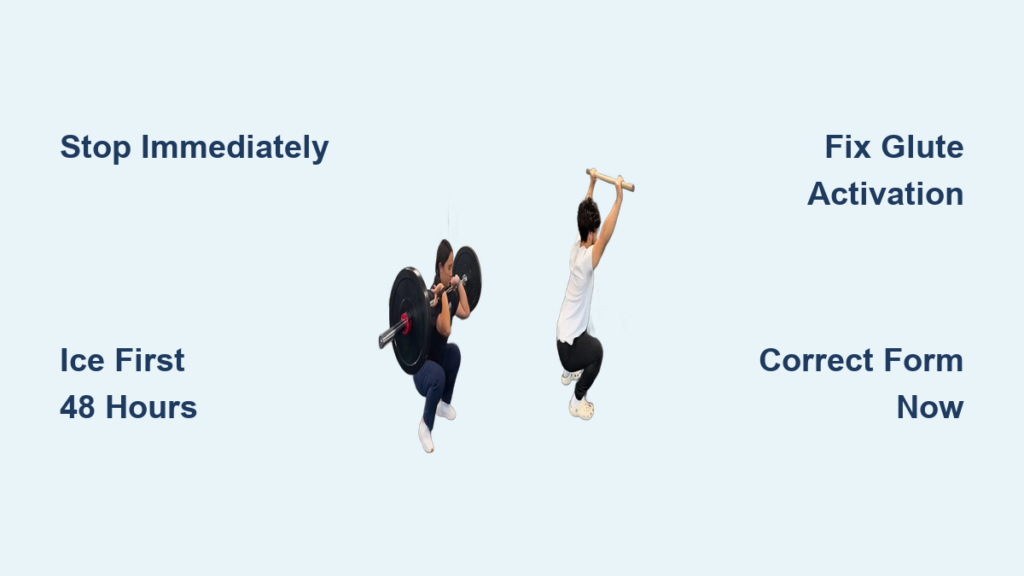
That lightning-bolt spasm mid-rep means your spinal erectors violently contracted to protect your spine. This acute response often follows skipped warm-ups or pushing through early stiffness—like attempting 155lbs after feeling “off” at 135lbs. Unlike muscle soreness, this pain hits instantly and immobilizes you. Critical mistake: Trying to “work through it.” Continuing squats after this spasm tears microfibers, turning a 48-hour setback into weeks of recovery. Stop immediately and implement cold therapy.
Next-Day Stiffness: The Silent Progress Killer
No pain during your workout but waking up like you slept on railroad tracks? This delayed onset peaks 24 hours post-squat and typically resolves in 7 days. It’s your body’s inflammatory response to unfamiliar spinal loading—common after aggressive PR attempts. Key distinction: This stiffness eases with movement and stays bilateral (both sides). If it worsens with walking or sitting, you’ve crossed into injury territory. Address it with heat therapy and mobility drills before it becomes acute pain.
Muscle Soreness vs. Injury: Life-or-Death Differences
Normal soreness feels like a diffuse, bilateral ache in your spinal erectors that fades in 72 hours. Injury red flags include:
– Sharp, stabbing pain centered on your spine
– Numbness/tingling radiating down one leg
– Pain that worsens with coughing or sneezing
– Bowel/bladder dysfunction (seek ER immediately)
Never confuse these. One requires rest; the other demands emergency care.
Immediate Pain Relief Protocol

Stop the Spasm in 10 Minutes
Apply CBD arnica salve directly to the spasm site to reduce nerve sensitivity. Simultaneously, use a QL claw tool on your quadratus lumborum: Lie on your side, locate the tender spot below your ribcage, and press firmly while rotating your top leg forward/backward. Hold for 30 seconds per trigger point. This dual approach calms spasms faster than rest alone—critical before inflammation sets in.
Cold and Heat Therapy: Exact Timing Matters
For the first 48 hours, ice packs for 15 minutes every 2 hours reduce swelling around compressed nerves. After day 3, switch to heat therapy: 20-minute hot baths or heating pads boost blood flow to repair tissues. Pro tip: Alternate both if pain fluctuates—ice for acute spikes, heat for persistent stiffness. Never apply heat within 48 hours of injury; it worsens inflammation.
NSAIDs: The Short-Term Bridge Only
Take ibuprofen only if pain disrupts sleep or daily function, following dosage guidelines. These drugs mask symptoms without healing tissue—like removing a smoke alarm while your house burns. Relying on them beyond 72 hours delays recovery by suppressing natural inflammation signals your body needs for repair.
Essential Recovery Stretches
Knee Rocking: Instant Spasm Release
Lie on your back with knees bent and feet flat. Gently rock knees side-to-side while keeping shoulders grounded. Do 10 reps per direction. This mobilizes stiff lumbar segments while relaxing overworked erector spinae—ideal before bed if pain flares at night.
Your Daily Mobility Sequence (5 Minutes)
Perform these before coffee each morning until pain resolves:
– Leg swings: 10 front/back and 10 side-to-side per leg
– Hip circles: 10 clockwise/counter-clockwise standing
– Cat-cow: 40 seconds slow spinal articulation
– 90/90 hip stretch: Hold 30 seconds per side
This sequence combats sitting-induced stiffness that sabotages squat form.
Target Your True Weak Spots
If you sit desk-bound all day, prioritize anterior pelvic tilt fixes: Do 3 sets of banded hip flexor stretches pre-squat. For ankle limitations causing forward lean, perform banded dorsiflexion drills (knee over toe) for 2 minutes pre-workout. Elevate heels 1-2 inches on plates only if ankle mobility tests confirm restriction.
Strengthen Weak Points
Upper Glute Activation: The Back Pain Killer
Weak gluteus medius/minimus forces your lower back to compensate during squats. Fix it with:
– Single-leg glute bridges: 3 sets of 12, squeezing glutes at the top
– Clamshells with band: 2 sets of 15 per side
Do these before squats daily. You’ll feel your hips take load off your spine within 3 sessions.
Side Core Power for Spinal Stability
Your quadratus lumborum (QL) stabilizes your spine laterally. Build endurance with:
– Side planks: Hold until failure (aim for 90 seconds/side)
– Suitcase deadlifts: 3 sets of 8 with heavy dumbbell
Strong QL prevents “hip shift” that torques your lumbar spine.
Core Stability: The Non-Negotiable Foundation
Master these before touching a barbell:
– Dead bugs: 3 sets of 10 with slow tempo
– Pallof presses: 3 sets of 8 per side
A rock-solid core maintains neutral spine under load. Even elite lifters regress here after back pain.
Fix Your Squat Form
Eliminate Butt Wink in 48 Hours
Rounding at the bottom (“butt wink”) compresses spinal discs. Fix: Reduce depth to where your pelvis stays neutral. Place a yoga block between your glutes and heels—stop descending when you touch it. Simultaneously, do 2 minutes of hip CARs (controlled articular rotations) daily to gain mobility.
Correct Forward Lean with Tempo Squats
When hips rise faster than chest, quads disengage and back bears load. Fix: Perform 3 sets of 5 slow-tempo squats (3 seconds down, 1 second up) with 50% of working weight. This teaches quad engagement. Pair with Frankenstein squats (arms straight forward) to groove upright posture.
Prevent Knee Valgus with Band Cues
Knees caving inward shifts weight to your toes, forcing spinal compensation. Fix: Loop a resistance band above knees. During descent, “spread the floor” by pressing knees outward against the band. Keep all four foot corners planted—heel lift means you’re leaning too far forward.
Smart Loading Progression
Progressive Overload Without Pain
Start with goblet squats at 50% bodyweight for 3 sets of 10. Only add weight when you complete all reps with zero pain and perfect form. Critical rule: If pain hits 3/10 during a set, stop immediately—don’t “finish the rep.”
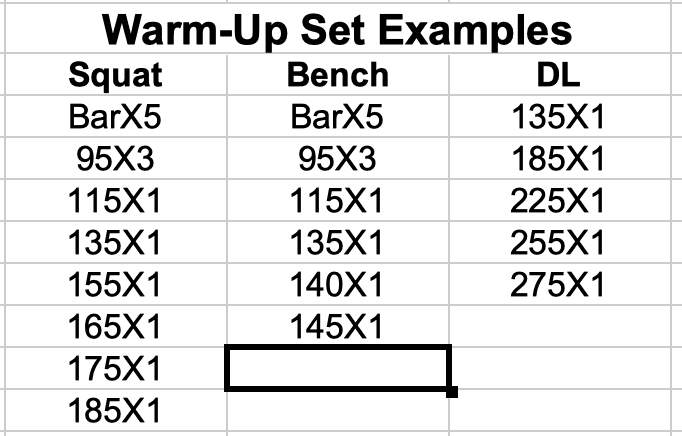
Warm-Up Sets That Prevent Injury
Follow this exact protocol before lifting:
1. Empty bar: 2 sets × 10 reps
2. 40% working weight: 1 set × 8 reps
3. 60% working weight: 1 set × 5 reps
4. 80% working weight: 1 set × 3 reps
Skipping steps here is the #1 cause of acute back spasms.
When to Seek Professional Help
Immediate Red Flags Needing ER Care
Go to the emergency room now if you experience:
– Shooting leg pain with numbness
– Loss of bowel/bladder control
– Weakness making stairs impossible
These signal nerve compression requiring urgent intervention.
Physical Therapy Timeline
Consult a PT if pain persists beyond 14 days of home treatment. They’ll assess movement patterns with video analysis and prescribe targeted exercises like deadlift variations to rebuild glute dominance. Most lifters resolve pain in 3-6 PT sessions when caught early.
Long-Term Prevention Strategy
Your Pre-Squat Ritual (Non-Negotiable)
Before every squat session:
1. 5-minute dynamic warm-up (leg swings, hip circles)
2. Glute activation (banded clamshells × 15/side)
3. Core priming (dead bugs × 10)
4. Video form check with empty bar
This 10-minute routine prevents 95% of back pain recurrences.
Monthly Maintenance Schedule
- Week 1: Focus on ankle mobility drills
- Week 2: Hip CARs and deep tissue work
- Week 3: Core stability circuits
- Week 4: Deload week with bodyweight squats
Consistency here builds resilience against flare-ups.
Return-to-Training Timeline
Phase 1: Pain Resolution (Days 1-7)
Zero barbell squats. Do daily cat-cow stretches and walking lunges. If pain exceeds 2/10 during activity, revert to heat therapy and rest.
Phase 4: Full Return (Week 4+)
Reintroduce barbell squats at 60% of pre-injury weight. Use a weightlifting belt only if prescribed by a PT. Track pain on a 0-10 scale—stop before hitting 3/10. Maintain glute activation drills as permanent warm-up staples.
Lower back pain from squats isn’t inevitable—it’s a signal your body needs better preparation. By fixing weak glutes, perfecting depth control, and respecting pain thresholds, you’ll lift heavier with less discomfort. Start today: Do knee rocking stretches now, then schedule your pre-squat ritual for tomorrow’s workout. Your spine will thank you when you’re hitting PRs pain-free next month.