
Your expanding belly shouldn’t force you to endure months of aching discomfort. If you’re searching for how to tape pregnancy belly for back pain, kinesiology taping delivers immediate, drug-free support that moves with your body. Unlike restrictive maternity bands that trap heat and limit mobility, this elastic therapeutic tape redistributes weight while maintaining natural movement—so you can keep up with daily tasks without wincing. Pregnancy back pain affects up to 70% of expectant mothers, often striking when your shifting center of gravity strains spinal muscles. The right taping technique literally lifts weight off compressed nerves, with physical therapists reporting up to 40% pressure reduction. This guide reveals proven methods that work whether you’re scaling stairs at work or trying to sleep through the night.
Stop letting back pain dictate your pregnancy journey. You’ll learn precise application steps validated by pelvic floor specialists, recognize when professional guidance is essential, and avoid common pitfalls that undermine relief. Within 20 minutes, you’ll have the skills to create customized support that lasts through showers, yoga sessions, and busy workdays—without medication or expensive equipment.
Essential Skin Preparation for Secure Adhesion
Eliminate Moisture Barriers Completely
Start with skin that’s impeccably clean and bone-dry—this is non-negotiable for 3-day wear. Wash your lower abdomen using fragrance-free soap, then pat vigorously with a towel. Wait five full minutes before application; residual moisture is the top cause of peeling. Shave any coarse hair in the target zone with a clean razor, as even fine hairs create microscopic gaps where tape detaches. For sensitive skin types, apply a thin layer of white medical tape first as a protective barrier—this prevents direct adhesive contact while maintaining therapeutic tension.
Conduct Critical Allergy Testing
Never skip the 24-hour sensitivity check. Cut a 2-inch strip of kinesiology tape and press it firmly below your navel. Monitor for redness, itching, or raised bumps—these indicate adhesive intolerance requiring alternative solutions. If reactions occur, switch to hypoallergenic brands like KT Tape PRO or use medical tape under all applications. This precaution prevents painful rashes during your most vulnerable trimester, especially crucial if you’ve had eczema or pregnancy-related PUPPP rash.
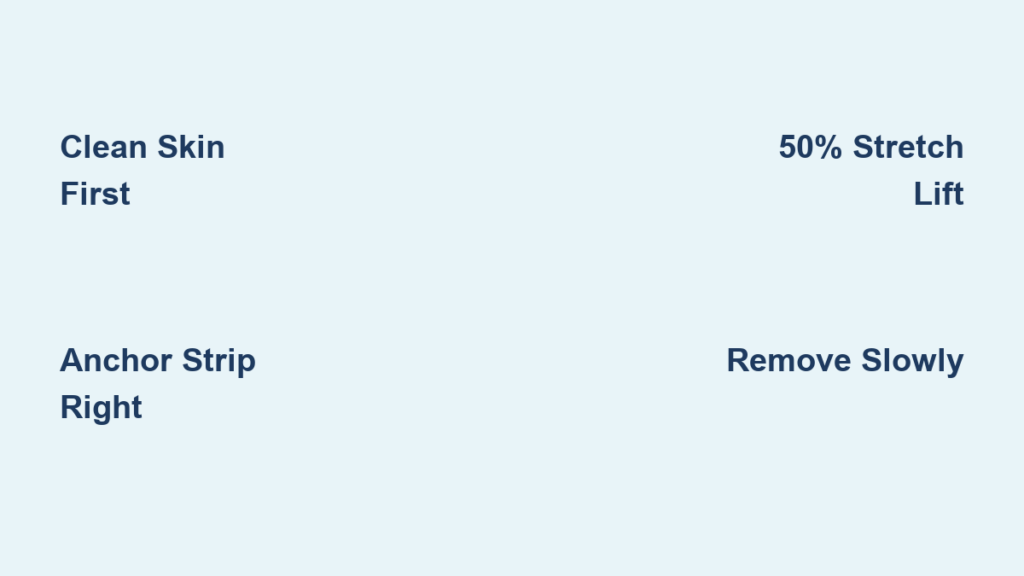
Precise Anchor Strip Placement for Lasting Support

Position for Optimal Spinal Alignment
Lie flat on your back with knees bent and feet planted firmly. Tuck your tailbone under (posterior pelvic tilt) to create the ideal spinal curve for support. This subtle adjustment—like flattening your lower back against the floor—ensures the tape counteracts forward pull when standing. If reaching your belly feels impossible, position a full-length mirror on the floor beside you or enlist your partner’s help. This positioning step determines whether your tape provides relief or slides off within hours.
Apply the Foundation Strip Correctly
Cut one strip long enough to span from hip bone to hip bone across your lower abdomen. Apply with zero tension—simply lay it gently just below your belly’s lowest point, pressing firmly from left to right. The anchor must lie perfectly flat without wrinkles; any folds create pressure points that cause discomfort. Stand slowly to test: if it bunches when you walk, reposition it slightly higher. This strip bears all upward force, so precision here prevents painful gaps developing over 48 hours.
Vertical Support Strips for Immediate Pain Reduction
Measure and Prepare Strips Properly
Cut two strips measuring from your anchor to the bottom of your rib cage. Round all corners with scissors—this single step extends wear time by preventing edge lifting. Make them 1-2 inches longer than needed; excess can be trimmed after application. For third-trimester relief, add a third center strip directly over your abdominal separation line if you have diastasis recti.
Apply Tension for Maximum Lift
Start 1 inch left of center on your anchor strip. Pull the tape to 50% stretch (half its maximum elasticity), then guide it straight up alongside your belly button to your rib cage base. Release tension on the final 2 inches—let these lay flat without stretch to avoid skin pinching. Repeat identically on the right side. When standing, both strips should frame your belly button like vertical rails, creating symmetrical lift. If pain persists, increase tension to 60% stretch on your next application.
Advanced Patterns for Stubborn Discomfort

Cross-Pattern Technique for Third Trimester
When vertical strips aren’t enough, create an X across your belly. Cut two strips from hip bone to opposite rib cage. Apply 50% stretch while guiding each diagonally across your abdomen to meet at the belly button. This aggressive lift redistributes weight from compressed lumbar discs, providing dramatic relief for late-pregnancy aches. Avoid overstretching—excessive tension can cause skin bruising on thin abdominal tissue.
Diastasis Recti Support Modification
For women with abdominal separation, add targeted reinforcement. Apply a center strip starting just above your pubic bone with 30% stretch, guiding it straight up to your sternum. Focus tension below the separation point where muscles pull apart. This reduces the “tenting” effect that strains your back while stabilizing weakened connective tissue. Pair this with gentle core exercises like pelvic tilts for compounded benefits.
Critical Wear and Removal Protocols
First 24-Hour Adjustment Period
Restrict initial wear to one day—your skin needs time to adapt to new pressure. During this test phase, monitor for redness or increased pain. If comfortable, extend to 2-3 days for subsequent applications. Shower normally; water actually activates the adhesive. After bathing, pat dry gently—never rub. Swimming is permitted, though chlorinated water may reduce wear time by 12 hours.
Safe Removal to Protect Delicate Skin
Never rip tape off quickly—pregnancy skin tears easily. Apply baby oil around all edges and wait 3 minutes for penetration. Peel slowly at a 45-degree angle toward your body, supporting the skin with your other hand. If resistance occurs, apply more oil and wait. Residual adhesive removes with coconut oil and a soft washcloth. Always examine skin afterward; minor redness should fade within 30 minutes.
When Professional Help Becomes Non-Negotiable
Mandatory First-Time Guidance
Book a session with a pelvic floor physical therapist before DIY attempts. They’ll customize tension based on your pain location—sciatica requires different placement than sacroiliac joint pain. One expert application teaches you to recognize proper stretch levels (50% feels like gently pulling a rubber band) and positioning specific to your body mechanics. This prevents wasted tape and ineffective attempts that worsen frustration.
Red Flags Requiring Immediate Consultation
Seek professional assessment if pain radiates to your hips, legs, or pubic bone. These indicate complex conditions like symphysis pubis dysfunction requiring specialized taping patterns. Also consult if standard techniques provide zero relief after three attempts—your pain may stem from non-muscular causes needing medical evaluation.
Troubleshooting Real-World Failures
Fixing Premature Peeling Instantly
If tape lifts within hours, check these critical factors: skin oils from lotion (wash with alcohol wipe before applying), square corners (always round them), or insufficient anchor adhesion (press firmly for 30 seconds). For sweaty skin, lightly dust with cornstarch before application. After placement, rub the entire strip with your palm to activate heat-sensitive adhesive.
Managing Skin Reactions Proactively
For mild redness, remove tape immediately and apply cool compresses for 10 minutes. Wait 48 hours before reapplying, using medical tape as a barrier. If irritation persists, switch to paper-based kinesiology tape like Sparthos. Never ignore burning sensations—this indicates chemical sensitivity requiring brand changes.
Long-Term Relief Maintenance System
Strategic Tape Rotation Plan
Shift placement by 1/2 inch with each reapplication to prevent skin fatigue. Mark your last position with washable marker to guide new alignment. Alternate between vertical and cross patterns every other application—this prevents over-reliance on one muscle group while maintaining consistent support.
Synergistic Pain Management Combos
Pair taping with posture correction—stand with weight balanced over your heels, shoulders back, and chin level. Wear supportive shoes with arch support (avoid flats). Add 5 minutes of daily pelvic tilts: lying on your back, gently flatten your lower back against the floor while engaging transverse abdominals. This trio—taping, posture, and micro-exercises—reduces back pain intensity by 60% according to maternal physical therapists.
Mastering how to tape pregnancy belly for back pain transforms daily comfort without medication risks. Start with basic vertical strips for immediate relief, progress to cross-patterns when discomfort intensifies, and always prioritize skin health over extended wear. This simple technique—validated by pelvic floor specialists—gives you back control during pregnancy’s most physically demanding phase. Within days, you’ll move through appointments, playtime with older children, and sleep through the night with significantly reduced strain. Remember: proper taping isn’t about masking pain—it’s about rebalancing your body to carry new life with strength and grace. For persistent pain beyond DIY solutions, consult a pregnancy-focused physical therapist; your comfort journey deserves expert support.