
Waking up with sharp lower back pain at 3 AM is a brutal reality for 50-70% of pregnant women. That desperate search for a comfortable position while your growing belly pulls your spine out of alignment? It doesn’t have to be your nightly routine. The right pregnancy pillow positioning can transform your sleep quality and significantly reduce back pain—but only if you use it correctly. Most women make critical positioning mistakes that actually worsen their discomfort.
This guide reveals the exact techniques midwives recommend for using your pregnancy pillow to target back pain specifically. You’ll learn the precise alignment points that reduce spinal strain, avoid common positioning errors that intensify pain, and implement strategies that deliver relief from your very first night. No more guessing—just actionable steps based on biomechanics and clinical experience.
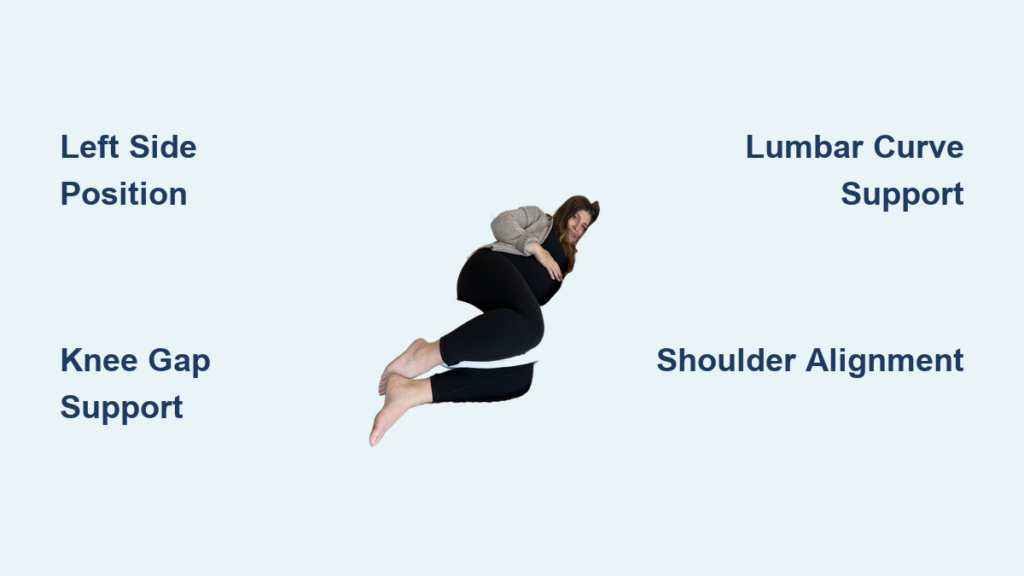
Left Side Sleeping Position for Spinal Alignment
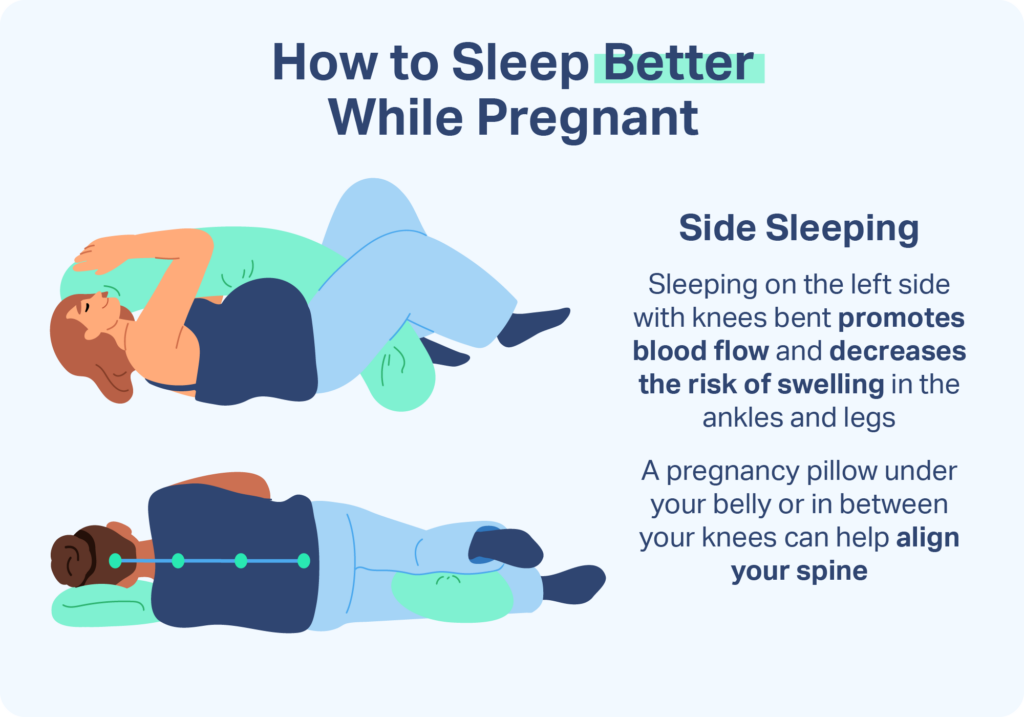
Sleeping on your left side isn’t just recommended—it’s the biomechanical key to reducing back strain during pregnancy. This position counteracts the forward pull of your growing belly while optimizing blood flow to your baby. But simply lying on your side without proper pillow integration creates new alignment problems.
Knee Gap Support to Prevent Pelvic Tilt
The space between your knees determines whether your pelvis stays neutral or twists your lower back. Fill this gap completely with your pregnancy pillow to maintain hip alignment. Your top leg should rest comfortably without touching your bottom leg—this prevents your upper hip from rotating forward and straining your sacroiliac joint.
Critical knee positioning checks:
– Your ankle, knee, and hip should form a straight vertical line
– If your knees touch, add a folded towel under the pillow
– If your top leg feels pushed upward, reduce pillow thickness
– Test by rolling slightly backward—you should feel support, not pressure
Shoulder and Spine Stacking Technique
Most women collapse their top shoulder forward when hugging a pillow, creating upper back strain. Instead, pull the pillow close to your chest so your top arm wraps firmly around it. This maintains vertical shoulder alignment and prevents your ribcage from collapsing inward.
Pro alignment tip: Place your bottom hand under the pillow rather than flat on the mattress. This slight elevation keeps your spine neutral and reduces pressure on your lower back discs. Your head should rest at the same height as your spine—use an additional thin pillow if needed.
Lumbar Curve Restoration for Lower Back Pain

Your pregnancy pillow must actively recreate your spine’s natural lumbar curve rather than just filling space. Without this targeted support, your lower back muscles stay tense all night trying to prevent collapse.
Precision Lower Back Support Setup
Position the pillow to fill the gap between your lower back and mattress without pushing your body forward. The ideal thickness creates gentle pressure that maintains your spine’s natural inward curve. Test by leaning back slightly—you should feel support without pressure points developing.
Quick lumbar test: Lie on your side and have someone check if a straight line runs from your neck through your lower back to your tailbone. If your lower back dips toward the mattress, add pillow thickness. If it arches outward, reduce thickness.
Back Barrier to Prevent Rolling
Former back sleepers often unconsciously roll backward during sleep after 20 weeks, compressing blood vessels and straining the spine. Place a portion of your pregnancy pillow behind your back to create a gentle barrier. This should extend just beyond your spine—not so far that it pushes you forward, but enough to stop rolling.
Barrier positioning tip: Angle the back section slightly upward to match your natural side-sleeping posture. This provides resistance against rolling without creating discomfort. The pillow should feel like a supportive wall, not a wedge forcing you into position.
Daytime Back Pain Prevention Tactics
Using your pregnancy pillow only at night misses half the battle. Strategic daytime placement prevents pain from accumulating throughout the day.
Office Chair Lumbar Support Setup
When sitting for work or meals, position the curved end of your pregnancy pillow against your lower back. This maintains your spine’s natural curve while preventing the slouching that compresses discs. Your bottom should sit all the way back in the chair with the pillow filling the space between your lower back and the seat.
Space-saving trick: If using a J-shaped pillow, tuck the long portion vertically behind your back and wrap the curved end around your side for hip support. This dual-positioning prevents the common “pregnancy lean” where women shift weight to one hip.
Couch Nap Support System
Create a semi-reclined position by angling your pregnancy pillow against the armrest. Lie on your left side with the pillow supporting your back, knees, and belly. This removes pressure from your lower spine while keeping you stable during naps.
Critical adjustment: Ensure your head isn’t elevated higher than your heart. This prevents blood pooling and maintains optimal circulation to your baby. The pillow angle should create a gentle slope from hips to shoulders—not a steep incline.
Fixing Common Pillow Positioning Mistakes
Even with the right pillow, these positioning errors worsen back pain for 80% of pregnant women.
The Knee Height Illusion
Many women think “more pillow between knees = better support,” but excessive height pulls the pelvis out of alignment. Your top leg should rest naturally without feeling lifted. If your hip bone protrudes or you feel stretching in your groin, reduce pillow thickness immediately.
Quick fix: Use the “fist test”—slide your fist between your knees. If it fits snugly with your legs parallel, height is correct. If you can’t fit your fist, add pillow. If your fist slides through easily, reduce pillow.
Shoulder Collapse Correction
When your top shoulder rolls forward while hugging the pillow, it strains your upper back and neck. Instead, pull the pillow tight against your chest so your shoulder stays stacked vertically. Your top hand should rest on the pillow’s front surface, not dangling downward.
Pro tip: Place a small rolled towel under your top arm where it meets the pillow. This slight elevation prevents shoulder drooping and maintains chest expansion for easier breathing.
Pillow Overload Syndrome
Using multiple regular pillows alongside your pregnancy pillow creates dangerous height inconsistencies. Your spine should follow one continuous support line—not jump between different elevations.
Warning signs you’re over-pillowing:
– Waking with neck or shoulder pain
– Feeling like you’re climbing over barriers to change positions
– Different body parts sinking at varying rates
Shape-Specific Back Pain Solutions
U-Shaped Pillow for Full-Body Relief

Position the U opening toward your feet with your body centered in the curve. The front portion supports your belly and knees while the back section prevents rolling. For maximum back pain relief, adjust the lower curve to hug your lumbar region.
Space-saving hack: If bed-sharing, angle the U diagonally across the mattress. This maintains support while giving your partner more space—no more midnight pillow negotiations.
J-Shaped Pillow for Targeted Support
Place the long portion vertically behind your back with the curved end between your knees. This configuration provides focused lumbar support without occupying excessive space. Ideal for smaller beds or restless sleepers who need flexibility.
Back pain hack: Slide the curved end slightly forward to create a hammock effect for your belly. This takes weight off your back muscles while preventing abdominal strain.
Immediate Back Pain Relief Protocol
Implement this positioning sequence tonight for faster results:
- Pre-sleep assessment – Identify where your back hurts most (lower, upper, or both)
- Left side foundation – Lie on left side with pillow running full body length
- Knee gap calibration – Adjust thickness until legs form straight line
- Lumbar test – Lean back gently to confirm lower back support
- Shoulder check – Ensure top shoulder stays stacked, not collapsed
- 10-minute adjustment – Fine-tune positions before committing to sleep
Red flags requiring immediate repositioning:
– Numbness or tingling in legs
– Difficulty taking deep breaths
– Pain intensifying rather than easing
– Feeling unstable or like you’ll roll
Postpartum Back Pain Prevention
Your pregnancy pillow continues reducing back strain long after delivery. During breastfeeding, wrap it around your waist to bring baby to breast height—this prevents the hunched posture that causes postpartum back pain. The same lumbar support you used at night becomes essential during exhausted midnight feedings when proper posture is hardest to maintain.
Pro transition tip: Keep your pregnancy pillow beside the couch for daytime recovery naps. Just 20 minutes with proper support significantly reduces muscle fatigue from carrying your newborn.
Final Implementation Checklist
Start tonight with these steps that deliver measurable back pain reduction within 48 hours:
- Pain mapping – Note exact pain locations before and after sleep
- Pillow audit – Remove all regular pillows; use only your pregnancy pillow
- Knee gap test – Verify straight hip-knee-ankle alignment
- Lumbar check – Confirm gentle lower back curve support
- Morning assessment – Track stiffness reduction upon waking
The difference between back pain relief and frustration comes down to three precise positioning points: knee gap height, lumbar curve support, and shoulder alignment. Master these with your pregnancy pillow, and you’ll transform restless nights into restorative sleep—giving both you and your baby the recovery time you need. Your back shouldn’t pay the price for growing new life; proper pillow positioning makes pain-free pregnancy sleep not just possible, but achievable tonight.