
That sharp twinge when you bend to pick up your keys. The dull ache that makes sitting through meetings unbearable. Lower back pain affects millions daily, often striking without warning and disrupting your routine. While painkillers offer temporary relief, kinesiology taping provides a drug-free solution that supports healing while keeping you mobile. This guide delivers precise taping techniques used by physical therapists to alleviate discomfort from muscle strains, sciatica, and posture-related issues.
You’ll discover exactly which tape to choose, how to prepare your skin for maximum adhesion, and step-by-step application methods for specific pain patterns. Whether you’re dealing with weekend warrior soreness or chronic desk-job discomfort, these evidence-based techniques can provide meaningful relief within hours. Most importantly, you’ll learn how to combine taping with movement strategies for lasting results.
Select the Right Tape for Lower Back Relief

Standard athletic tape restricts movement—counterproductive when treating back pain. Kinesiology tape’s elasticity provides therapeutic support while allowing natural motion, crucial for lower back recovery where flexibility matters.
Top tape options for lower back applications:
– KT Tape PRO WIDE: 4-inch width efficiently covers larger muscle groups
– Rock Tape: Superior adhesion withstands sweat during active days
– CureTape Sports: Extra-sticky formula prevents peeling during movement
Essential taping kit must-haves:
– Sharp scissors with rounded tips (prevents fraying)
– Rubbing alcohol pads (removes skin oils for better adhesion)
– A partner (critical for precise back placement)
– Razor (for hair removal if needed)
Pro tip: Always test a small tape patch 24 hours before full application. Skin reactions, while rare, can occur with certain adhesives, especially on sensitive back skin.
Prepare Your Skin for Maximum Tape Adhesion
Oil, sweat, and dead skin cells sabotage tape performance. Proper skin preparation doubles wear time from 2 to 5 days—critical for continuous lower back support.
Follow this skin prep protocol:
1. Clean thoroughly with alcohol pads across the entire area
2. Remove all barriers—no lotions, deodorants, or sunscreen residue
3. Shave or trim hair in a 2-inch buffer zone around application area
4. Dry completely—even slight dampness prevents proper bonding
5. Optional boost: Pre-tape spray adds 50% adhesion time for heavy sweaters
Common mistake: Skipping the alcohol wipe guarantees premature peeling, especially along belt lines and lower back creases where friction is highest.
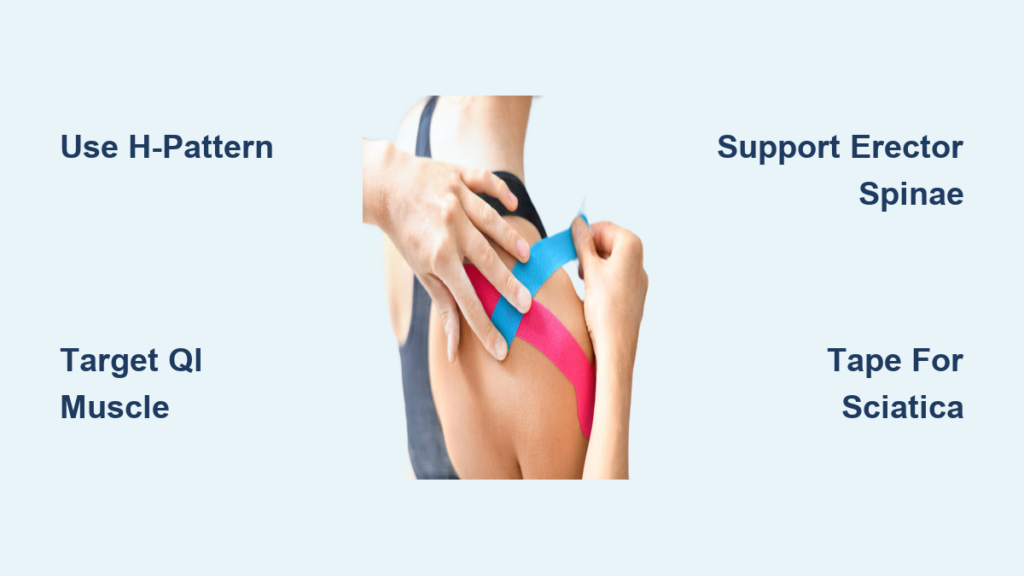
Apply the Basic H-Pattern Lower Back Taping
The H-pattern technique delivers comprehensive support for both muscle groups and spinal alignment—ideal for general lower back pain from lifting or prolonged sitting.
Cut and Position H-Pattern Strips Correctly
You’ll need:
– 2 vertical strips: 30 cm (12 inches)
– 1 horizontal strip: 25 cm (10 inches)
Step-by-step application:
1. Round all corners to prevent catching on clothing
2. Tear backing paper 5 cm from end to create easy-grab tabs
3. Apply horizontal strip first over the sorest spot with 60% stretch
4. Add vertical strips along spine—anchor at sacrum with no tension
5. Rub vigorously for 30 seconds to activate heat-sensitive adhesive
Positioning hack: Use your belt line as reference. Start horizontal strip 2 inches above this point for most lower back pain locations.
Relieve Quadratus Lumborum Muscle Tension
That deep, stabbing pain when twisting or coughing often comes from quadratus lumborum tension. This targeted technique provides relief without restricting breathing—crucial for everyday movement.
Quadratus Lumborum Relief Application
What you’ll need:
– 2 strips: 30 cm each
– 10-15% stretch only (excessive stretch increases tension)
Application process:
1. Locate your SIPS—the bony bumps at the back of your pelvis
2. Bend forward slightly (or have partner assist)
3. Anchor strips laterally to SIPS with zero tension
4. Apply diagonally upward following muscle fibers
5. Smooth ends with no stretch to prevent skin irritation
Test it: Twist gently side-to-side. You should feel support without restriction. If breathing feels constrained, remove and reapply with less stretch.
Support Erector Spinae Muscles Effectively
This extension support technique prevents painful over-arching while maintaining full forward bend capability—perfect for post-workout soreness or lifting injuries.
Y-Tape Application for Spinal Support
Setup requirements:
– Single Y-shaped strip or 2 individual strips
– 25 cm length per branch
Critical positioning:
1. Base placement: Center Y over sacrum (top of tailbone)
2. Maximum flexion: Lean forward completely before applying
3. Parallel placement: Follow spine muscles—not directly on spine
4. Zero tension anchors: Ends must lay flat without pull
5. Activation: 30-second rubdown generates heat for bonding
Visual check: Completed tape should form two parallel strips running up each side of your spine, never crossing the actual vertebrae.
Address Specific Pain Patterns with Targeted Taping

Different conditions require customized approaches. One-size-fits-all taping rarely delivers optimal results for lower back issues.
Sciatica Nerve Pain Relief Technique
- Start with standard H-pattern on lower back
- Add sciatic strips: 3 strips running from lower back through glutes to hamstring
- Use 50% stretch along nerve pathway only
- Combine with hip taping for comprehensive support
Herniated Disc Support Approach
- Use extension support technique with horizontal strips
- Apply 2-3 horizontal strips with 40% stretch across lumbar area
- Avoid vertical strips that might increase pressure
- Focus on unloading rather than restriction
SI Joint Dysfunction Stabilization
- Apply X-pattern from opposite shoulder to hip
- Use 50% stretch across SI joint
- Add hip strips for cross-support during walking
- Test with single-leg stands—pain should decrease significantly
Maintain Tape Effectiveness for 3-5 Days
Peak pain relief occurs in the first 48 hours, but proper care extends benefits throughout the tape’s wear period.
Daily Maintenance Rules
- Pat dry after showers—never rub vigorously
- Avoid direct heat from hair dryers or heating pads
- Re-anchor edges if they start lifting
- Monitor skin for irritation under tape edges
Safe Tape Removal Process
- Warm the tape with hand rubbing for 30 seconds
- Peel slowly in direction of hair growth
- Support skin with other hand to minimize pulling
- Use baby oil for stubborn adhesive (never rip quickly)
- Check skin for redness lasting more than 2 hours
Skin break tip: Wait 24 hours between applications to prevent irritation. Moisturize during breaks to maintain skin health.
Combine Taping With Targeted Movement
Tape works best as part of a comprehensive recovery strategy—never as a standalone solution.
Daily Movement Integration Protocol
- Morning: Apply tape after shower on clean, dry skin
- Throughout day: Perform gentle cat-cow stretches hourly
- Evening: Remove tape before bed to let skin breathe
- Weekly: Progress to core strengthening exercises
Warning signs to stop: Increased pain, numbness, or tingling means tape placement needs adjustment or removal.
Recognize Red Flags Needing Professional Help
Some conditions require medical evaluation before attempting self-taping.
Absolute No-Go Situations
- Open wounds or rashes in application area
- Recent surgery sites (wait for complete healing)
- Signs of infection—redness, warmth, or pus
- Numbness or tingling in legs (possible disc issues)
When to Consult a Healthcare Provider
- Pain worsens after 48 hours of taping
- Leg weakness or loss of reflexes develops
- Bowel/bladder changes accompany back pain
- History of cancer with new back pain onset
Smart approach: If pain scores above 7/10 or radiates below knee, consult a professional before continuing self-treatment.
Build Long-Term Back Health After Pain Relief
Taping provides temporary support while you address underlying causes of lower back pain.
Progressive Exercise Integration
Week 1-2: Focus on gentle mobility with tape support
Week 3-4: Add core strengthening (planks, dead bugs)
Week 5+: Progress to functional movements with reduced tape use
Lifestyle Modifications That Prevent Recurrence
- Workstation setup: Monitor at eye level, feet flat on floor
- Movement breaks: Stand every 30 minutes, stretch every hour
- Sleep position: Pillow between knees (side) or under knees (back)
- Bending technique: Hip hinge instead of spinal rounding
Success marker: You should need less tape over 4-6 weeks as strength and mobility improve.
Kinesiology taping delivers drug-free lower back pain relief when applied correctly. Start with the basic H-pattern for immediate support, then progress to condition-specific techniques as you identify your pain pattern. Remember that tape works best when combined with movement—use it as a bridge to build strength while managing discomfort. Most importantly, listen to your body: if pain persists beyond two weeks or worsens, seek professional evaluation. With consistent application and complementary exercises, you’ll reduce reliance on taping while building a stronger, more resilient back that keeps you moving through your daily life without limitation.