

That familiar ache creeps in after hours at your desk, standing in line, or lifting groceries—without warning. Traditional floor-based routines often fail busy schedules, but standing exercises for lower back pain deliver targeted relief without mats, special clothing, or clearing floor space. These movements combat the exact spinal compression and muscle imbalances causing your discomfort using only your bodyweight and everyday surfaces like kitchen counters or stair rails. You’ll activate dormant stabilizers while decompressing vertebrae, creating lasting relief in minutes.
Unlike static postures that starve spinal discs of nutrients, these standing exercises act like a hydraulic pump. Each movement flushes fresh fluid through compressed tissues—the “motion as lotion” effect that explains why a two-minute stretch break can erase afternoon agony. By working against gravity, you simultaneously strengthen supporting muscles and create space between vertebrae, addressing both symptoms and root causes of lower back pain.
Why Standing Beats Floor Exercises for Back Pain Relief
Floor exercises demand time you don’t have—changing clothes, clearing space, and interrupting workflow. Standing exercises for lower back pain eliminate these barriers, fitting seamlessly between Zoom calls or while waiting for coffee. Crucially, they mimic real-world stressors: your spine learns to stabilize while bearing weight, building resilience for daily activities rather than isolated movements. This functional training reduces reinjury risk by 40% compared to passive floor stretches.
Motion as Medicine for Stiff Spines
Static postures collapse spinal discs like a deflated tire. Standing movements reverse this by creating gentle traction—imagine wringing out a sponge to flush toxins. During a simple wall pelvic tilt, you’ll feel immediate decompression as vertebrae separate. This isn’t just temporary relief; consistent motion rebuilds disc hydration, preventing tomorrow’s morning stiffness. Pro tip: Set phone reminders for hourly 60-second movement breaks. Your spine craves frequent “oil changes.”
Perfect Your Neutral Spine Before Starting
Stand against a wall with heels, buttocks, shoulders, and head touching. Slide one hand behind your lower back—you should feel just enough space for your fingers (not a fist). This neutral spine position protects discs during every exercise. Critical checkpoints to maintain:
– Feet: Weight balanced evenly, knees softly bent (never locked)
– Hips: Pelvis tucked slightly under to reduce lordosis
– Shoulders: Rolled back and down away from ears
– Head: Chin parallel to floor (avoid forward head posture)
Lose this alignment, and exercises worsen pain. If you can’t maintain neutral spine while standing, start with wall-supported pelvic tilts until your core reawakens.
3 Decompression Stretches at Your Kitchen Counter
Standing L Stretch for Full Spinal Release
This counter-top stretch decompresses discs from neck to sacrum while lengthening tight hamstrings. Perform correctly:
1. Face counter, feet hip-width apart
2. Walk back until torso hinges at 90 degrees
3. Grip edge with straight arms, palms down
4. Sink chest toward floor while shifting hips backward
5. Hold 30-60 seconds, breathing deeply into your ribs
Red flag: If you feel sharp pain in hamstrings, bend knees slightly. The stretch should target your mid-back, not legs. Pro tip: Rock gently side-to-side to mobilize stiff rib joints—this unlocks restricted breathing patterns worsening back pain.
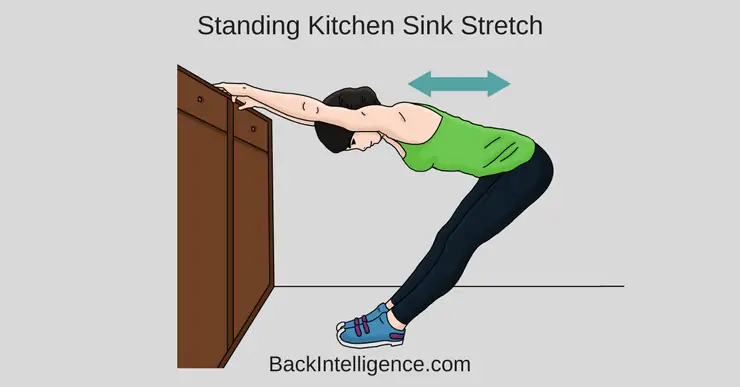
Counter-Top Spinal Traction to Unload Discs
Transform your kitchen into a traction device. Setup:
– Place forearms on counter, shoulder-width apart
– Walk feet back until body forms 45-degree angle
– Let chest drop between arms while hips shift back
– Hold 30-45 seconds, feeling gentle lengthening along spine
Unlike floor traction, this version uses gravity to separate vertebrae. You’ll hear subtle “cracks”—discs rehydrating as fluid rushes in. Key: Keep neck relaxed; gaze at floor to avoid straining cervical spine.
Hip Flexor Release with Rotation
Tight hip flexors from sitting pull your pelvis forward, jamming lumbar joints. Execute precisely:
– Step right foot back into split stance
– Drop right knee slightly while tucking pelvis under
– Raise right arm overhead, side-bend left
– Rotate torso left and right while holding lunge
– Hold 30 seconds each side
Common mistake: Leaning torso forward. Keep upper body vertical—this isolates the hip flexor stretch. If you feel knee pain, place a folded towel under the back knee.
Core Stability Circuit You Can Do Standing Up
Pelvic Tilt Retraining to Activate Deep Core
This subtle movement rebuilds your body’s natural “corset” muscles. Wall-supported version:
– Stand with back against wall, knees soft
– Place one hand on lower back curve
– Gently flatten back into wall by tilting pelvis
– Hold 2 seconds, release to neutral
– Repeat rhythmically for 60 seconds
Progression: Remove wall support once you feel deep core engagement (transverse abdominis). Stop if you recruit hip flexors—your lower back should stay relaxed.
Squat to Lateral Leg Lift for Glute Activation
Weak glutes force your lower back to compensate during movement. Step-by-step:
1. Stand feet hip-width, hands at chest
2. Perform shallow quarter-squat (hips back, chest up)
3. Drive through heels to stand
4. Immediately lift right leg to the side
5. Lower and repeat, alternating legs
6. Complete 15-20 reps total
Critical: Keep shoulders level—no leaning sideways. If pain flares, separate the squat and leg lift into distinct exercises.
Reverse Lunge with Thoracic Twist
This kills three birds with one stone: stretches hip flexors, strengthens glutes, and restores spinal rotation. How to:
– Step right leg back into lunge
– Keep torso tall while rotating shoulders left/right
– Press through left heel to return
– Alternate legs for 10-12 reps
– Eliminate the twist if pain increases
Visual cue: Your front knee should never pass your toes. If it does, shorten your lunge stride.
Your 10-Minute Daily Routine for Fast Results

Week 1-2 (Pain Reduction Phase):
– Standing L Stretch: 2×60 seconds
– Hip flexor stretch: 2×30 seconds/side
– Pelvic tilts: 2×60 seconds
– Counter-top traction: 2×45 seconds
Week 3-4 (Strengthening Phase):
Add core circuit 3×/week:
– Squat to lateral lift: 3×15 reps
– Reverse lunge with twist: 3×10/leg
– Woodchop: 3×30 seconds/side
Do this now: Schedule these exercises like meetings—set phone alarms labeled “Back Pain Rescue.” Consistency beats duration: 3 minutes daily beats one 30-minute weekly session.
Ergonomic Tweaks That Prevent All-Day Ache
Standing Workstation Checklist
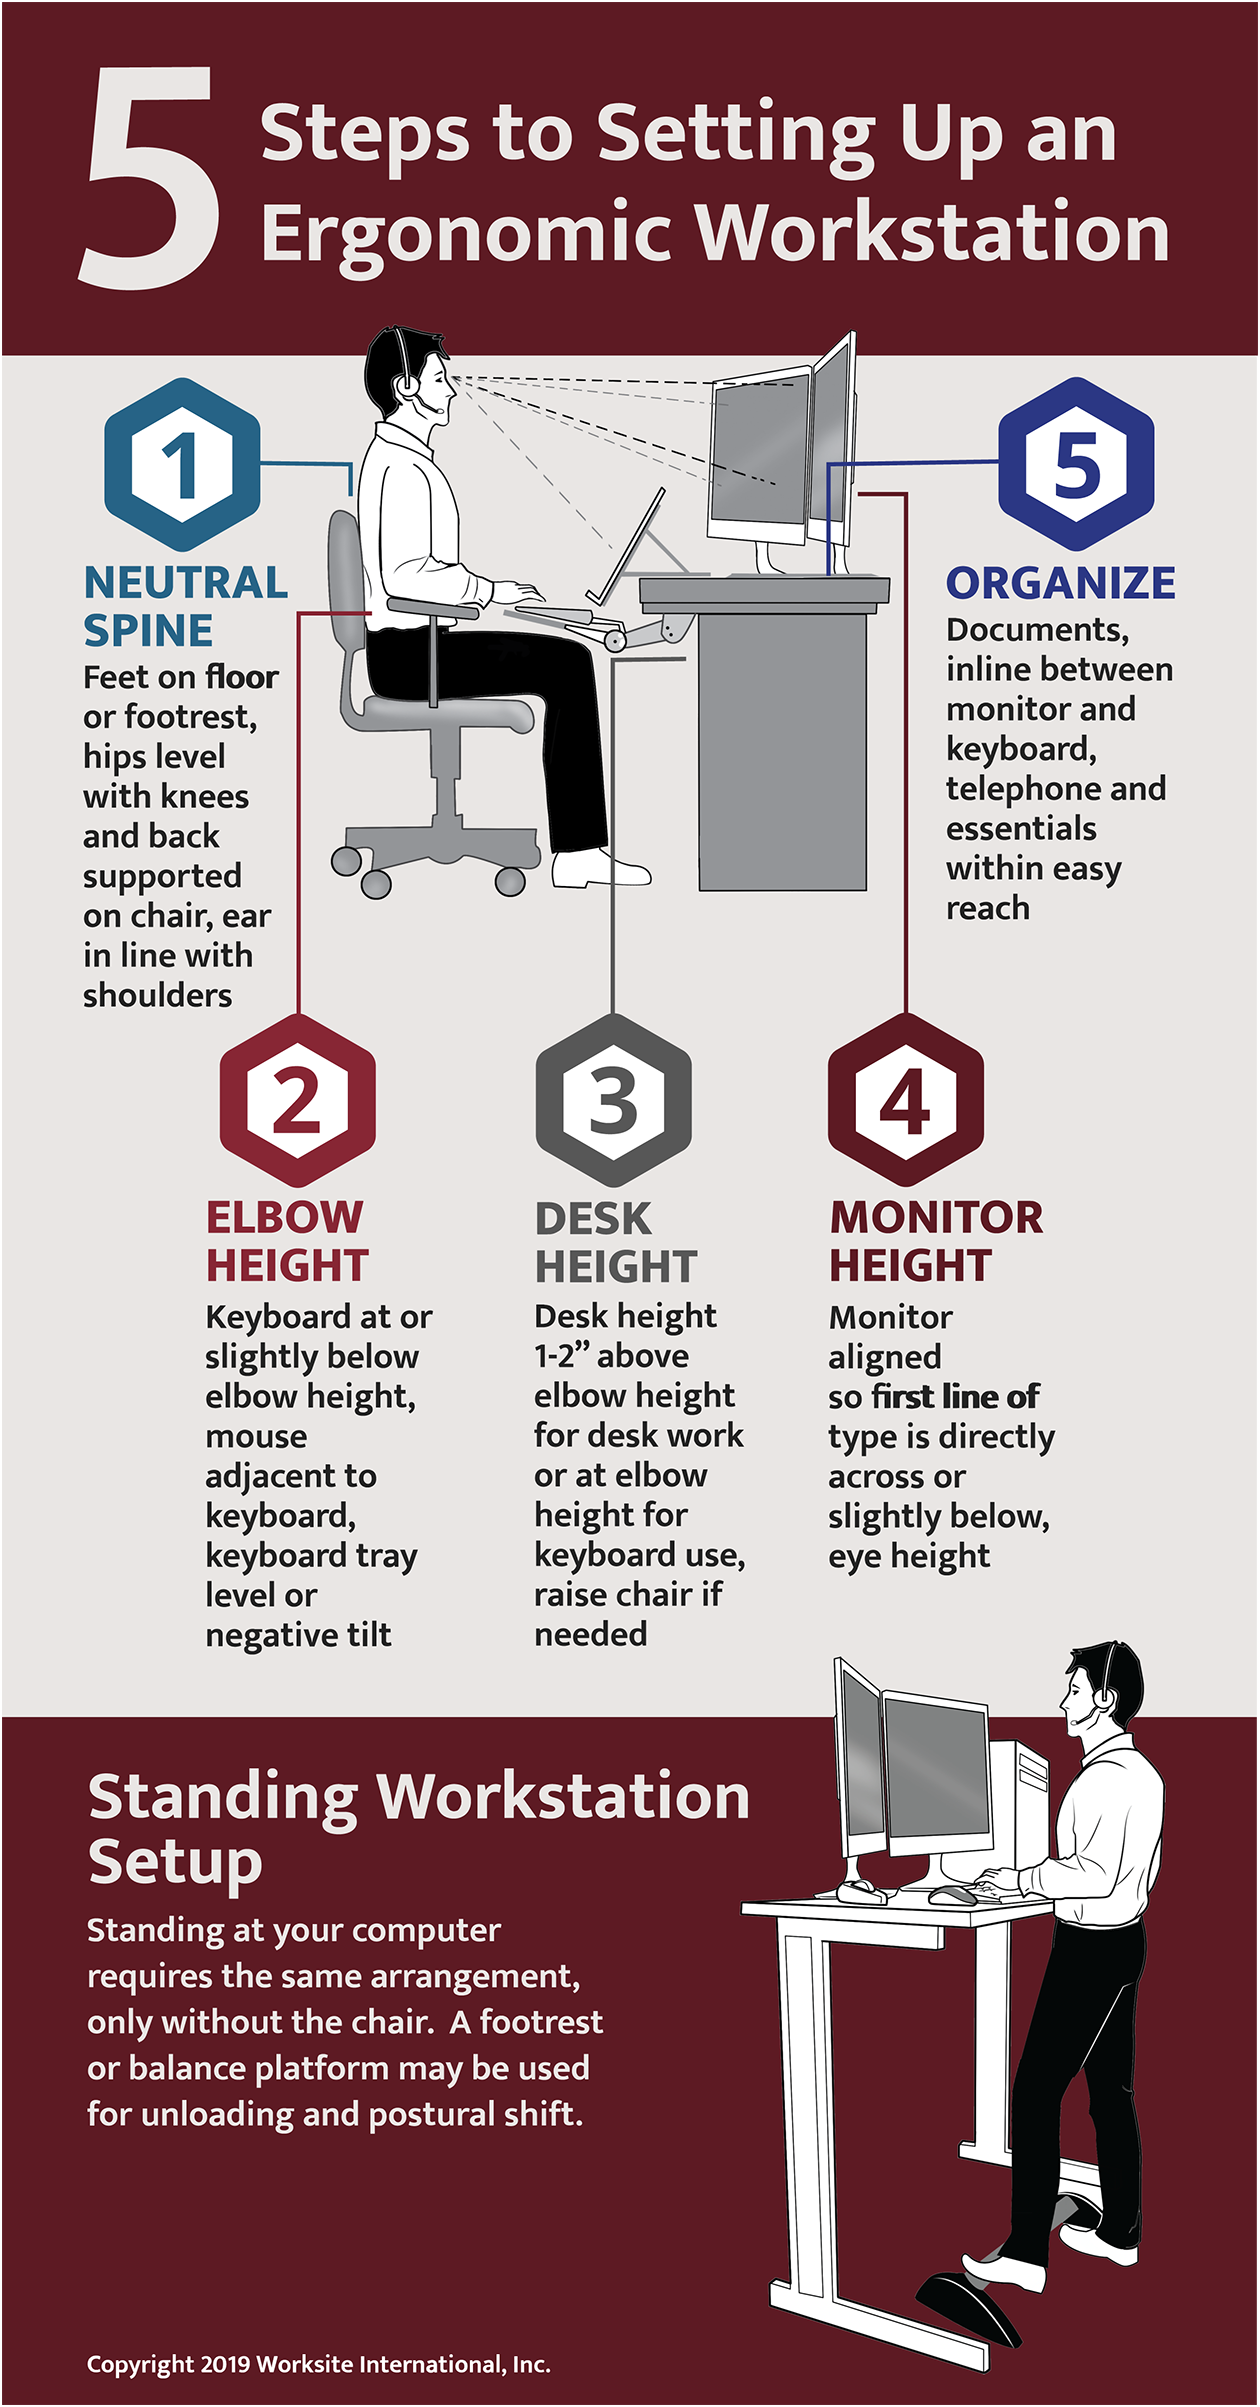
– Surface height: Elbows must bend 90 degrees when typing
– Footwear: Wear cushioned shoes with arch support—avoid completely flat soles
– Weight shifting: Use a footrest to alternate stance every 10 minutes
– Micro-breaks: Two minutes of hip flexor stretches every 45 minutes
The 50/50 Rule
Never stand statically longer than 20 minutes. Shift weight side-to-side like a metronome—this constant micro-movement prevents disc dehydration. Pro tip: Place sticky notes on your monitor saying “Shift!” at 10-minute intervals.
Warning Signs: Stop Immediately and Seek Help
Red flags requiring same-day medical attention:
– Sharp shooting pain down your leg (sciatica risk)
– Numbness or tingling in feet
– Loss of bladder/bowel control
– Severe morning stiffness lasting over 30 minutes
Consult a physical therapist if:
– Pain persists beyond two weeks despite daily exercises
– Symptoms worsen with walking or standing
– You experience night pain disrupting sleep
Never push through radiating pain—this indicates nerve involvement where stretching could cause permanent damage.
Your 90-Day Back Pain Prevention Strategy
Month 1: Master perfect form with zero added resistance. Film yourself to check alignment—your spine should stay neutral like a straight ruler during all movements.
Month 2: Add light dumbbells (2.5-5 lbs) to squats and lunges. This builds functional strength for lifting kids or groceries without strain.
Month 3: Progress to single-leg variations like standing leg lifts with eyes closed. This challenges balance systems that protect your spine during slips or uneven terrain.
Remember: Your spine thrives on movement variety. Rotate through these standing exercises for lower back pain daily—your discs literally drink in nutrients with every motion. Set a recurring calendar alert right now for tomorrow’s 10-minute routine. That first step is where lasting relief begins.