

That persistent ache in your lower back can turn simple tasks like bending to tie your shoes or sitting through a work meeting into daily struggles. You’ve probably tried heating pads, painkillers, and maybe even expensive treatments with limited success. What if the solution to your lower back pain was a simple, affordable yoga ball costing less than your weekly coffee habit? Research shows targeted yoga ball exercises for lower back pain can deliver real relief by strengthening core muscles, improving posture, and nourishing spinal discs through gentle movement.
This guide delivers exactly what you need—science-backed yoga ball exercises specifically designed to target lower back discomfort. You’ll discover which movements effectively reduce pain while building the foundational strength your spine craves. No confusing terminology, no complicated routines—just practical exercises you can implement today to reclaim your mobility and comfort.
Select the Perfect Yoga Ball Size for Maximum Relief
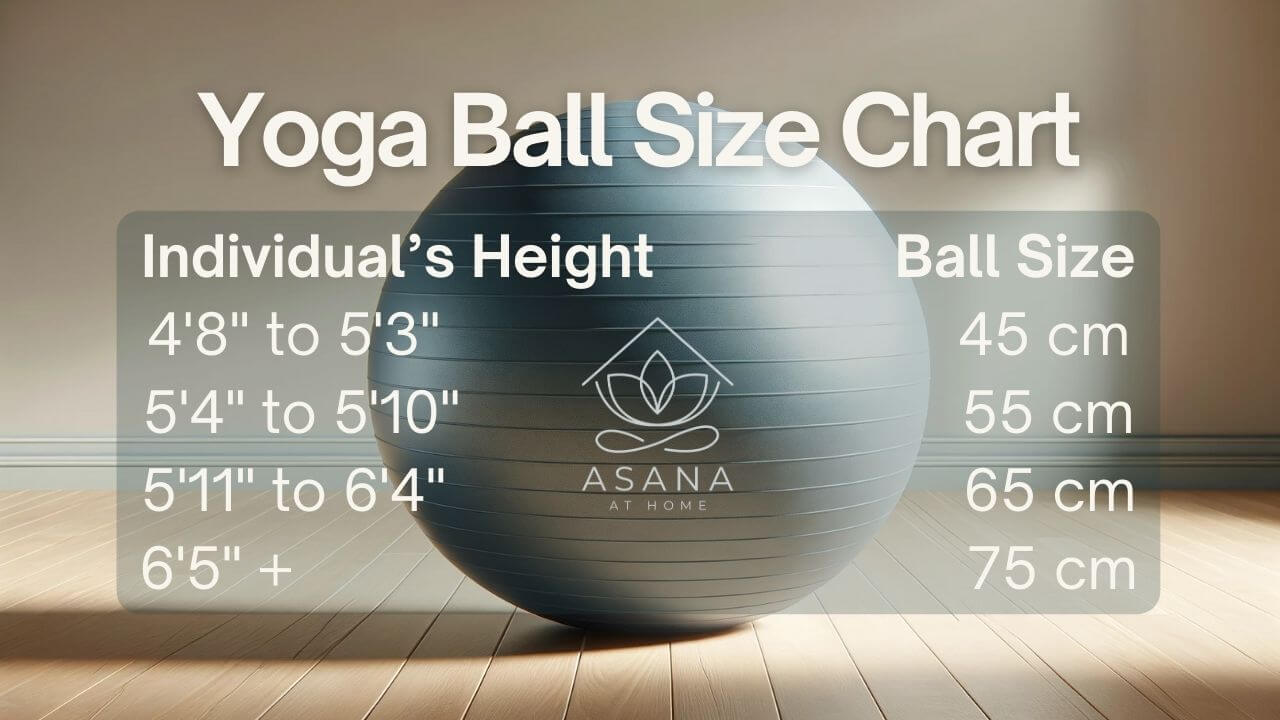
Choosing the wrong size ball sabotages your lower back pain relief efforts before you even begin. Your yoga ball must match your height precisely to maintain proper spinal alignment during exercises. For heights between 4’11” and 5’4″, select a 55 cm ball. Those between 5’4″ and 5’11” need the standard 65 cm size, while taller individuals from 5’11” to 6’7″ require the 75 cm model.
Perform this quick inflation test before starting any yoga ball exercises for lower back pain: Sit on your ball with feet flat on the floor. Your knees should bend at exactly 90 degrees, forming a perfect “L” shape with your thighs parallel to the ground. If your thighs angle downward, the ball’s too small; if they angle upward, it’s too large. The ball should indent slightly under your weight without feeling mushy—this slight give provides the ideal therapeutic resistance for healing your back.
Perfect Your Neutral Spine Position Before Exercising
Find Your Natural Alignment in 4 Steps
Your starting position determines whether yoga ball exercises help or hurt your lower back. Begin by planting both feet flat on the floor with heels directly under knees. Imagine a string pulling upward from the crown of your head—gently grow 2 inches taller while keeping your chin slightly tucked. Pull your shoulders back and down, creating space between your shoulder blades. This neutral spine position, where your natural lumbar curve is maintained without exaggeration, becomes your foundation for every exercise.
Most people unknowingly sit with a rounded spine that compresses discs and strains muscles. Practice finding this neutral position daily—many discover their “normal” posture was actually worsening their lower back pain. When you maintain this alignment during yoga ball exercises, you activate the deep core muscles that truly support your spine rather than straining superficial muscles.
Warm-Up Exercises to Prepare Your Spine
Pelvic Tilts for Instant Spinal Awareness
Sit tall on your ball with hands resting on your hips. Gently roll the ball forward to round your back (like a cat stretch), then roll backward to create a slight arch. Find the sweet spot between these extremes—that’s your neutral spine. Repeat this slow rocking motion 10 times to increase blood flow to your spinal structures. This simple movement stimulates natural pain inhibitors while teaching your body proper spinal mechanics.
Hip Circles to Lubricate Your Spine
Maintain your neutral spine position while seated upright and rotate your hips in slow circles on the ball. Keep your shoulders still and focus all movement at your hips. Perform 8 circles clockwise, then 8 counterclockwise. This gentle motion nourishes your spinal discs by facilitating water movement in and out of disc structures—critical for healing degenerated discs that often cause chronic lower back pain.
Core-Strengthening Exercises That Target Pain at the Source
Bridge with Ball Under Calves (Beginner)
Lie on your back with calves resting on the ball, arms at your sides. Engage your core by pulling your belly button toward your spine, then press through your heels to lift your hips until your body forms a straight line from shoulders to knees. Hold for 6 seconds while breathing normally, then lower slowly. Repeat 8-12 times. This movement strengthens your glutes and hamstrings—the unsung heroes that take pressure off your lower back.
Progression: Once comfortable, move from calves to heels on the ball. This small adjustment dramatically increases the challenge to your posterior chain muscles that stabilize your spine.
Seated Knee Extensions for Daily Stability
Sit upright on your ball with feet hip-width apart. Slowly straighten one knee, lifting your foot 2-3 inches off the floor while maintaining perfect posture. Lower with control and repeat with the other leg. Alternate for 8-12 reps per side. This exercise builds the hip stability that prevents lower back strain during everyday activities like walking or standing. Most people with lower back pain have weak hip stabilizers—this simple movement addresses that critical weakness.
Advanced Pain-Relieving Positions for Lasting Results
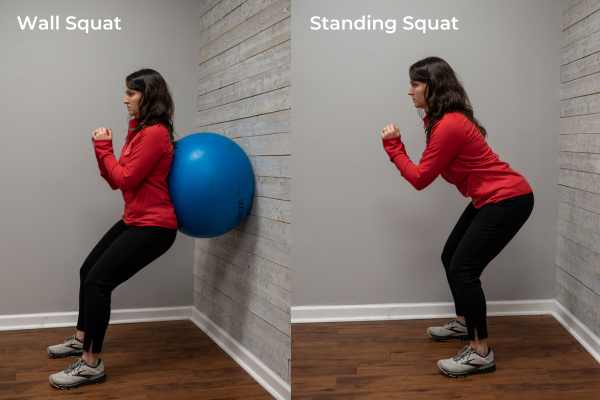
Wall Squat with Ball Support (Safe for Beginners)
Stand with your back to a wall and place the ball between your mid-back and the wall. Position feet about 12 inches in front of your hips. Slowly squat down as if sitting in a chair, allowing the ball to roll along your spine. Ensure your knees stay behind your toes, and hold for 6 seconds before rising. Repeat 8-12 times. This wall-supported exercise builds quadriceps strength without straining your lower back—perfect if you’re new to yoga ball exercises for lower back pain or have balance concerns.
Prayer Stretch for Spinal Decompression
Kneel upright with the ball in front of you. Place clasped hands on the ball and slowly roll it forward, leaning from your knees while keeping your hips back. Feel the gentle stretch through your lower back as you roll forward. Roll back to start and repeat 8-12 times. This movement decompresses spinal discs that have been compressed from sitting all day—ideal for office workers suffering from lower back pain. If you feel any discomfort, simply roll back slightly until the stretch feels therapeutic.
Build Your Lower Back Pain Relief Routine

Week 1-2: Foundation Building Protocol
Start with just 5 minutes of basic sitting and gentle bouncing each morning to awaken your core muscles. In the afternoon, dedicate 10 minutes to pelvic tilts and hip circles to increase spinal mobility. Each evening, complete one set of supine bridges and ball curls to begin strengthening your posterior chain. This gradual approach prevents overexertion while establishing proper movement patterns—critical for sustainable lower back pain relief.
Week 3-4: Strength Development Schedule
By your third week, progress to full sessions three times weekly. On Mondays, Wednesdays, and Fridays, complete two sets of each exercise including bridges, knee extensions, and wall squats. Tuesdays and Thursdays should focus on stretching and mobility work like the prayer stretch and hip circles. Weekends become active recovery days with gentle bouncing while watching TV—turning passive time into therapeutic movement.
Critical Safety Guidelines for Pain-Free Progress
Stop immediately and consult a healthcare provider if you experience:
– Sharp, shooting pain radiating down your legs
– Numbness or tingling in your feet
– Loss of bladder or bowel control
– Fever accompanying your back pain
These red flags indicate potential nerve compression or serious conditions requiring medical attention. When performing yoga ball exercises for lower back pain, always ensure adequate space around you, check ball inflation before each session, and consider using a spotter for advanced movements. Start with wall-supported exercises if you have balance concerns—safety comes before intensity.
Transform Daily Habits with Your Yoga Ball
Replace your office chair with your yoga ball for 30-minute intervals throughout the workday. This simple switch forces continuous core engagement to maintain balance, strengthening postural muscles that support your spine. During TV commercials, perform seated marches or knee extensions—turning passive entertainment into therapeutic movement. Spend 5 minutes on the ball each morning before getting dressed; this gentle movement hydrates spinal discs after sleep, reducing morning stiffness.
Track your progress by noting how long you can sit comfortably on the ball each day. When you reach 30 minutes without discomfort or complete 15 bridges pain-free, you’ll know your lower back strength is improving. Consistency trumps intensity—ten minutes daily beats one hour weekly for sustainable lower back pain relief.
Your spine has been waiting for this gentle revolution in pain management. Start with just one or two yoga ball exercises for lower back pain today, and within weeks, you’ll notice reduced discomfort, improved posture, and the freedom to move through your day without that constant ache holding you back.