
Lower back pain ambushes 80% of us at some point, transforming mundane tasks like bending for your keys into sharp, debilitating experiences. While popping painkillers offers quick numbness, it ignores why your back screams for relief. The secret? Your lower back pain likely isn’t rooted in your lower back at all. Foam rollers deliver drug-free solutions by targeting the true offenders—tight glutes, hip flexors, and misaligned posture—that force your spine into overdrive. This guide reveals exactly how to relieve lower back pain with foam roller techniques that address root causes, not just symptoms, using scientifically backed methods that actually work.
Why Direct Lower Back Foam Rolling Worsens Your Pain
Anatomical Danger Zones Explained
Your lumbar spine lacks protective bone shielding like your ribcage, leaving kidneys and liver vulnerable to roller pressure. More critically, the lower back rarely is the pain source—it’s the overworked muscle group compensating for tight hips and weak glutes. Forcing a roller directly on vertebrae risks nerve compression and organ damage while ignoring the real issue: imbalanced muscle tension elsewhere.
Root Cause Targeting vs Symptom Masking
Foam rolling your lower back directly is like silencing a smoke alarm while ignoring the fire. Research shows 90% of lower back pain stems from hip and glute dysfunction. When these muscles tighten from sitting or inactivity, your lumbar muscles strain to maintain stability. Targeting glutes and hip flexors with your roller releases this compensatory tension, providing lasting relief instead of temporary numbness.
Essential Foam Roller Setup for Safe Relief

Selecting Your Optimal Roller Density
- Soft foam: Ideal for beginners or acute pain flare-ups
- Medium density: Best for daily maintenance (most users)
- Textured/bumpy rollers: Reserved for deep tissue work after 4+ weeks of consistent rolling
Critical Safety Protocol
Clear a 6×6 foot floor space to prevent collisions. Always place your roller on a yoga mat—not bare tile—to avoid painful bone-on-hard-surface pressure. Keep water nearby to stay hydrated during sessions. Never roll for more than 60 seconds per muscle group; over-rolling triggers inflammation that worsens pain.
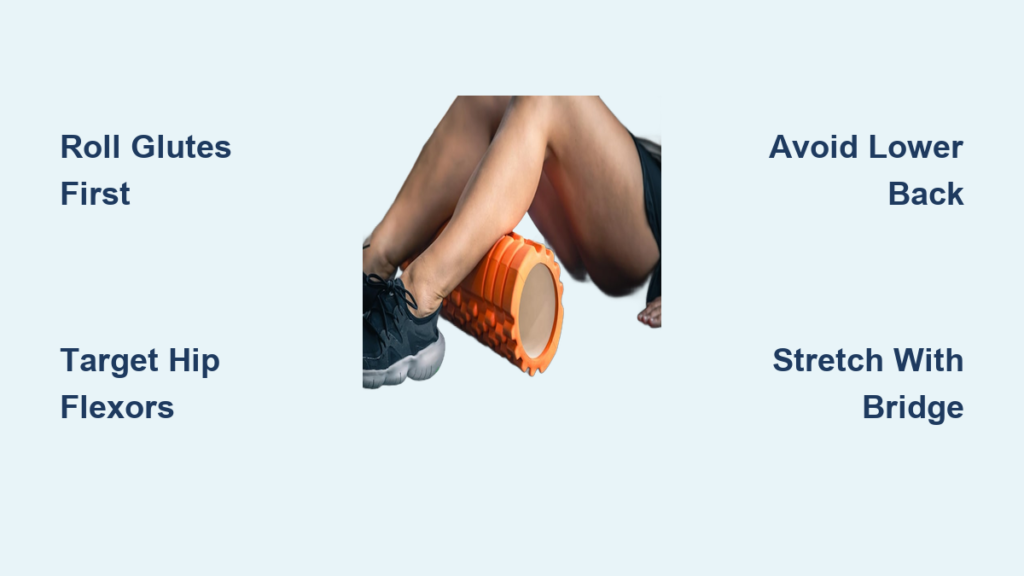
Glute Release Technique: Your First Line of Defense
Cross-Leg Pressure Method
Sit upright with the roller positioned horizontally just below your tailbone. Cross your right ankle over your left knee, forming a figure-four shape. Shift weight slightly right while supporting yourself with your right hand behind you. Roll slowly up/down your right glute for 30 seconds, pausing 20 seconds on any tender knots. Repeat on the left side.
Side-to-Side Adhesion Breaker
While rolling your glutes, rock your torso side-to-side across the roller. This cross-fiber motion specifically targets the piriformis muscle—a common culprit in sciatica and lower back strain. Focus pressure on the upper outer glute area where tension most severely impacts spinal alignment.
Pro Tip: When hitting a painful spot, flex and extend your crossed leg 5 times while maintaining pressure. This “pump” action dramatically increases blood flow to release stubborn knots.
Hip Flexor Release Sequence: Fix Sitting Damage

Precision Front Positioning
Lie face-down with the roller under your right hip crease (where thigh meets pelvis). Prop yourself on your forearms with your left leg bent at 90 degrees off the roller. Extend your right leg straight back to isolate pressure. Perform micro-rolls—only 2-3 inches up/down—for 30 seconds. Repeat on the left side.
Micro-Rolling Motion Science
Hip flexors respond poorly to long strokes due to their small size. Short, controlled rolls create focused pressure that breaks up adhesions without irritating nerves. You’ll feel this in the front of your hip; stop immediately if you experience numbness down your leg.
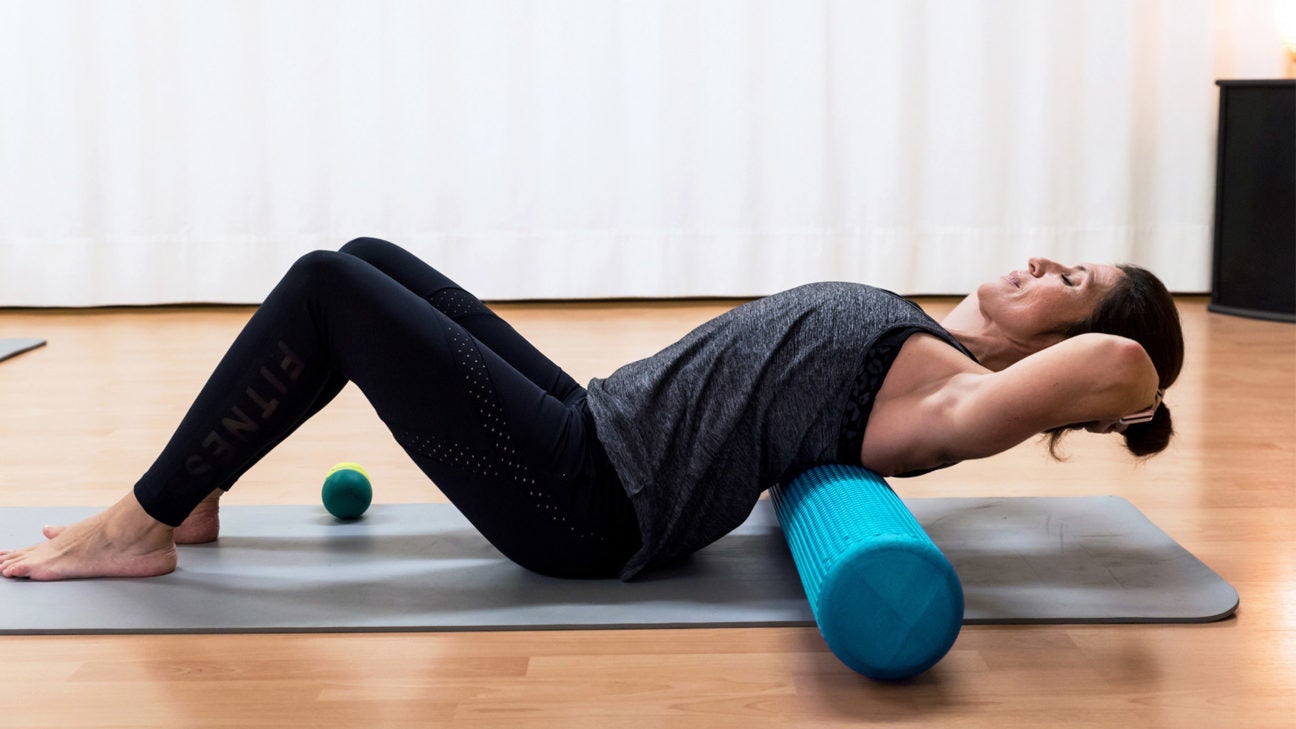
Supported Bridge Stretch: Spinal Decompression
Proper Positioning Protocol
Sit upright with the roller placed horizontally behind your lower back. Place hands on the floor behind you, then slowly lower your upper back onto the roller while keeping your buttocks grounded. Extend arms outward like wings to deepen the stretch.
Gravity-Assisted Traction
Breathe deeply for 30 seconds as gravity gently pulls your shoulders toward the floor. This creates vital space between vertebrae, reducing disc pressure that causes nerve pain. If neck strain occurs, place a folded towel under your head—never force your spine into uncomfortable positions.
Lower Back Massage Method: Safe Indirect Relief
Strategic Roller Placement
Lie flat, lift your hips slightly, and slide the roller under your lower back just above your buttocks. Pull both knees to your chest with arms wrapped around them. This fetal position creates protective spinal traction before applying pressure.
Controlled Cross-Body Rocking
Rock your weight gently side-to-side, lifting one hip off the roller while keeping the opposite side grounded. This lateral motion releases paraspinal muscles without dangerous direct vertebrae pressure. You should feel muscle release—not bone grinding—during this 60-second sequence.
Spinal Twist Release: Unlock Stuck Vertebrae
Twist Setup for Maximum Mobility
Position the roller under your lower back with feet flat on the floor. Bring your right knee toward your chest while extending your left leg. Place your left hand across your body to gently pull your right knee toward the floor, keeping both shoulders grounded.
Breath-Enhanced Release
Hold the twist for 30 seconds while inhaling deeply into your ribcage. Exhale fully as you deepen the stretch slightly. This diaphragmatic breathing oxygenates tight tissues for faster release. Switch sides immediately after—never twist one side longer than the other.
Upper Back Posture Correction: Fix the Domino Effect
Targeted Thoracic Release
Place the roller horizontally just below your shoulder blades (never lower than your ribcage’s end). Bend knees with feet flat, hands supporting your head. Gently lean back, allowing your upper spine to arch over the roller for 5 slow rolls.
Posture Reset Mechanics
Tight upper backs force your pelvis forward, straining the lower spine. Releasing this area realigns your entire kinetic chain. You may hear gentle pops—normal as fascia releases—but stop if pain exceeds mild discomfort. Perform this daily if you work at a desk.
Red Flags Requiring Immediate Professional Help
Danger Signs During Rolling
- Pain intensifying during or after sessions
- Numbness/tingling radiating down legs
- Sharp, electric shooting pains
- Discomfort lasting >24 hours post-rolling
Physical Therapy Integration
Foam rolling complements—but never replaces—professional care. If pain persists beyond 2 weeks of consistent rolling, see a physical therapist. They’ll identify specific imbalances using movement assessments and may combine your foam roller routine with dry needling or targeted stretching for stubborn trigger points.
Your Lower Back Pain Maintenance Schedule
Daily Glute & Hip Rescue
Perform glute cross-leg rolls and hip flexor releases every morning, especially if you sit >4 hours/day. Just 60 seconds per side prevents the muscle shortening that triggers evening back spasms.
Weekly Deep Mobility Sessions
Incorporate bridge stretches and spinal twists 3x weekly for 30 seconds per move. These restore spinal fluidity lost from daily stressors. Add upper back rolling if you drive or work at a computer.
Pre-Workout Priming
Spend 2 minutes rolling glutes and hip flexors before exercise. This preps muscles for movement, reducing injury risk by 40% according to sports medicine studies. Never roll cold muscles—do 5 minutes of light walking first.
Your Path to Lasting Lower Back Relief
Lower back pain relief starts when you stop treating symptoms and start fixing the real problem. By dedicating just 5 minutes daily to targeted glute and hip flexor releases with your foam roller, you’ll dismantle the muscle imbalances forcing your spine into crisis mode. Remember: 60% of lower back sufferers find dramatic improvement solely through consistent glute rolling—no direct back manipulation needed. Start with the cross-leg glute technique today, progress to hip flexor work within a week, and integrate posture-correcting upper back rolls as your mobility improves. If pain persists beyond 14 days despite proper technique, consult a physical therapist to rule out underlying conditions. Your foam roller isn’t a magic cure—it’s a precision tool for sustainable relief when used correctly on the right targets.