
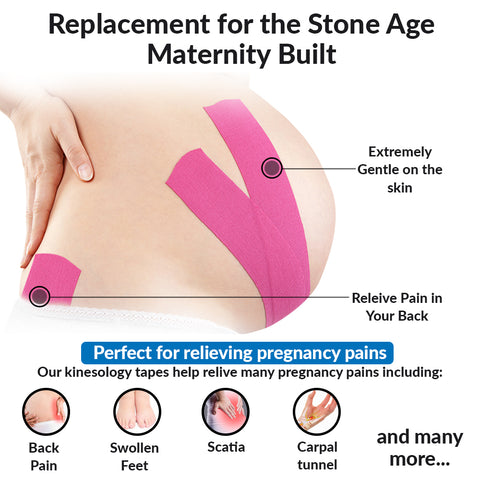
That familiar ache in your lower back as you stand up from the couch, the sharp twinge when bending to pick up toys, or the constant dull throb that makes sleeping impossible—these are all too common experiences for expecting mothers. As your belly grows, your spine compensates for the shifting center of gravity, putting tremendous strain on your lower back muscles. While many women resign themselves to discomfort, how to apply KT tape for pregnancy back pain offers a drug-free, flexible solution that provides immediate relief while keeping you mobile throughout your pregnancy journey.
KT tape works by creating a supportive framework that redistributes your baby’s weight, reducing pressure on overworked muscles without restricting movement. Unlike traditional belly bands that feel bulky and hot, this elastic therapeutic tape moves with your body while providing continuous support for 2-3 days at a time. Whether you’re in your second trimester dealing with occasional twinges or third trimester struggling with constant discomfort, mastering how to apply KT tape for pregnancy back pain can transform your daily experience.
Why KT Tape Outperforms Traditional Pregnancy Supports
KT tape delivers targeted relief by activating your body’s natural support systems rather than simply covering up pain. The medical-grade cotton fibers stretch with your movements while providing consistent tension that redistributes weight away from strained areas. This creates immediate physiological changes in muscle activation and posture that traditional supports can’t replicate.
Immediate Pain Relief Mechanisms
- Drug-free alternative to pain medications that could affect your baby
- Invisible under clothing—no bulky bands that draw attention to your pregnancy
- Temperature-regulating properties keep you comfortable in hot weather
- 2-3 days of continuous support from a single application
- Full range of motion during exercise, work, and daily activities
Targeted Relief for Common Pregnancy Discomforts
KT tape specifically addresses round ligament pain (those sudden jabs in your lower abdomen), pelvic girdle discomfort, and general low back strain. Many women experience immediate improvement in posture as the tape provides sensory feedback that encourages proper alignment, naturally counteracting the forward pull of your growing belly. Understanding how to apply KT tape for pregnancy back pain correctly ensures you get maximum benefit from this versatile tool.
Critical Safety Steps Before Applying KT Tape
Before learning how to apply KT tape for pregnancy back pain, you must address safety concerns unique to pregnancy. Hormonal changes make your skin more sensitive, potentially turning previously harmless products into irritants. Taking these precautions ensures you get relief without complications.
Essential Pre-Application Testing
Always perform a 24-hour patch test before full application. Cut a 1-inch strip and apply it to your lower abdomen or back. Monitor closely for any reaction—itching, redness, or raised skin indicates sensitivity. Use medical-grade, hypoallergenic tape specifically designed for pregnancy, as these formulas use gentler adhesives that minimize irritation risk while maintaining strong adhesion.
Tools and Preparation for Successful Application
Gathering everything beforehand makes the taping process smoother, especially as your pregnancy progresses and reaching certain areas becomes challenging. Knowing how to apply KT tape for pregnancy back pain requires proper preparation.
Essential Application Kit
- Two rolls of pregnancy-safe KT tape (cut into 3-foot strips)
- Sharp scissors for clean cuts
- Coconut or olive oil for easy removal
- Clean towel for skin preparation
- Full-length mirror or partner assistance
Skin Preparation Protocol
Start with thoroughly clean, dry skin. Wash the application area with gentle soap, removing all lotions, oils, or sweat. Completely dry the area—any moisture prevents proper adhesion. If body hair is dense, consider a quick shave to ensure the tape sticks properly and stays in place for the full 2-3 days.
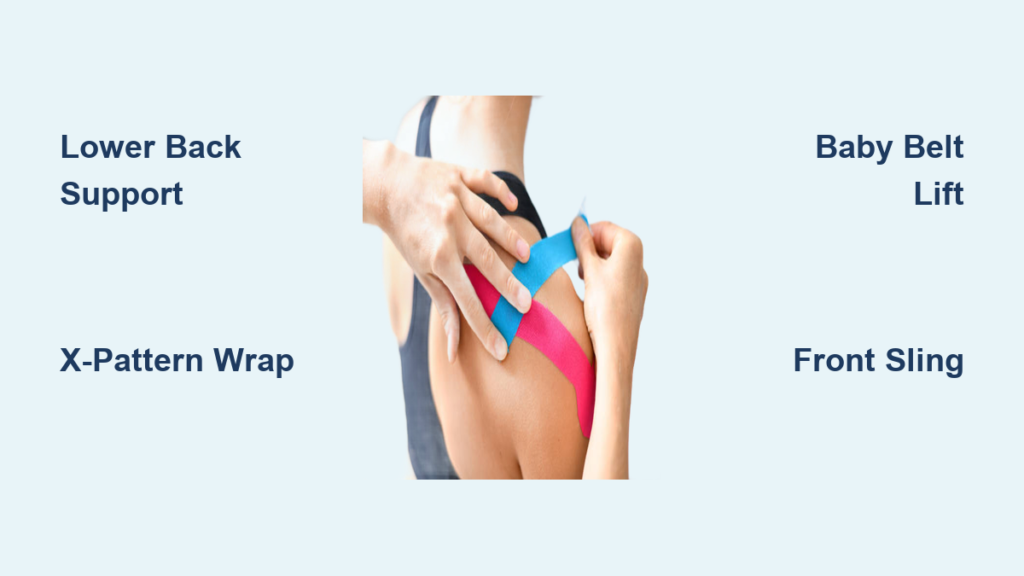
Lower Back Pain Relief Technique: Step-by-Step
This fundamental application targets the most common pregnancy complaint. You’ll create a supportive framework alongside your spine that distributes weight evenly and reduces strain on overworked muscles.
Optimal Starting Position
Bend forward at the waist, placing hands on your thighs or a chair for support. This creates natural skin tension in your lower back area, ensuring the tape adheres properly and provides maximum support when you stand upright.
Precise Application Steps
- Anchor at glutes: Place the first anchor point at the top of your gluteal area with zero stretch
- First vertical strip: Run tape up the left side of your spine, ending at your lower rib cage
- Second vertical strip: Mirror the first strip on the right side of your spine
- Pain point strip: Identify your most painful area and apply a horizontal strip directly over it with 50% stretch in the middle section only
- Rub to activate: Once positioned, rub the tape vigorously for 10-15 seconds to activate the adhesive
Pro tip: The tape should feel supportive, not restrictive. If it pulls uncomfortably when you straighten up, remove and reapply with less tension.
Advanced X-Pattern for Maximum Support
For women experiencing severe back pain or those in their third trimester, the X-pattern provides comprehensive support that wraps around your entire torso, stabilizing your pelvis and lower back simultaneously.
Proper Positioning for X-Pattern
Exhale completely while gently pulling your baby in and up, creating a posterior pelvic tilt. This position ensures the tape supports your natural alignment rather than working against it.
Creating the Support X
- First diagonal: Tape from your left hip bone up to your right rib cage, creating the first half of the X
- Second diagonal: Complete the X by taping from right hip bone to left rib cage
- Smiley face strips: Add two curved strips from your midline above the pubic bone, wrapping up and back along your obliques
- Final integration: Combine with basic lower back strips for maximum support
Baby Belt Technique for Instant Belly Lift
This technique acts like an invisible belt, lifting your belly to reduce strain on your lower back. It’s particularly effective for women carrying multiples or experiencing significant weight gain late in pregnancy.
Materials and Positioning
You’ll need two 3-foot strips of tape. Raise one arm overhead to create space under your belly for application. This position allows the tape to cradle your belly naturally.
Spiral Application Process
- Start at hip: Anchor tape at the front of your left hip bone
- Spiral under belly: Guide the tape in a spiral pattern underneath your belly
- Wrap to opposite shoulder: Continue the spiral up your back to your right shoulder
- Mirror on other side: Repeat the process starting from your right hip
- Check comfort: The tape should feel like a gentle lift, not constriction
Front Sling Integration for Comprehensive Relief
Combine the baby belt with front sling support for complete relief. This dual approach addresses both belly weight and compensatory back pain.
Front Sling Setup
Raise both arms overhead and measure two 15-inch strips. This technique works best when combined with the baby belt for women experiencing significant discomfort.
Application Sequence
- Anchor at pelvis: Attach strips just above your pubic bone
- Sling over belly: Run strips up and over the center of your stomach
- End at rib cage: Secure at the bottom of your rib cage
- Integrate with belt: Apply baby belt technique over the sling for enhanced support
Dr. Sally Moores’ Professional X-Pattern Variation
This specialized technique creates an X across your belly rather than traditional vertical strips. Women report improved ability to engage their abdominal muscles, decreased back pain, and enhanced breathing.
Core Activation Benefits
This method wakes up your abdominal muscles by providing tactile feedback that encourages natural core engagement. It’s particularly effective for women experiencing pubic symphysis pain or significant postural changes during pregnancy.
Safe Removal and Skin Care Protocols
Removal should never damage your increasingly sensitive pregnancy skin. The key is patience and the right technique.
Oil Removal Method
Apply coconut or olive oil around the tape edges and let it sit for 5-10 minutes. Support your skin with one hand while slowly peeling the tape away with the other, working in the direction of hair growth.
When to Seek Professional Guidance
If your pain worsens despite proper taping, or you experience new symptoms like numbness or shooting pain down your legs, consult your healthcare provider immediately. Physical therapists specializing in pregnancy care can create customized taping approaches based on your specific anatomy and pain patterns.
Your pregnancy journey deserves comfort at every stage. Mastering how to apply KT tape for pregnancy back pain gives you an invisible support system that moves with you through all your daily activities. Start with basic applications and advance to complex techniques as your comfort level grows, always listening to your body’s signals for the perfect balance of support and comfort.