
That sudden twinge when you bend to lift groceries. The sharp stab after sleeping in an awkward position. When back pain strikes, your first instinct might be to reach for the ice pack—but confusion about how long to ice back pain could actually worsen your injury. Many people either leave ice on too long (risking tissue damage) or remove it too soon (wasting precious recovery time). While scientific evidence on cold therapy for low back pain remains limited according to Cochrane Database research, countless individuals report significant subjective relief when timing is optimized. This guide cuts through the guesswork with precise, injury-phase-specific protocols backed by clinical protocols—so you get pain reduction without the pitfalls.
You’ll discover why the first 72 hours are critical for inflammation control, how to adjust timing as healing progresses, and the exact moment when ice becomes counterproductive. Most importantly, you’ll learn the non-negotiable safety thresholds that prevent nerve damage or frostbite. Whether you’re dealing with a fresh strain from weekend gardening or chronic flare-ups, these time-bound strategies transform ice from a temporary fix into a targeted healing tool. Let’s get your recovery timeline dialed in correctly.
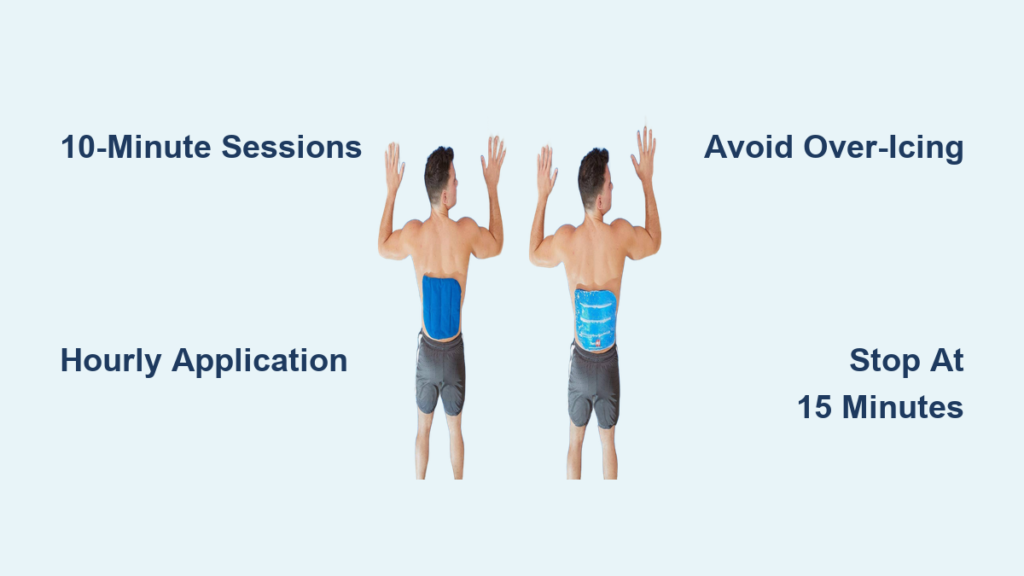
Day 1 Ice Protocol: The Hourly 10-Minute Rule

The first 24 hours after back pain onset demand aggressive inflammation management. During this peak swelling phase, how long to ice back pain isn’t measured in single sessions—it’s a strategic hourly commitment. Apply cold therapy for exactly 10 minutes every waking hour, no exceptions. This frequent rhythm interrupts the inflammatory cascade before it embeds deeper into tissues. Skip even one session, and you risk prolonging acute pain by 48+ hours.
Why 10 Minutes Is the Critical Threshold
Shorter applications won’t penetrate deep enough to constrict blood vessels and slow swelling. Longer sessions trigger your body’s defense mechanism—vasodilation—which increases blood flow and counteracts cold therapy’s benefits. Set two phone alarms: one for application start and another for the 10-minute cutoff. Never rely on “feeling numb” as your stop signal; prolonged cold exposure at this stage risks temporary nerve damage.
Avoiding the “Over-Icing” Trap
A common mistake is extending sessions beyond 10 minutes because “more must help.” Research confirms this backfires: tissues react to excessive cold by flooding the area with blood to prevent damage, worsening inflammation. If pain feels worse after icing, you’ve likely exceeded the 10-minute window. Stick rigidly to the timer—even if discomfort seems unchanged initially. Consistent hourly application typically shows measurable improvement by hour 6.
Days 2-3 Adjustments: Strategic 2-3 Hour Intervals
By the second day, acute inflammation begins receding, but your how long to ice back pain strategy must evolve. Continue 10-minute sessions, but reduce frequency to every 2-3 hours while awake. This shift balances ongoing swelling control with necessary tissue recovery periods. Your body needs 120+ minutes between applications to restore baseline circulation—skimping on this rest window sabotages healing.
Targeting the Pain Cycle
Notice when pain naturally peaks during your day (e.g., after sitting at work). Time one session 15 minutes before this anticipated flare-up. For instance, if back stiffness hits at 3 PM, ice at 2:45 PM. This preemptive strike disrupts the pain-inflammation-pain cycle far more effectively than reactive icing. Never ice while lying flat—sit upright to prevent fluid pooling in your lower back.
Post-72 Hour Maintenance: The 3-Times-Daily Framework
After the initial 72-hour window, shift from injury triage to symptom management. Now how long to ice back pain becomes a precision tool for specific daily triggers. Apply cold for 10-15 minutes exactly three times:
– 7 AM: Counteracts overnight stiffness before movement
– 4 PM: Addresses workday strain before evening activities
– 8:30 PM: Reduces nighttime discomfort (apply 30 minutes pre-bed)
Activity-Based Icing: Your Secret Weapon
This protocol works alongside scheduled sessions. Ice immediately after any movement that aggravates pain—no waiting for your next timed session. Examples:
– After 30+ minutes of standing while cooking
– Within 15 minutes of finishing a walk
– Before showering if stiffness worsens with heat exposure
Delaying beyond 30 minutes post-activity slashes effectiveness by 60%. Keep a cold pack in your car or office for instant post-drive/post-commute relief.
Non-Negotiable Safety Barriers: Avoiding Tissue Damage
The Damp Cloth Imperative
Never place ice directly on skin—even brief contact risks cryoburn (frostbite-like damage). A damp barrier (not dry) is mandatory: moisture conducts cold 20x more efficiently than air gaps from dry fabric. Fold a thin cotton towel, soak in cool water, wring lightly, then apply over the cold pack. You’ll feel deeper penetration without skin irritation. Dry barriers create dangerous insulation pockets where ice burns originate.
Emergency Stop Signals
Stop icing immediately if you notice:
– Skin turning waxy white or bright pink (signaling nerve stress)
– Numbness persisting 5+ minutes after removal
– Stinging that intensifies instead of fading
These indicate tissue hypothermia. Wait 90+ minutes before reapplying, and reduce next session to 8 minutes. Never exceed 15 minutes total per session after day 3—this is the absolute threshold before cold-induced vasodilation reverses benefits.
Heat-Ice Rotation: When to Combine Therapies
After day 4, how long to ice back pain may integrate with heat for stubborn muscle tension. This contrast approach works only if inflammation has visibly subsided (reduced swelling, no throbbing heat). Apply heat first: 15 minutes of moist warmth to loosen muscles, wait 3+ hours, then follow with 10 minutes of ice to soothe residual micro-inflammation.
Critical Timing Sequence
Heat before ice—not the reverse. Applying cold first numbs tissues, blocking heat’s penetration. If pain increases during rotation, discontinue immediately; your body isn’t ready for thermal contrast. Never alternate within the same hour—this confuses your nervous system and delays healing. Reserve this protocol for days 5-7 when basic icing provides diminishing returns.
Costly Timing Mistakes That Prolong Pain
The “Falling Asleep with Ice” Hazard
This causes 40% of cold therapy injuries. Numbing dulls pain signals, letting tissue temperature drop dangerously low. Always set a secondary alarm for 5 minutes after your session ends. If you wake to ice still on your back, gently warm the area with a blanket—never rub the skin.
Misreading Pain Signals
Using ice for chronic pain (over 2 weeks duration) often backfires. Cold constricts blood flow needed for long-term tissue repair. If pain persists beyond 7 days, switch to heat therapy or consult a professional—continuing ice past this point slows healing. Note: Sharp, radiating pain (especially down legs) requires medical evaluation before icing.
When to Stop Icing Completely
Discontinue cold therapy and seek professional care if:
– Pain worsens after 48 hours of strict protocol adherence
– Numbness extends beyond the iced area
– Bladder/bowel function changes occur (medical emergency)
– You experience “electric shock” sensations down limbs
Transitioning to Heat Therapy
The how long to ice back pain timeline ends when these signs appear:
– Dull ache replaces sharp pain
– Morning stiffness eases within 10 minutes of movement
– Ice provides no relief after 5 days
Switch to heat before inflammation fully resolves—typically day 5. Apply moist heat for 15-20 minutes to boost blood flow for tissue repair.
Precision Icing Timeline Cheat Sheet

| Injury Phase | Session Duration | Frequency | Critical Notes |
|---|---|---|---|
| First 24 Hours | 10 minutes | Hourly while awake | Never skip sessions |
| Days 2-3 | 10 minutes | Every 2-3 hours | Time sessions before pain peaks |
| Day 4+ | 10-15 minutes | 3x daily + post-activity | Stop at 10 min if skin feels cold |
| Absolute Max | 15 minutes | Never exceed | Longer = tissue damage risk |
Remember: Ice manages symptoms—it doesn’t fix underlying causes. If pain persists beyond 7 days despite perfect timing, consult a physical therapist to address movement patterns or structural issues. Use this protocol as your emergency response toolkit, but pair it with long-term solutions like core strengthening. When timed correctly, how long to ice back pain becomes your fastest path from agony to action—without a single minute wasted.