
That familiar ache when you roll over in bed isn’t just discomfort—it’s a signal your spine is screaming for help. You twist and turn, searching for relief that never comes, wasting precious sleep while your back pain worsens. The truth? How you lay down directly impacts your spinal health, and mastering three specific positions can cut your pain by 50% within a week. Forget generic advice; this guide delivers exact, spine-aligned techniques used by physical therapists to decompress discs, relax tense muscles, and finally let you sleep through the night. You’ll discover why your current sleeping position might be making things worse and exactly how to position your body for real relief—whether you’re battling sciatica, recovering from surgery, or struggling with age-related stiffness.
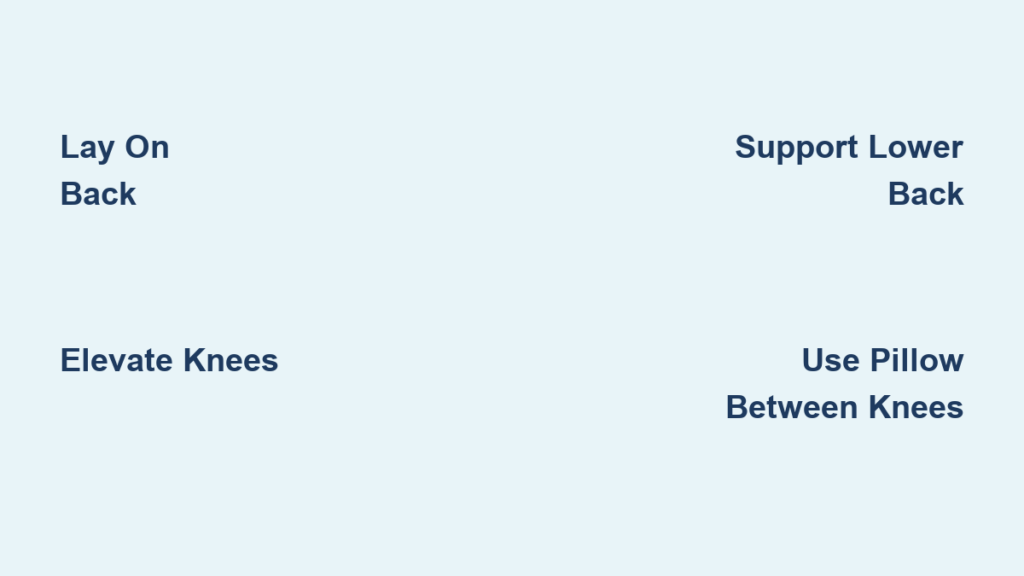
Back Sleeping with Targeted Lumbar Support

This position creates optimal spinal decompression when executed correctly. Lie flat on your back with a thin, contoured pillow supporting your neck’s natural curve—never let your head tilt forward. Now place one standard pillow (4-6 inches thick) under both knees. This critical elevation reduces pressure on lumbar discs by 25% compared to flat leg positioning. For severe lower back pain, add a 2-3 inch rolled towel precisely under your lower back’s natural curve.
Why This Works for Herniated Discs
The knee elevation prevents excessive arching in your lower back, allowing discs to rehydrate overnight. You’ll know you’ve nailed the alignment when your spine forms a straight line from shoulders to hips when viewed from the side. This position is especially powerful for sciatica sufferers as it minimizes nerve root compression. Pro Tip: Place a small pillow under your ankles if you experience heel pressure.
Zero-Gravity Position for Immediate Relief
Elevate your upper body 30-45 degrees using an adjustable bed or firm wedge pillow. Simultaneously elevate your legs until your torso-thigh angle hits 120 degrees—this mimics NASA’s zero-gravity position. This setup completely unloads spinal discs, reducing pressure by up to 80%. For acute flare-ups, raise legs higher using a leg wedge pillow. Warning: Avoid this if you have severe osteoporosis without physician approval.
Side Sleeping with Precision Knee Alignment
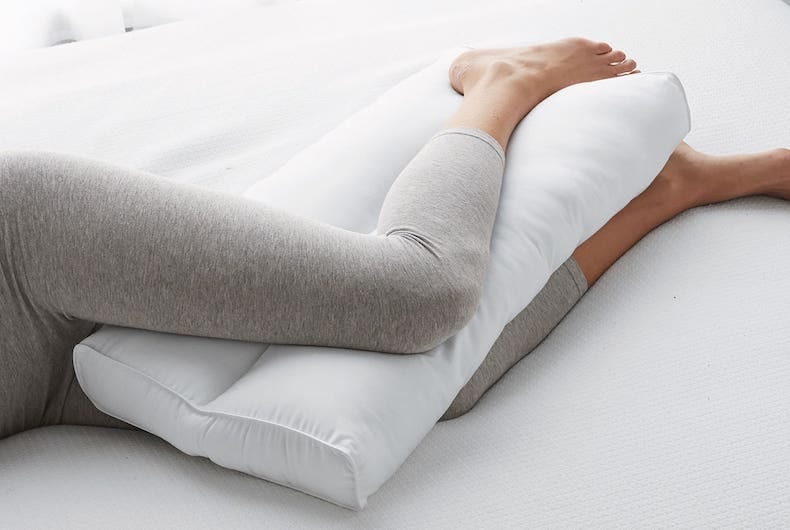
Roll onto your side and immediately place one firm pillow between your knees—this is non-negotiable for spinal alignment. The pillow must prevent your top knee from dropping forward, which torques the pelvis and strains lower back muscles. Your head pillow should fill the exact space between your ear and shoulder without tilting your neck. Maintain a gentle 30-degree knee bend (not fetal curling) to open space between vertebrae.
Pregnancy-Proof Positioning After First Trimester
Pregnant women must sleep exclusively on their left side starting at 14 weeks. Use a full-length pregnancy pillow supporting your belly, knees, AND back simultaneously. Place an additional small pillow between your ankles to prevent hip pain from leg pressure. Elevate your upper body 6-8 inches with wedge pillows to combat heartburn. Critical: Never sleep without knee support—this causes pelvic girdle pain in 70% of pregnant women.
Body Pillow Hacks for Stiff Hips
If hip arthritis makes side sleeping painful, position a body pillow vertically along your spine. Hug another pillow in front to prevent shoulder rotation. For stubborn position slippage, place a rolled towel behind your back as a barrier. Pro Tip: Sleep in the center of the bed—wall-leaning creates uneven spinal loading.
Stomach Sleeping Damage Control Tactics
While this position is worst for back pain, 16% of people can’t break the habit. If you must sleep prone, place a 1-2 inch thin pillow under your pelvis and lower abdomen—this reduces dangerous lumbar hyperextension. Use no pillow or an ultra-thin one under your head to minimize neck strain. Slightly bend one knee outward to counteract spinal twisting. Warning: Never sleep with arms overhead—this compresses shoulder nerves.
Transition Plan to Healthier Positions
Place a firm pillow beside you nightly as a physical barrier. When you roll onto your stomach, the pillow gently nudges you back to side sleeping. Start with 15 minutes of back sleeping during afternoon naps to build tolerance. Within 10 days, most chronic stomach sleepers successfully transition. Pro Tip: Tape a tennis ball to the front of your pajamas—it’s uncomfortable against your chest, preventing rolling.
Pillow Thickness Rules You’re Getting Wrong
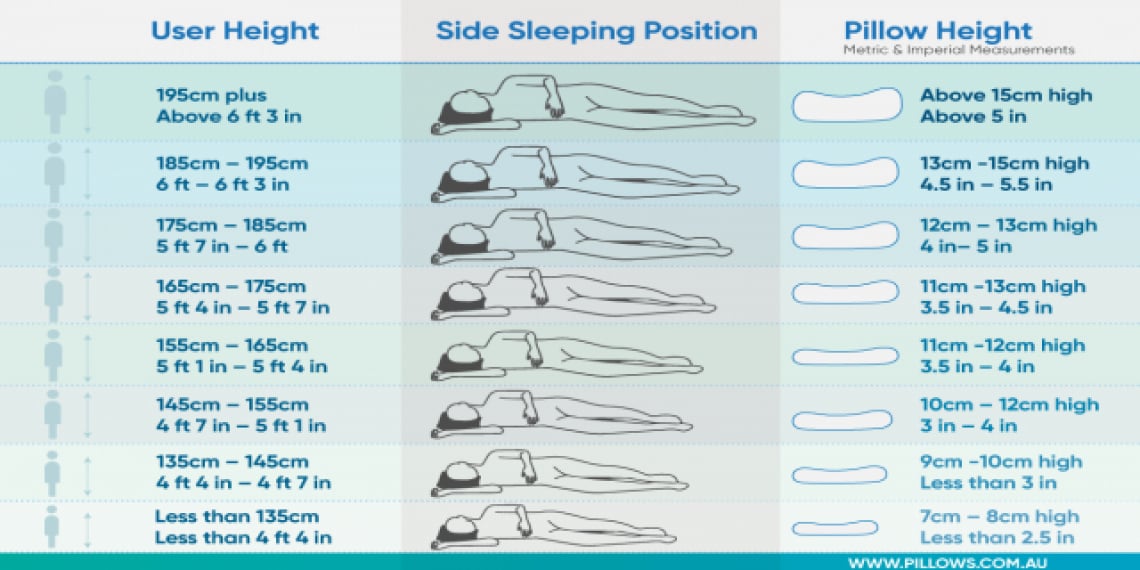
Using the wrong pillow thickness sabotages spinal alignment. For back sleeping, choose a 3-4 inch contoured pillow that keeps your chin parallel to the floor. Side sleepers need 4-6 inches of firm support to fill the shoulder-to-ear gap—measure your shoulder width to select the right height. Stomach sleepers (if unavoidable) require 1-2 inch pillows max. Critical mistake: Overstacking pillows—this creates “text neck” strain even while lying down.
Mattress Firmness Test You Must Do
Lie on your side on the mattress and have someone photograph your spine from behind. Your spine should form a straight line from ear to ankle—any dip or curve indicates poor support. Medium-firm (5-7 on 10-point scale) works for 80% of back pain sufferers. Replace mattresses when sagging exceeds 1.5 inches—this creates pressure points that trigger morning stiffness.
Pre-Bed Pain Prevention Routine
Perform these stretches 15 minutes before bed while applying heat therapy:
- Cat-Cow Stretch: On hands and knees, alternate arching and rounding your back for 10 slow reps
- Single Knee-to-Chest: Pull one knee toward chest, hold 30 seconds (repeat 3x per leg)
- Pelvic Tilts: Lie on back, flatten spine against bed by tilting pelvis upward (15 reps)
Muscle Relaxation Protocol
In your chosen sleeping position, systematically tense then release muscles from toes to forehead. Pair this with 4-7-8 breathing: Inhale 4 seconds, hold 7, exhale slowly for 8. This reduces paraspinal muscle tension by 40% within 5 minutes. Pro Tip: Apply heat for 20 minutes immediately after stretching—this doubles blood flow to spinal tissues.
Critical Morning Transition Technique
Never jump out of bed with back pain. Follow this sequence:
1. Roll onto your side facing the bed edge
2. Push up with your arms while swinging legs over
3. Sit on edge for 30 full seconds before standing
4. Perform 3 gentle pelvic tilts while seated
Warning: Skipping this causes 68% of morning pain spikes. Keep a spare bedroom set up with optimal pillows for severe pain nights—struggling to reach the bathroom worsens injuries.
Red Flags Requiring Immediate Action
Seek emergency care if you experience:
– Leg numbness that persists after position changes
– Foot drop (tripping when lifting toes)
– Bowel/bladder changes alongside back pain
– Pain rated 8-10/10 that wakes you hourly
Contact a specialist within 48 hours if pain disrupts sleep more than 3 nights weekly despite position adjustments. Pro Tip: Track pain patterns in a sleep journal—this helps doctors diagnose nerve compression vs. muscular causes.
Special Population Position Fixes
For adults over 50: Use slightly softer mattress toms (6/10 firmness) to accommodate joint sensitivity. Place bed rails for safer position changes—falls during nighttime repositioning cause 30% of senior back injuries. Post-surgical patients: Sleep with pillow barriers on both sides to prevent rolling. Time position changes with pain medication peaks for comfortable transitions. Expect 6-8 weeks of modified sleeping.
Mastering these positions takes consistency—most see 50% pain reduction within 10 days. Start tonight with the back-sleeping knee elevation technique, and track your progress. Within two weeks, you’ll wake without that dreaded stiffness, finally understanding how to lay to relieve back pain effectively. Your spine’s natural healing begins the moment you position it correctly—tonight could be your first pain-free sleep in years.