

That sudden twinge when lifting groceries or the persistent ache after a long workday – lower back muscle pain disrupts your life in an instant. Unlike nerve-related pain, muscle strain typically flares with movement and eases with rest, but ignoring it risks chronic issues. The good news? 90% of acute cases improve within six weeks using targeted strategies. This guide delivers science-backed techniques to stop the pain cycle today while rebuilding resilience. You’ll discover exactly when to apply ice versus heat, which exercises actually help (and which worsen pain), and how to modify daily habits for lasting relief – starting with your very next movement.
Cold and Heat Therapy Protocols

Applying the wrong temperature at the wrong time can prolong recovery. Master this two-phase approach to reduce inflammation while boosting healing circulation.
Phase 1: Cold Therapy (First 48 Hours)
Cold therapy immediately after injury or pain flare-ups constricts blood vessels to minimize swelling and numbs pain receptors. Wrap commercial gel packs (maintaining 32-35°F) in a thin towel to prevent skin damage. Apply for 15-20 minutes every 2-3 hours while awake – never directly on skin. Critical warning: Stop immediately if skin turns white, numbness occurs, or pain intensifies. This isn’t just discomfort; it signals tissue damage.
Phase 2: Heat Therapy (After 48 Hours)
Once acute inflammation subsides (usually after 48 hours), switch to moist heat to relax tight muscles and increase blood flow. Use hydrocollator packs at 140-160°F for 15-30 minutes, or take warm baths at 100-105°F. Apply heat 3-4 times daily before gentle stretching. Never use heat during the initial inflammatory phase – it can worsen swelling and delay healing.
Immediate Pain Relief Medications
Strategic medication use provides crucial short-term relief while you implement movement-based recovery.
NSAID Guidelines
For quick pain reduction, take ibuprofen (400mg) every 6-8 hours with food to protect your stomach. Never exceed 2400mg daily. Naproxen sodium (220mg) offers longer-lasting relief – ideal for overnight comfort – but max out at 660mg daily. Crucial note: Skip NSAIDs if you have kidney issues or take blood thinners. These medications address symptoms but don’t heal tissue – combine them with movement protocols.
Topical Pain Relief Options
Diclofenac gel (1%) applied 4 times daily penetrates deep without digestive side effects. Use a pea-sized amount for each application – more won’t increase effectiveness. Rub gently until absorbed, then wash hands thoroughly. Avoid broken skin, and never combine with heat therapy as it can cause chemical burns.
Optimal Resting Positions

Your sleep posture either accelerates healing or silently aggravates strain. These positions maintain spinal alignment while reducing muscle tension.
Best Sleeping Positions
Supine with knee support: Lie flat with knees bent 90° over pillows. Place a small towel roll under your lower back’s natural curve to prevent flattening. Use a medium-firm pillow supporting your neck’s curve – not your head. Side-lying fetal position: Curl gently on your side with a pillow between knees (keep knees slightly higher than hips). Fill the shoulder-to-neck gap with a contoured pillow to avoid spinal twisting.
Positions to Avoid
Sleeping on your stomach hyperextends your lumbar spine, increasing pressure on strained muscles by 200%. If you’re a chronic stomach sleeper, place a thin pillow under your pelvis to reduce strain – but commit to transitioning to side or back sleeping within two weeks.
Progressive Exercise Framework
Exercising too aggressively too soon re-injures tissue, while excessive rest weakens supporting muscles. Follow this phased approach.
Level 1: Acute Phase Exercises (Days 1-3)
Start within 24 hours of pain onset: Pelvic tilts – Lie knees bent, gently flatten lower back into floor for 3-5 seconds. Complete 10 reps hourly. Diaphragmatic breathing – Place hands on ribs, inhale deeply expanding sideways (not upward). Practice 10 breaths hourly to reduce muscle guarding. Ankle pumps – Move ankles up/down rhythmically for 20 reps hourly to prevent circulation issues.
Level 2: Subacute Phase (Days 4-14)
Progress only when pain decreases 50%: Single knee to chest – Bring one knee toward chest, hold 10 seconds. Repeat 3x daily per leg. Cat-camel stretches – On hands/knees, alternate arching (cat) and sagging (camel) spine through full range. Do 10 slow reps, 2x daily. Bridges – Lift hips using glutes, hold 5 seconds. Complete 2 sets of 15 reps.
Core Strengthening Progression
Weak deep stabilizers force surface muscles to overcompensate, creating strain. Target these often-neglected muscles.
Deep Stabilizer Activation
Transverse abdominis training: While lying knees bent, gently draw belly button toward spine without holding breath. Hold 10 seconds, 10 reps hourly. Progress to doing this while sitting or standing. Multifidus engagement: Focus on moving individual vertebrae – imagine “zipping up” your spine from tailbone to head while breathing normally.
Functional Integration
Anti-rotation exercises: Hold Pallof presses (cable/band at chest height) for 20 seconds per side, resisting rotational pull. Do 3 sets daily. Anti-extension exercises: Perform dead bugs – lie knees bent 90°, lower opposite arm/leg while pressing lower back into floor. Complete 3 sets of 10 reps.
Ergonomic Workplace Setup
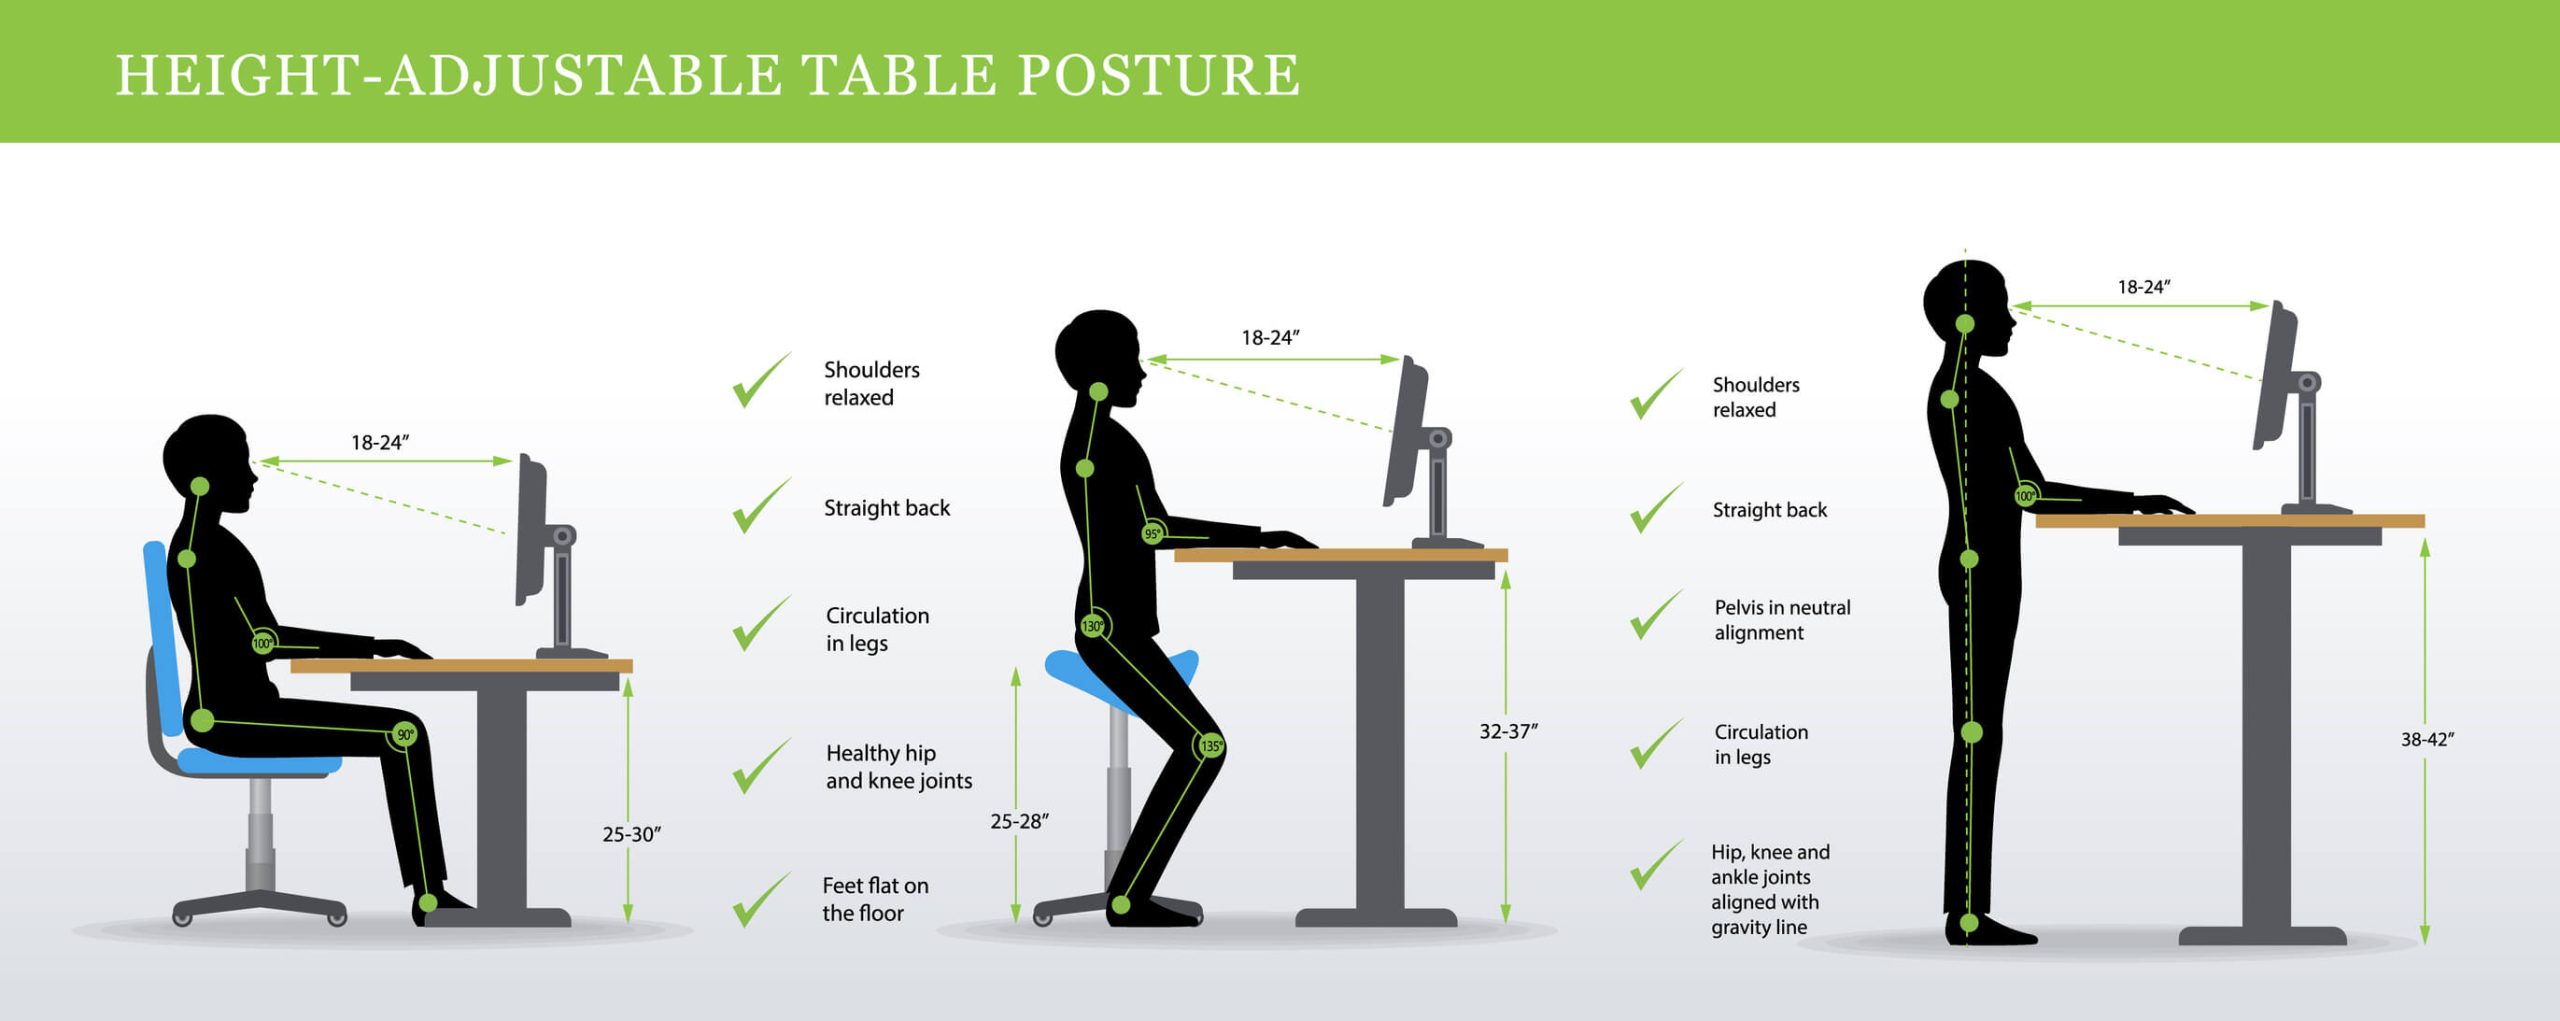
Poor workstation ergonomics silently strains lumbar muscles for hours. These adjustments provide immediate relief.
Chair Optimization
Set seat height so hips sit 1-2 inches above knees (creating 100-110° hip angle). Adjust lumbar support to maintain your spine’s natural curve at belt level. Position armrests so elbows rest at 90° with shoulders relaxed. Stand every 30 minutes – walk 2 minutes while performing shoulder blade squeezes (pull shoulder blades together for 5 seconds).
Monitor and Keyboard Placement
Position monitor top at eye level, 20-26 inches away. Center it directly in front – angled monitors force spinal rotation. Keep keyboard/mouse at elbow height with wrists straight. Use a document holder at screen height to avoid neck twisting.
Warning Signs and Red Flags
Most muscle pain resolves with self-care, but these symptoms require immediate medical evaluation: Cauda equina indicators – sudden bladder/bowel incontinence or saddle numbness (inner thighs/groin). Infection markers – fever over 101°F with severe back pain. Fracture signs – point tenderness over spine after trauma. See a doctor immediately if pain radiates below your knee or persists beyond 6 weeks despite consistent care.
Long-term Prevention Strategies
Prevent recurrence with these non-negotiable daily habits: Morning activation routine (5 minutes): Cat-camel (10 reps), bird-dog holds (5 sec/side x5), glute bridges (15 reps). Weekly strength: Deadlifts (3×10 with light weight), planks (build to 60 sec). Postural vigilance: Set phone alarms hourly to check alignment – ears over shoulders, shoulders over hips. Stand tall while waiting in line or brushing teeth.
Lower back muscle pain demands immediate action but rewards consistency. Start today with cold therapy if acute, transition to heat after 48 hours, and begin pelvic tilts within 24 hours. By week three, you should achieve 70% pain reduction through progressive exercises and ergonomic adjustments. Remember: movement is medicine, but timing is everything. Never push through sharp pain – that’s your body signaling tissue damage. Stick to this phased approach, and you’ll transform from pain management to permanent resilience. Your strongest back isn’t built in a gym; it’s forged through intelligent daily movement.