

You just crushed leg day, but now your lower back feels like it’s been through a demolition derby. If you’re searching for how to relieve lower back pain from gym sessions, you’re not alone—studies show 80% of lifters experience this issue. The good news? Most gym-induced back pain resolves within days when you apply the right strategies immediately. This guide cuts through the noise with battle-tested solutions to ease your discomfort, differentiate harmless soreness from dangerous red flags, and get you lifting pain-free again.
Ignoring early symptoms often turns minor strains into chronic problems. But with precise interventions targeting the root cause—not just masking pain—you’ll recover faster and build a more resilient spine. Let’s dive into the exact steps proven to fix your aching back without wasting time on ineffective remedies.
Spot Normal vs. Dangerous Pain
Normal muscle soreness after squats or deadlifts shows up 12–24 hours post-workout as a dull ache that improves with light movement and fades within 3–5 days. This delayed-onset muscle soreness (DOMS) stems from micro-tears during muscle adaptation—it’s actually a sign your training is working. You’ll still move freely through your full range of motion without sharp limitations.
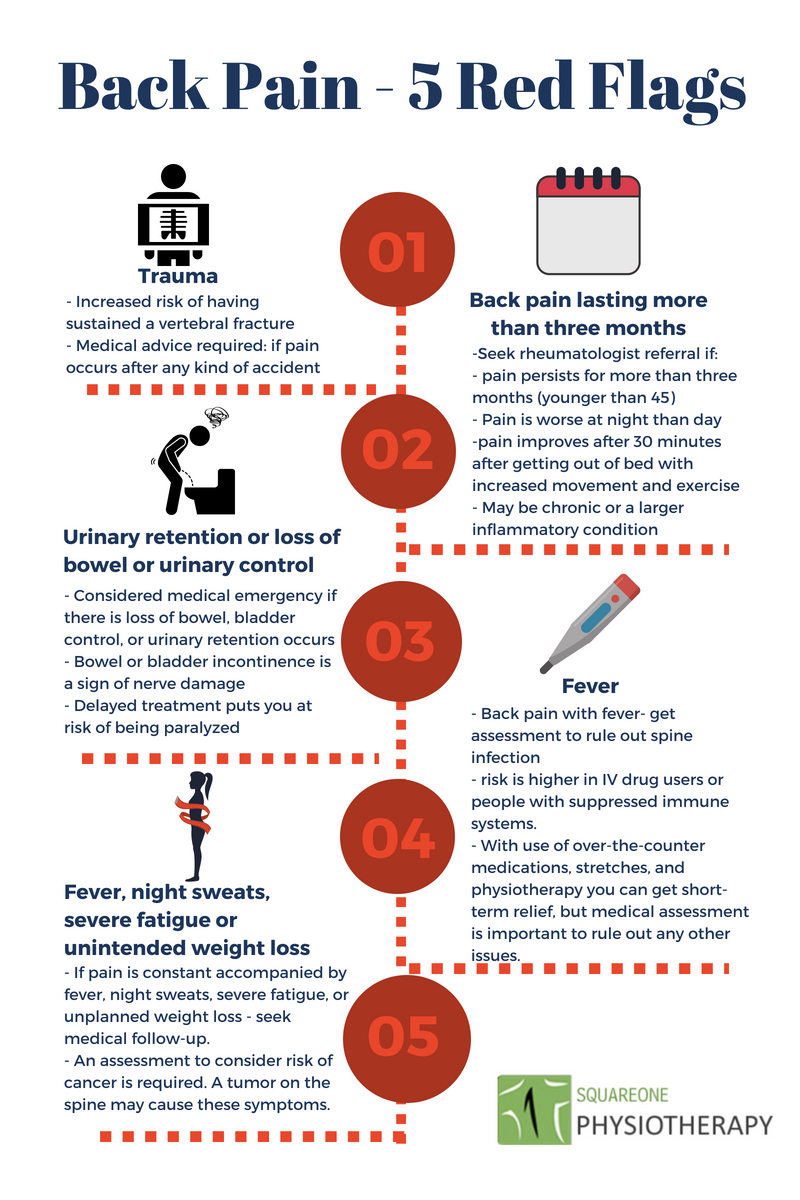
Red flags demanding immediate medical attention include sharp pain lasting over five days, numbness or tingling shooting down your leg, sudden leg weakness when walking, or loss of bladder control. These indicate potential nerve compression or disc injury. Never ignore an audible “pop” during lifting—this often signals a serious ligament tear or disc herniation requiring urgent evaluation. When in doubt, skip the “tough it out” mentality; professional assessment prevents minor issues from becoming career-ending injuries.
Immediate Relief First 48 Hours
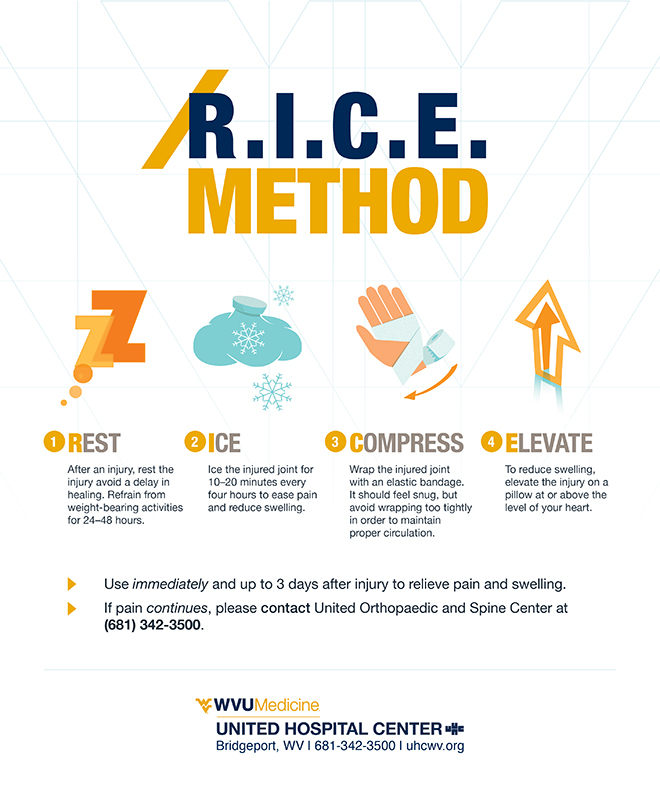
Skip the couch potato approach—complete rest worsens stiffness and delays healing. Instead, implement the RICE-M protocol within the first hour of pain onset: Relative rest means avoiding deadlifts, squats, and twisting motions while walking short distances hourly to maintain blood flow. Ice application for 15–20 minutes every 2–3 hours reduces inflammation (always use a towel barrier to prevent skin damage). Compression with a lumbar support wrap during daily activities stabilizes your spine, while Elevation—lying on your back with knees bent 90° on pillows—unloads spinal pressure. Medication like ibuprofen controls inflammation as directed, but never exceed dosage limits.
When to Switch to Heat
After 48–72 hours, transition from ice to heat therapy to boost blood flow and relax tight muscles. Apply a heating pad for 15 minutes, 2–3 times daily, or take warm showers focusing on your lower back. Crucially, never sleep with a heating pad—this risks severe burns during prolonged contact. Heat works best once acute inflammation subsides, typically when pain shifts from sharp to achy stiffness. If swelling or throbbing persists beyond 72 hours, revert to ice and consult a professional—this suggests ongoing tissue damage needing specialized care.
Gentle Movement That Heals
Start these exercises only when pain drops below 5/10 on your personal scale. Perform them 2–3 times daily with smooth, controlled motions—never force through sharp pain.
Supine Mobility
Knee rolls rebuild spinal mobility: Lie on your back with knees bent, gently roll both knees side-to-side 10 times while keeping shoulders grounded. Pelvic tilts reset alignment: Flatten your lower back into the floor, then gently arch it upward 15 times. Single knee-to-chest releases tension: Pull one knee toward your chest, hold 30 seconds, and repeat on both sides—this eases pressure on irritated nerves.
Quadruped Relief
Cat-camel stretches on hands and knees restore fluid movement: Slowly arch your spine upward (like a Halloween cat), then sag it downward 10 times. Child’s pose provides passive relief: Sit back on your heels with arms extended forward, holding 60 seconds while breathing deeply into your lower ribs. Sphinx pose gently strengthens: Lie prone with elbows under shoulders, lifting your chest while keeping hips grounded for 60 seconds—builds endurance without strain.
Activate Core & Glutes
Begin these exercises once acute spasms subside and you can walk without limping. Weak glutes and core muscles are primary culprits in gym-related back pain—they force your spine to bear loads it shouldn’t.
Bridge Progression
Master the glute bridge to retrain pelvic stability: Lie on your back with knees bent, tighten your abs and glutes, then lift hips until your body forms a straight line from knees to shoulders. Hold for 3 breaths before lowering slowly. Start with just 5 reps—quality trumps quantity. Progress gradually to 30 reps as strength improves; rushing this step risks reinjury.
Core Stabilizers
Bird-dog exercises build anti-rotation strength: On hands and knees, extend your right arm and left leg simultaneously, holding 5 seconds before switching sides (10 reps per side). Dead-bugs teach core bracing under load: Lie supine with knees bent 90°, alternately lower opposite arms and legs toward the floor while keeping your lower back pressed flat (10 reps per side). Side-planks start from your knees—progress to feet only when you can hold 30 seconds without hip sagging.
Rebuild Strength Safely
Return to lifting only after 2–4 weeks of pain-free movement. Rushing back too soon causes recurring injuries—patience prevents setbacks.
Movement Quality Checklist
Maintain neutral spine throughout every rep—imagine a straight rod running from your head to tailbone. Hinge hips before bending knees in deadlift patterns to avoid rounding your back. Brace your core like preparing for a punch—this creates intra-abdominal pressure protecting your discs. Exhale during the effort phase (lifting the weight) to stabilize your trunk without breath-holding.
Progressive Loading Model
Week 1–2: Practice movement patterns with just a dowel rod—focus on flawless form. Week 3–4: Lift 50% of your pre-injury max weight for 2–3 sets of 8–10 reps. Week 5–6: Increase to 60–70% max weight for 3–4 sets of 5–6 reps. Week 7+: Boost weight by ≤10% weekly—never skip this incremental approach.
Exercises to Avoid During Flare-Ups
Eliminate these high-risk moves until fully healed: Heavy deadlifts or squats, good-mornings, traditional sit-ups, double straight-leg lifts, and high-impact plyometrics. These compress your spine excessively or force unstable positions—replace them with safer alternatives like goblet squats until your back regains resilience.
Daily Flexibility Routine
Perform this sequence daily—consistency matters more than duration. Hold each stretch 30 seconds for 2–3 sets, breathing deeply to relax tense muscles.
Hip flexor stretch: In a half-kneeling position, tuck your pelvis and lean forward until you feel a gentle pull in the front of your hip. Hamstring stretch: Lie supine with a strap around one foot, straighten your knee until a mild stretch appears behind your thigh. Piriformis stretch: Lie on your back, cross one ankle over the opposite knee, and pull your thigh toward your chest. Thoracic mobility: Sit on a chair with a foam roller behind your shoulder blades, gently rotating your torso side-to-side.
Prevent Next Back Attack
Morning activation routine: 5 minutes of cat-camel (10 reps), knee-to-chest (30 seconds per leg), and bridges (15 reps) primes your spine for the day. Pre-workout: Always include 5 minutes of brisk walking plus body-weight squats (15 reps) and hip circles (10 per direction) to lubricate joints. Post-workout: Dedicate 5 minutes to hamstring, hip flexor, and child’s pose stretches. Workplace fixes: Use a lumbar roll in your chair and stand every 30 minutes—sitting longer than this shortens hip flexors, pulling your pelvis out of alignment.
When Professional Help Becomes Essential
Seek evaluation immediately if pain persists beyond 7 days of self-care, scores above 5/10, or recurs three+ times yearly. Neurological symptoms like leg weakness or numbness require same-day assessment—these indicate nerve compression needing targeted intervention. Physical therapists excel at movement re-education, using manual therapy for tight muscles and designing personalized exercise programs. MRI scans are rarely needed initially—reserve them for cases with red flags or no improvement after 4 weeks of conservative care.
15-Minute Daily Back-Care Circuit
Morning activation: Cat-camel (10 reps), pelvic tilts (15 reps), bridges (15 reps with 3-second holds). Mid-day reset: Standing hip flexor stretch (30 seconds per leg), shoulder blade squeezes (15 reps), and a 2-minute brisk walk. Evening recovery: Child’s pose (90 seconds), piriformis stretch (30 seconds per leg), and diaphragmatic breathing (2 minutes)—inhale deeply through your nose, expanding your belly, then exhale slowly through pursed lips.
Most gym-related lower back pain resolves within two weeks when you apply these targeted strategies consistently. Remember: gentle movement beats prolonged rest, progressive reloading prevents re-injury, and daily maintenance builds bulletproof resilience. If pain persists beyond 7 days or you notice red flags, professional guidance gets you back under the bar faster—don’t gamble with your spine’s long-term health. Your future PRs depend on treating today’s discomfort with smart, science-backed care.