

Waking up with that familiar lower back ache isn’t just annoying—it’s your body screaming that your sleep position is working against you, not with you. Eighty percent of adults experience lower back pain at some point, and poor sleep positioning significantly contributes to this daily misery. The intervertebral discs that cushion your spine need those precious sleep hours to rehydrate and repair, but if your position compresses them all night, you’re sabotaging your body’s natural healing process.
If you’re constantly adjusting pillows only to wake up in the same painful position, you’re not alone—research shows people with chronic lower back pain experience 42% more sleep disturbances than those without back issues. The good news? You don’t need expensive equipment or major lifestyle changes to transform your sleep experience. By the end of this guide, you’ll know exactly how to position your body, select supportive tools, and create an environment that actively reduces back pain while you sleep.
Best Sleep Positions for Back Pain Relief
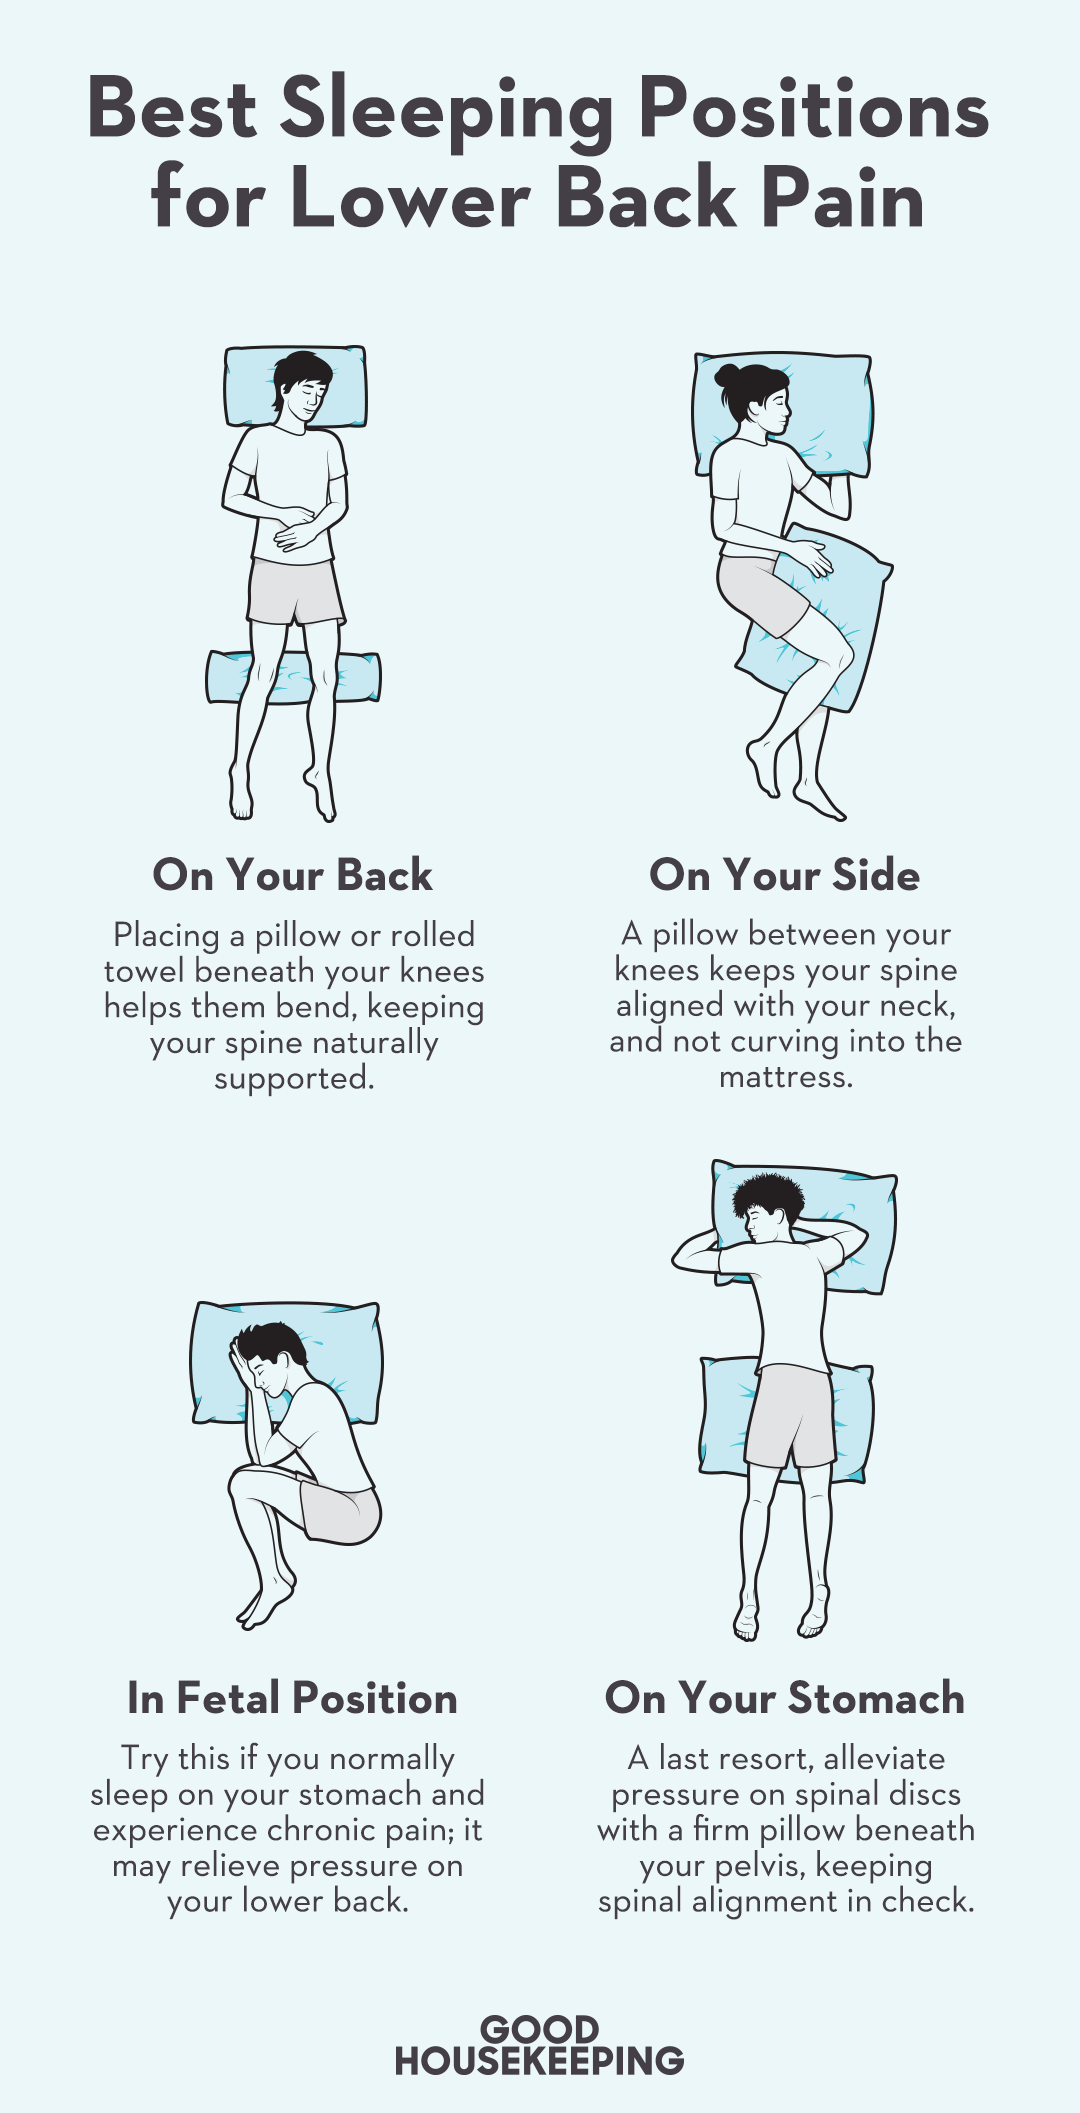
Side Sleeping with Proper Knee Alignment
Side sleeping becomes your most powerful ally against lower back pain when executed correctly. Grab a firm pillow (6-8 inches thick) and slide it between your knees—this simple move prevents your upper leg from pulling your hips out of alignment, which directly strains your lumbar spine. Your knees should rest comfortably against the pillow without forcing your legs apart unnaturally.
Pull your knees slightly toward your chest in a gentle fetal position to create space between vertebrae, allowing those compressed discs to rehydrate overnight. Check your head pillow: it should fill the gap between your ear and shoulder without cranking your neck up or down. Pro tip: Place a second pillow behind your back to prevent rolling onto your stomach during the night—this physical barrier keeps you locked in the optimal position without disturbing your sleep.
Back Sleeping with Strategic Elevation
Back sleeping provides exceptional spinal alignment when properly supported. Slide a pillow under your knees to maintain your spine’s natural curve, reducing pressure on lumbar vertebrae by approximately 30%. The pillow should be thick enough to create a gentle bend without lifting your feet off the bed—typically 4-6 inches for average body types.
Add a small rolled towel (2-4 inches thick) under the small of your back for targeted lumbar support. Your head pillow should be thinner than side sleepers need—just enough to support your neck’s natural curve. Warning sign: If you wake up with increased pain, your mattress might be too soft, allowing your hips to sink too deeply and creating that dreaded “hammock effect” that strains your lower back.
Modified Stomach Sleeping with Damage Control
If you’re committed to stomach sleeping despite its risks, implement these critical modifications immediately. Place a thin pillow (or rolled towel) under your pelvis and lower abdomen—this lifts your hips slightly and prevents dangerous hyperextension of your lumbar spine. Ditch your head pillow entirely or use the thinnest one possible to avoid creating a sharp angle in your neck that travels down to stress your entire spine.
Consider this your emergency position only—stomach sleeping places the most stress on your lower back. Start incorporating side sleeping for just 15 minutes each night and gradually increase until you’ve made the switch. Your spine will thank you within days.
Mattress Selection That Actually Works
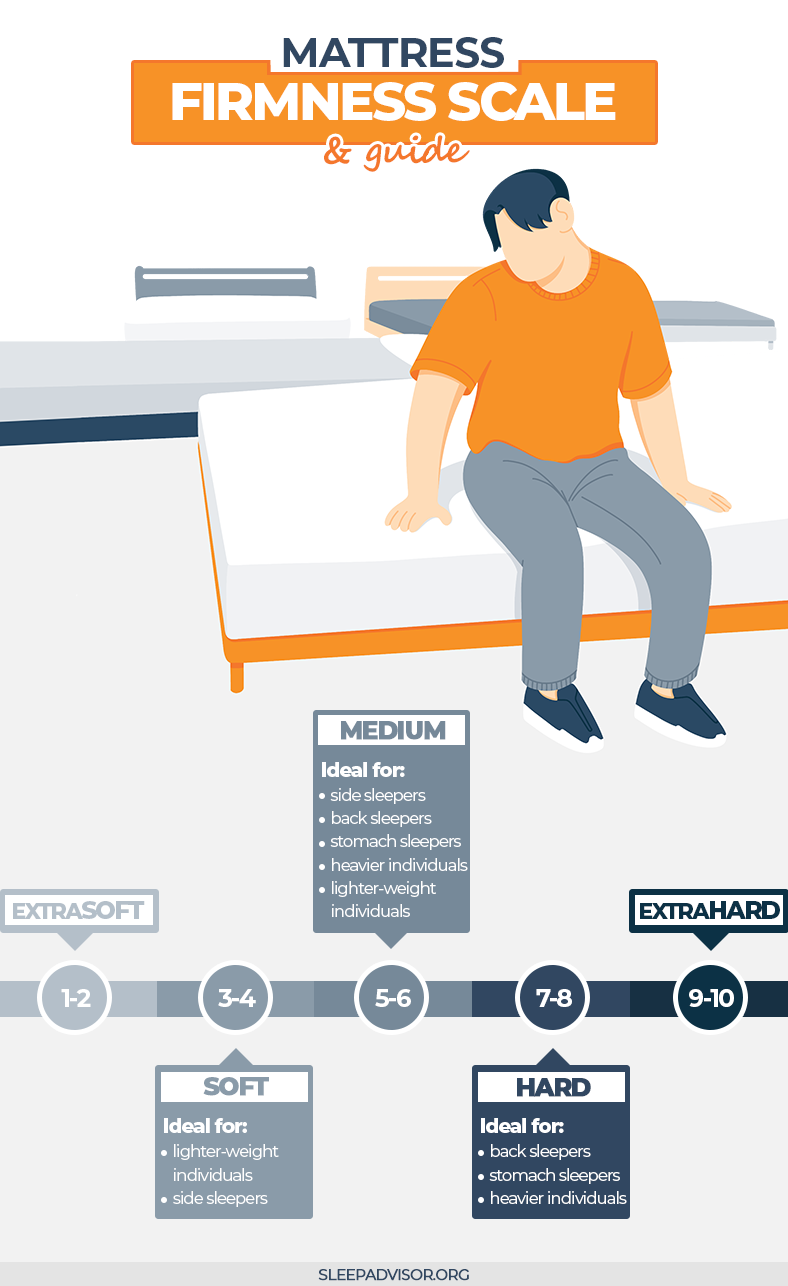
Perfect Firmness Level for Pain Relief
Medium-firm mattresses reduce clinically diagnosed back pain by 48% compared to firm options. Your ideal mattress lands between 5-7 on the firmness scale (1-10), where your shoulders and hips sink just enough to maintain spinal alignment while your lower back stays properly supported. Quick test: Lie on your side and have someone check if your spine forms a straight line from neck to tailbone. If there’s a visible dip at your waist, it’s too soft; if you feel pressure on your shoulder or hip, it’s too firm.
Memory foam mattresses excel for back pain sufferers because they contour to your body while maintaining crucial support. Latex offers similar benefits with more bounce and cooler sleeping temperatures. If replacing your mattress isn’t feasible immediately, a 2-3 inch medium-firm memory foam topper ($50-200) can transform an aging mattress without the full replacement cost.
Mattress Replacement Timeline You Can’t Ignore
Even the best mattress loses 50% of its support after 7-10 years. If you can feel springs or see visible sagging (especially in the lumbar area), you’re overdue for an upgrade that’s costing you pain-free mornings. DIY test: Place a straight object like a ruler across your mattress—if there’s a visible gap between the ruler and mattress surface, you need replacement.
Pillow Strategy for Spinal Alignment
Knee Pillow Specifications That Make a Difference
Invest in a contoured knee pillow measuring 8-10 inches long and 4-6 inches thick. Memory foam construction maintains consistent support all night, and the contoured design prevents the pillow from migrating between your knees. Look for removable, washable covers because this pillow will see nightly use.
Budget solution: Roll a towel to 4-inch diameter and secure with rubber bands. Cover with a pillowcase for a knee pillow that works almost as well as store-bought options. Replace your knee pillow when it loses more than 25% of its original thickness—the support degrades significantly at that point.
Full-Body Support Solutions for Side Sleepers

U-shaped or C-shaped pregnancy pillows provide comprehensive support for dedicated side sleepers. These 48-54 inch pillows support your knees, hips, and shoulders simultaneously while creating a physical barrier that prevents position changes. The firmness sweet spot: supportive enough to maintain alignment but cushioned enough to prevent pressure points.
Sleep Environment Optimization
Temperature Control Tactics for Pain Reduction
Keep your bedroom between 65-68°F (18-20°C) to reduce inflammation and muscle tension. Lower temperatures naturally decrease your body’s inflammatory response, which directly impacts morning back pain levels. Use breathable cotton or bamboo bedding to prevent overheating that causes position changes throughout the night.
Cooling hack: Place a cooling gel mattress topper on top of your existing mattress for immediate temperature regulation without replacing your entire bed. This simple addition can reduce nighttime awakenings by up to 35%.
Complete Darkness Protocol
Install blackout curtains or use a sleep mask to achieve complete darkness. Even small amounts of light disrupt your circadian rhythm and increase pain perception. Eliminate blue light 2 hours before bed—use warm-toned bulbs (2700K or lower) in evening hours instead. Pro tip: Cover all electronic lights with black tape—even the smallest LED can disrupt sleep quality enough to increase pain sensitivity.
Pre-Sleep Back Pain Protocol
15-Minute Stretching Routine That Works
Perform these gentle stretches 15-20 minutes before bed:
- Knee-to-chest: Lie on your back and gently pull one knee toward your chest, holding for 30 seconds (repeat 3 times each leg)
- Cat-cow: On hands and knees, alternate between arching your back upward and dipping it downward for 10 slow repetitions
- Piriformis stretch: While lying on your back, cross one ankle over the opposite knee and gently pull the uncrossed thigh toward your chest (hold 30 seconds each side)
Stop immediately if any stretch increases pain beyond mild discomfort. These should feel like gentle releases, not torture sessions.
Strategic Heat Therapy Application
Apply a heating pad set to medium heat (104-113°F) to your lower back for 15-20 minutes before sleep. Moist heat penetrates deeper than dry heat, so consider a microwavable heat pack or warm bath with Epsom salts. Time this therapy to end 30 minutes before sleep to prevent overheating during the night—your body needs to cool down to initiate deep sleep cycles.
Morning Transition Strategies
Safe Rising Technique to Prevent Pain Flare-Ups
Never sit straight up from lying down—this compresses your lumbar discs and can trigger instant pain. Instead, roll onto your side facing the edge of the bed. Push up with your arms while swinging your legs off the bed in one smooth motion. Sit on the edge for 30-60 seconds to let your spine adjust before standing.
Critical timing: Wait at least 10-15 minutes after waking before attempting deeper stretches—your spinal discs need time to rehydrate fully before loading them with movement. This simple delay can prevent morning pain spikes.
Special Condition Modifications
Herniated Disc Positioning Protocol
For herniated discs, the fetal position with knees to chest often provides immediate relief by opening up disc space. Use extra pillows to maintain this position throughout the night—place one between your knees and hug another to your chest. Avoid sleeping flat on your back initially, as this can increase pressure on the affected disc.
Sciatica-Specific Setup
Elevate your affected leg slightly higher than your hip when side sleeping using a wedge pillow or extra knee pillow. For back sleeping, place pillows under both knees and add a small towel roll under your lower back. Move slowly between positions to prevent nerve irritation that can trigger shooting pains.
Long-Term Success Habits
Consistency Protocol That Delivers Results
Maintain your sleep schedule within 30 minutes daily, including weekends. Your body’s repair processes work on a schedule, and irregular timing disrupts healing. Create a 30-45 minute pre-sleep routine that signals “repair time” to your body—this might include stretching, heat therapy, and light reading.
Tracking tip: Keep a simple pain journal noting your sleep position each morning and corresponding pain level (1-10 scale). Within two weeks, clear patterns will emerge showing which positions work best for your unique body.
Budget-Friendly Back Pain Solutions
Immediate Modifications Under $10
Roll towels or blankets as temporary pillow substitutes while you shop for proper support tools. Pool noodles wrapped in towels make excellent knee pillows for under $5. Use books or blocks to slightly elevate the foot of your bed (no more than 1-2 inches) for back sleeping relief—this mimics expensive adjustable beds at minimal cost.
Your back pain doesn’t have to be your morning destiny. Start with one change tonight—whether that’s adding a pillow between your knees or adjusting your bedroom temperature. Track your pain levels for one week, then add another modification. Within a month, you’ll have a personalized sleep system that turns your bed into a healing sanctuary rather than a torture device.
Remember: your spine spends one-third of its life in bed. Make those hours count toward healing, not hurting. Consistent application of these techniques reduces back pain significantly for 78% of users within 30 days—your pain-free mornings are closer than you think.