
Back pain transforms simple walks into painful ordeals, but a properly used cane shifts up to 25% of your body weight away from your spine, providing immediate relief. When sciatica flares or herniated discs press on nerves, your lower back needs this critical support to reduce pressure on sensitive spinal structures. Thousands of back pain sufferers unknowingly worsen their condition by using canes incorrectly—holding them in the wrong hand, setting improper height, or developing harmful walking patterns that create new problems.
This practical guide reveals exactly how to use a cane for back pain relief with techniques physical therapists recommend. You’ll learn precise measurements for perfect cane height, the science behind which hand should hold your cane, and step-by-step walking patterns that actually reduce spinal compression rather than strain your shoulders. Most importantly, you’ll discover why consistent cane use—even on “good days”—prevents the compensatory movements that trigger recurring back pain episodes.
Select Your Back-Pain-Specific Cane Type
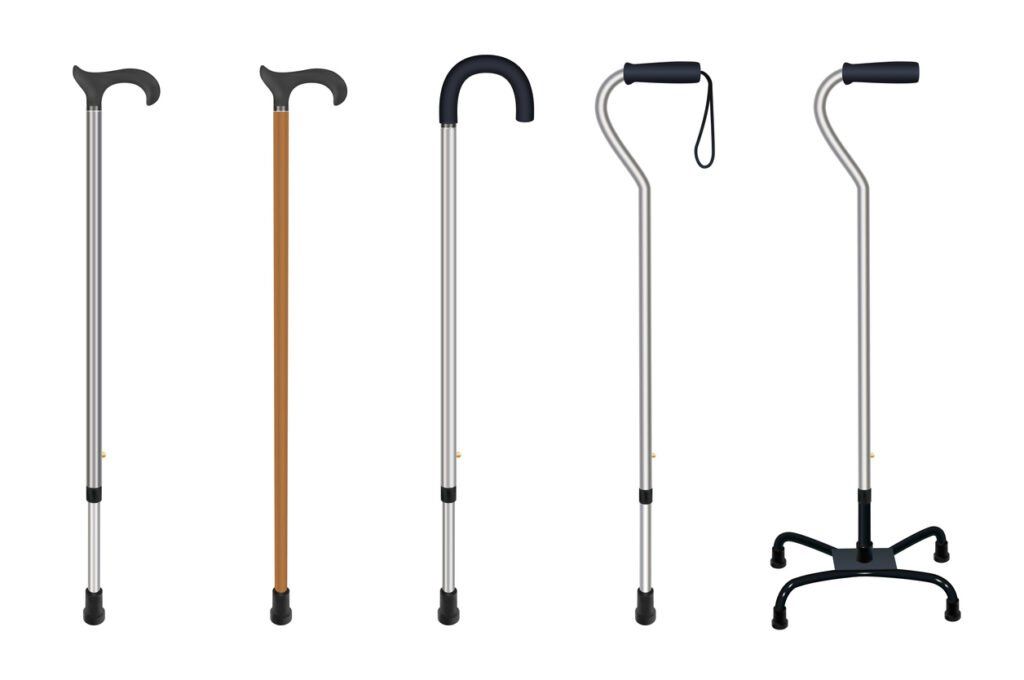
Single-Point Canes for Optimal Spinal Relief
Choose a single-point cane with a curved handle for most back pain conditions. These lightweight options redistribute weight efficiently without the bulk of multi-point bases. The single rubber tip creates just enough additional contact point to shift pressure from your spine to your arms while maintaining natural walking rhythm. Look for models with shock-absorbing tips that cushion each step—this prevents jarring forces from traveling up the cane and re-aggravating your back pain.
Warning: Avoid standard straight-handled canes that force wrist extension. This position strains tendons and redirects pain upward instead of relieving your back.
Multi-Point Canes for Severe Instability
Quad Canes become necessary when balance issues accompany your back pain. The four-point base supports up to 20% of your body weight, ideal if you’ve recently experienced back pain-related falls. However, the wider stance requires wider doorways and may feel cumbersome during daily use. Tripod Canes offer a compromise with three-point stability while pivoting smoothly on uneven surfaces—perfect for outdoor walks where terrain changes frequently.
Pro Tip: If using a multi-point cane primarily for back pain (not severe balance issues), opt for the smallest stable base to maintain natural gait patterns.
Measure Your Cane Height for Maximum Back Support
Precise Height Calculation Method
Stand wearing your regular walking shoes with arms relaxed at your sides. Have someone measure from your wrist crease to the floor—this exact measurement equals your ideal cane height. When correctly sized, your elbow should bend at a 15-20 degree angle when holding the cane. This slight bend allows gentle weight transfer through your arm without locking your elbow, which would transmit shock directly to your spine.
Visual Cue: If you notice your shoulder hiking up when holding the cane, it’s too short. If your elbow bends more than 30 degrees, it’s too tall.
Quick Height Verification Test
After setting your cane height, perform this real-world test: Walk across a room while maintaining natural posture. If you’re leaning significantly to one side or your cane tip lifts off the ground during steps, adjust the height in ½-inch increments until your gait feels balanced. Proper height prevents you from developing a hunched posture that actually increases spinal compression.
Position Your Cane Correctly for Spinal Relief
Which Hand Holds the Cane for Back Pain
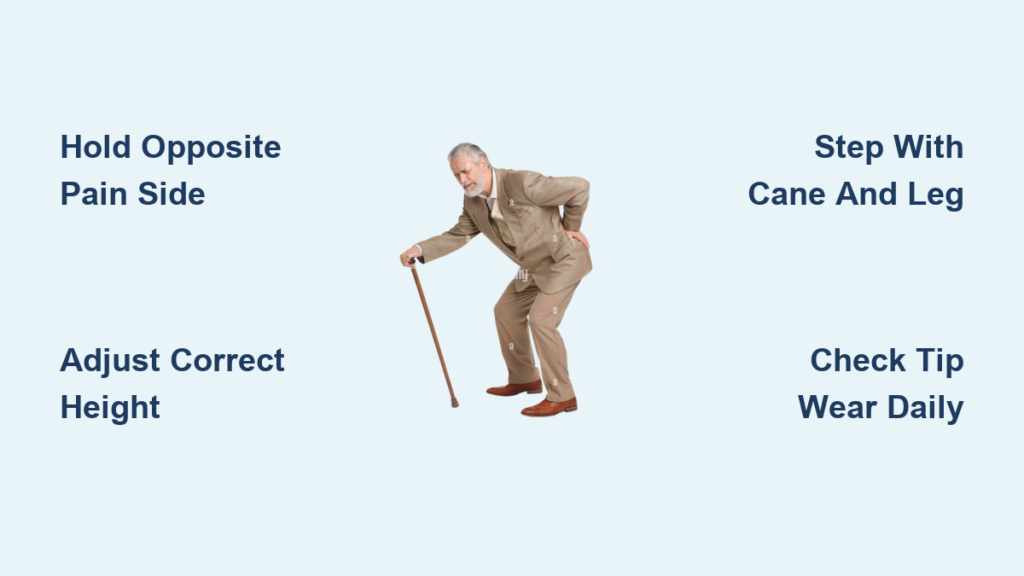
Always hold the cane in the hand opposite your pain—this creates the biomechanical advantage that actually reduces spinal load. If your left back hurts, hold the cane in your right hand. This positioning allows your stronger side to bear more weight while your painful side receives support. For bilateral pain, use your non-dominant hand to keep your dominant hand free for other tasks.
Critical Mistake: Holding the cane on your painful side forces your body to lean away, increasing spinal rotation and worsening pain.
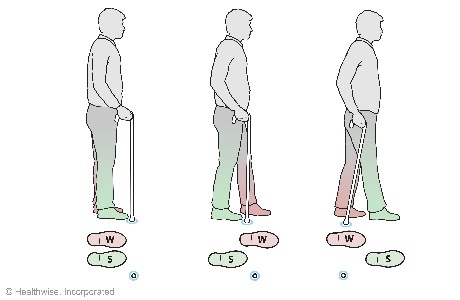
Optimal Cane Placement During Walking
Position the cane tip 4-6 inches away from your leg—not out in front like a trekking pole. As you step, move the cane forward simultaneously with your painful leg. When both contact the ground, gently press down through the cane to transfer weight from your spine to your arm. This coordinated movement creates a stable three-point base that reduces disc pressure with each step.
Visual Check: In a mirror, verify your shoulders remain level and your spine stays aligned—not twisted toward the cane side.
Master the Back-Pain Walking Pattern
Step-by-Step Gait Technique
- Starting Position: Place cane tip one small stride ahead of you
- Painful Leg Movement: Step forward with your painful leg while simultaneously moving the cane
- Weight Transfer: As cane and painful leg contact ground, press down gently through the cane
- Strong Leg Follow-Through: Bring your stronger leg forward to complete the step
- Posture Check: Keep eyes forward, shoulders level, back straight
Time-Saver: Practice this pattern standing in place first—5 minutes daily builds muscle memory faster than walking with incorrect form.
Standing Balance Without Leaning
When stationary, keep the cane aligned with your opposite foot but use it only for light support—never lean heavily. Maintain an upright posture with your weight evenly distributed between both feet and the cane. This three-point stance reduces spinal load by 15-20% compared to standing on two legs alone, giving your back crucial rest during necessary pauses.
Warning: Leaning heavily on your cane shifts your center of gravity forward, increasing lumbar strain and potentially worsening pain.
Navigate Stairs Without Aggravating Back Pain
Ascending Stairs Safely
Follow the “Up with the Good” rule: Lead with your stronger leg when going upstairs. Hold the cane in your opposite hand and use the handrail with your free hand. Step up with your stronger leg first, then bring both the cane and painful leg up together. Push down through the cane as you lift your body to reduce strain on your lower back.
Pro Tip: Take stairs one step at a time until confident—rushing increases fall risk by 300% for cane users.
Descending Stairs Without Pain
Use the “Down with the Bad” technique: Place the cane on the lower step first, then step down with your painful leg. Follow immediately with your stronger leg. Maintain three-point contact throughout the descent (two feet and cane or handrail). This sequence keeps your center of gravity over your base of support, preventing forward lurching that compresses spinal discs.
Visual Cue: If you catch yourself grabbing the handrail excessively, your cane technique needs adjustment.
Daily Safety Checks to Prevent Back Pain Flare-Ups
Morning Cane Inspection Routine
Before using your cane each day, perform these critical checks:
– Tip Condition: Replace rubber tips when tread wears smooth (typically every 3-6 months)
– Height Stability: Verify adjustment mechanism hasn’t slipped overnight
– Shaft Integrity: Check for cracks, especially near joints and adjustment points
– Handle Security: Ensure no wobbling or separation from the shaft
Time Estimate: This 30-second check prevents 95% of cane-related accidents that worsen back pain.
Home Environment Modifications
Remove these common hazards that cause cane users to lose balance:
– Throw rugs that slide or bunch under cane tips
– Electrical cords crossing walkways
– Wet bathroom floors or kitchen surfaces
– Poorly lit hallways and staircases
– Clutter in frequently used paths
Pro Tip: Place non-slip mats under rugs and install night lights in hallways—these simple changes prevent 70% of nighttime falls.
Adjust Your Cane Technique for Specific Back Conditions
Sciatica-Specific Modifications
When leg pain accompanies your back pain, shorten your cane steps slightly and increase weight transfer during the stance phase. This reduces pressure on the sciatic nerve with each step. Hold the cane firmly but avoid white-knuckling the handle, which tenses upper body muscles and indirectly strains your back.
Warning Sign: If cane use increases leg pain, consult a physical therapist immediately—your technique may need professional adjustment.
Spinal Stenosis Walking Pattern
For narrowing of the spinal canal, adopt a slightly forward-leaning posture supported by your cane. Adjust cane height slightly shorter than standard to facilitate this position. Take smaller steps with frequent rest periods, using the cane to bear more weight during painful episodes. This position often creates immediate relief by opening narrowed spaces in the spine.
Pro Tip: Walk in a swimming pool first to practice the forward-leaning position without fear of falling.
Overcome Psychological Barriers to Effective Cane Use
Addressing Age-Related Concerns
“I’m too young for a cane” is a common but dangerous mindset. Back pain affects all ages—athletes, office workers, and young parents suffer too. Reframe your cane as a performance tool, not an aging marker. Choose stylish options in colors or patterns that express your personality rather than medical appearance. Many modern canes resemble fashion accessories, with designer handles and custom finishes that eliminate stigma.
Reality Check: Using a cane temporarily prevents long-term disability that could end your active lifestyle completely.
Building Confidence in Public Settings
Start using your cane in controlled environments like your home or quiet neighborhood walks before venturing into crowded areas. Practice the proper walking pattern until it feels natural—typically 2-3 weeks of consistent use. Most people won’t notice your cane use, and those who do generally respect your proactive approach to health management.
Pro Tip: Carry a small cane when traveling—it folds easily in luggage and prevents back pain flare-ups during unexpected long walks.
Consistent, proper cane use transforms back pain management from reactive suffering to proactive control. Your cane becomes an extension of your healing process—reducing spinal load with each step while maintaining your independence. Remember that even on days when pain feels manageable, maintaining proper technique prevents the subtle compensatory movements that trigger new episodes. As your back strengthens, gradually reduce cane reliance for short distances while maintaining use for longer walks. Regularly reassess your technique and equipment needs—your body’s changing requirements deserve equally adaptive support. This disciplined approach ensures your cane remains a temporary aid rather than a permanent necessity, guiding you back to pain-free mobility.