

That stubborn ache flaring between your shoulder blades after hunching over a computer, or the deep throb in your lower back from lifting boxes—back pain affects 80% of adults and can hijack your life. While painkillers mask symptoms, a massage gun delivers targeted percussive therapy that tackles the root cause: knotted muscles and restricted blood flow. But press too hard on your spine or use the wrong attachment, and you’ll worsen inflammation instead of melting tension. This guide reveals exactly how to use a massage gun for back pain relief—based on clinical evidence and professional protocols—so you get results in minutes, not weeks.
Most users make critical errors like jamming the device against bones or maxing out speed settings, triggering bruising and nerve irritation. When applied correctly just 1-2 cm away from your spine with the right attachment, percussive therapy stimulates mechanoreceptors to block pain signals while boosting circulation. Follow these science-backed techniques, and you’ll unlock lasting relief from even chronic stiffness.
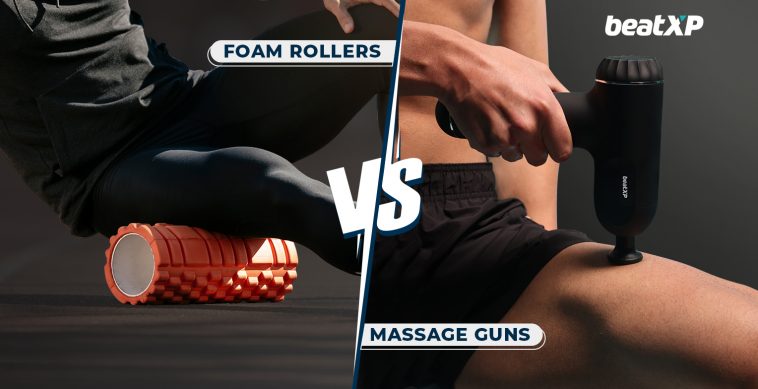
Why Massage Guns Relieve Back Pain Faster Than Foam Rollers
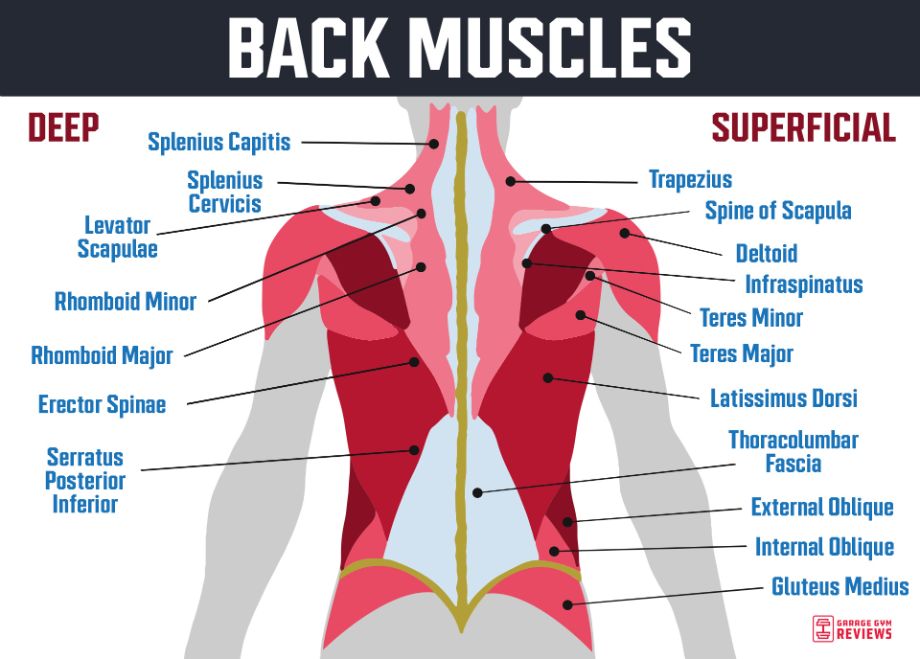
Percussive therapy works where foam rolling fails because it combines three key actions: rapid pulses (1,200-3,200 per minute), adjustable depth (10-16mm amplitude), and precise targeting. This trifecta interrupts pain signals to your brain while flooding tight muscles like your erector spinae and quadratus lumborum with oxygen-rich blood. Unlike broad-pressure tools, a massage gun’s focused percussion reduces muscle spindle activity—essentially “resetting” overactive fibers causing that locked-in sensation after sitting all day. Clinical studies confirm users experience 30-50% less pain within 10 minutes when applied correctly, especially for nonspecific low-back tightness from desk jobs or lifting.
How Percussion Therapy Targets Your Specific Pain
- For lower back stiffness: Rapid pulses break up trigger points in your glutes and QL muscle that refer pain to your lumbar spine
- For upper back knots: Gentle strokes along paraspinal muscles release tension pulling your shoulders forward
- For post-workout soreness: Increased lymphatic drainage flushes lactic acid within 2 hours of exercise
- For chronic tightness: Regular use improves fascial glide, letting vertebrae move freely without “catching”
Critical Safety Zones to Avoid on Your Back
Never Target These Areas—Even Briefly
Applying a massage gun directly to your spine or kidney region risks nerve damage and tissue bruising. The spinous processes (bony spine protrusions) lack protective muscle, so percussion transmits shock straight to delicate nerves. Similarly, the kidney zone (mid-back between T11-L2 vertebrae) contains fragile organs. Instead, glide the device 1-2 cm lateral to your spine—where thick paraspinal muscles absorb percussion safely. Avoid your tailbone entirely; treat surrounding glutes with circular motions to relieve referred pain. If you feel sharp tingling or see red pinpoint spots (petechiae), stop immediately—you’ve overdone pressure.
When Massage Guns Worsen Back Pain
Skip percussive therapy if you have:
– Recent injuries (less than 72 hours old with swelling or bruising)
– Radiating symptoms like leg numbness or bowel/bladder changes (seek ER care)
– Medical conditions including osteoporosis, blood thinners, or spinal hardware
– Acute inflammation shown by redness, warmth, or fever near the painful area
Selecting the Perfect Attachment for Your Back Pain
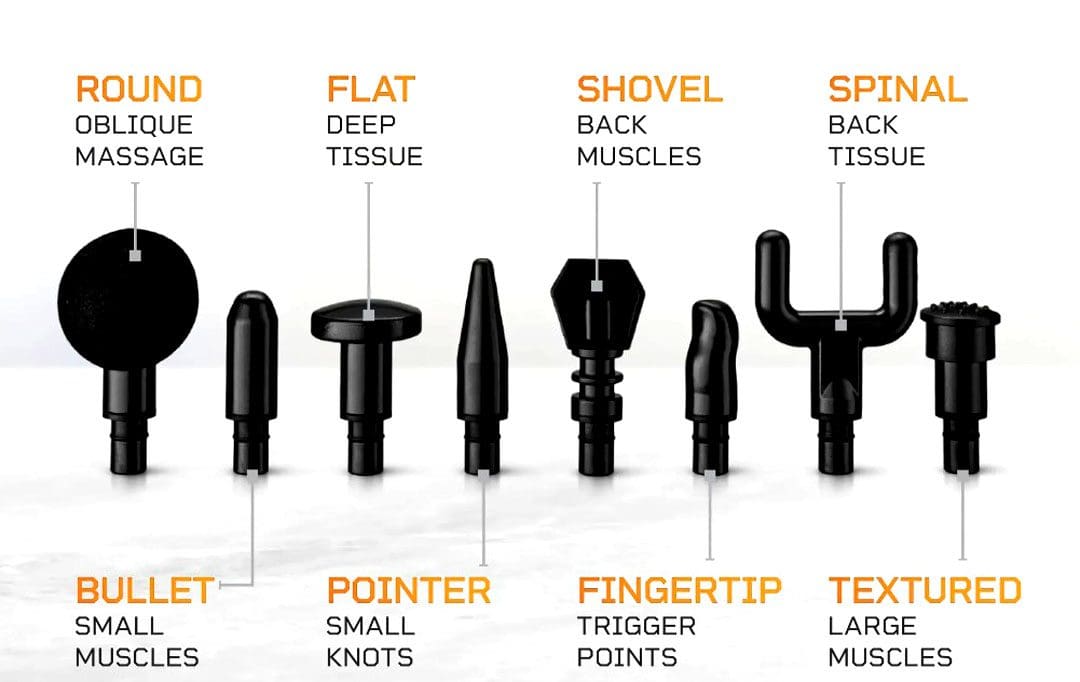
Match Attachments to Your Specific Pain Location
| Pain Location | Best Attachment | Why It Works |
|---|---|---|
| Lower back (QL muscle) | Bullet or Flat head | Penetrates deep between 12th rib and hip bone |
| Glutes referring pain | Large Ball | Softly melts tension without hitting sciatic nerve |
| Along spine (1-2cm lateral) | Fork/U-head | Straddles vertebrae to safely treat multifidi muscles |
| Upper traps from desk posture | Soft Foam Paddle | Gentle on delicate neck-shoulder junction |
Never use the bullet attachment on your mid-back—it’s too aggressive for thinner muscle layers near ribs. For first-time users or acute pain, the pneumatic (air-cushioned) head provides therapeutic pulses without discomfort.
Setting the Right Speed for Immediate Relief
Speed Levels Decoded for Back Pain
- Level 1-2 (1,200-1,800 ppm): Use for kidney-area treatment, elderly users, or first sessions—gentle enough to relax guarded muscles
- Level 3-4 (1,800-2,400 ppm): Ideal for chronic low-back tightness; creates enough vibration to break adhesions without triggering spasms
- Level 5+ (2,500+ ppm): Only for athletes on thick glutes—high speed on thin paraspinal muscles causes micro-tears
Start at Level 2. If you feel your muscles tensing against the pulses, drop to Level 1. True relief happens when tissues soften into the percussion—not when you’re bracing against it.
Self-Treating Lower Back Pain: 6-Step Protocol
Step 1: Glute Activation (60 Seconds/Side)
Place a pillow under your knees while lying on your back. Use the Large Ball attachment at Speed 2 on your glutes. Make slow circles from your hip bone toward your tailbone—never pressing directly on bone. You’ll feel fibers soften as blood flow increases. Stop if you sense sciatic nerve tingling.
Step 2: QL Muscle Release (45 Seconds/Side)
Switch to the Flat head. Locate your QL by placing fingers on the bottom rib and hip bone—this diagonal muscle causes side-bending pain. Glide vertically from rib 12 to the top of your pelvis at 1 cm/sec. Breathe deeply into your ribs; pain should drop 2-3 points within 30 seconds.
Step 3: Paraspinal Sweeps (60 Seconds/Side)
Attach the Fork head. Position it to straddle your spine, staying 1-2 cm lateral. Glide upward from your sacrum to mid-back at Level 3. Move slower than you think—true tissue release happens at turtle pace. Pause 2 seconds on any “ropey” knots detected during your body scan.
Partner Techniques for Upper and Mid-Back Relief
Prone Position for Deep Paraspinal Access
Lie face-down with forehead on stacked hands. Your partner uses the Fork attachment at Speed 1-2 to glide along muscles beside your spine. The prone position flattens your natural curve, letting the device reach deep multifidi muscles causing stubborn upper-back knots. They should move from neck to waist in 10-second passes, avoiding bony landmarks.
Seated Upper Trap Reset (Fix Desk Posture)
Sit upright with elbows on thighs, chin slightly tucked. Your partner applies the Soft Foam Paddle in small circles where your neck meets shoulders. Focus on the “knot zone” 2 inches from your spine—not directly on vertebrae. This releases tension pulling your head forward, often providing instant headache relief.
Boost Results: Combine Massage Gun with Stretching
Contract-Relax Method for QL Pain
While the gun pulses on your tight quadratus lumborum (Side-lying position), actively bend your torso away from the device for 5 seconds. Relax completely as the gun sinks deeper into new tissue length. Repeat 3x—this neurologically “resets” tightness better than static stretching alone.
Post-Gun Stretch Sequence
Treat each muscle group then immediately stretch:
– Glutes: Figure-4 stretch for 30 seconds
– QL: Doorframe side-bend (hold frame, lean opposite) for 20 seconds
– Paraspinals: Child’s pose with arms extended for 45 seconds
This locks in new range of motion created by percussion.
How Long to Use a Massage Gun on Your Back
Daily Timing That Prevents Overuse
- Chronic tightness: 10 minutes max daily (2 min per muscle group)
- Post-workout recovery: 5-6 minutes within 2 hours of exercise
- General maintenance: 8 minutes 2-3x/week
Never exceed 90 seconds on one area—longer sessions increase inflammation. Set phone timers for each zone. Track progress: pain should drop 1-3 points on a 10-point scale immediately after treatment. If pain worsens, reduce time by 30% next session.
Post-Session Steps to Lock in Pain Relief
Critical 30-Minute Recovery Window
Drink 250ml water within 5 minutes to flush metabolic waste released during treatment. Then take a 5-minute walk—light movement prevents stiffness as tissues reorganize. Check your skin for petechiae (red pinpricks); if present, use lower pressure next time. Log results: “After 8-min QL/glute treatment, my 7/10 pain dropped to 4/10 lasting 5 hours.” This reveals patterns your body follows.
3 Costly Massage Gun Mistakes That Worsen Back Pain
Pressing Harder = More Damage
Your massage gun weighs 2-3 pounds—that’s sufficient pressure. White-knuckling the handle forces it into bones, causing bruising. Let the device float over muscles; if it’s skipping, reduce speed—not increase pressure.
Static Holds on Trigger Points
Holding the gun stationary over a knot for >5 seconds irritates nerves. Instead, glide slowly or make tiny circles. If treating your QL, move continuously along the rib-to-hip path—never park on one spot.
High Speed on Acute Pain
Cranking to Level 5 on fresh strains triggers muscle guarding. Drop to Level 1-2 and use the pneumatic attachment. Deep tissue work requires relaxed fibers—aggressive pulses make tissues tighten defensively.
Choosing a Massage Gun Specifically for Back Pain
Must-Have Features for Effective Back Use
- Stall force ≥35 lbs: Prevents motor bogging on dense paraspinals (Ekrin B37 at 56 lbs excels)
- Extension handle: Essential for self-treating mid-back (RENPHO Reach’s detachable model under $130 works)
- Noise ≤65 dB: Louder models (>70 dB) increase stress, counteracting relaxation
- Fork attachment included: Non-negotiable for safe spine-adjacent treatment
Avoid compact “travel” models—they lack the amplitude (12-16mm) needed for deep back muscles. The Theragun Prime’s triangular handle reduces wrist strain during 10-minute sessions, worth the investment for chronic users.
If your pain persists beyond 7 days despite consistent use, consult a physical therapist—they’ll identify biomechanical issues like weak glutes or pelvic tilt that percussive therapy alone can’t fix. But for most tension-based back pain, this protocol delivers drug-free relief in minutes. Master these techniques: treat muscles (not bones), match attachments to pain zones, and always combine with movement. Within 2 weeks, you’ll transform that nagging ache into flexible, pain-free motion—no pills required.