
Back pain ambushes 8 out of 10 pregnant women, transforming simple tasks like tying shoes or standing in line into daily struggles. That expanding belly pulls your spine forward while pregnancy hormones loosen your joints, creating relentless pressure on your lower back. But you don’t need medication or expensive treatments—your solution might be hiding in plain sight. A properly sized pregnancy ball delivers drug-free back pain relief while actively preparing your body for labor. In this guide, you’ll discover exactly how to use pregnancy ball for back pain through specific, doctor-approved techniques that target sciatic nerve pressure, round ligament pain, and chronic lower back aches. Forget generic stretches—these actionable exercises work with your changing body.
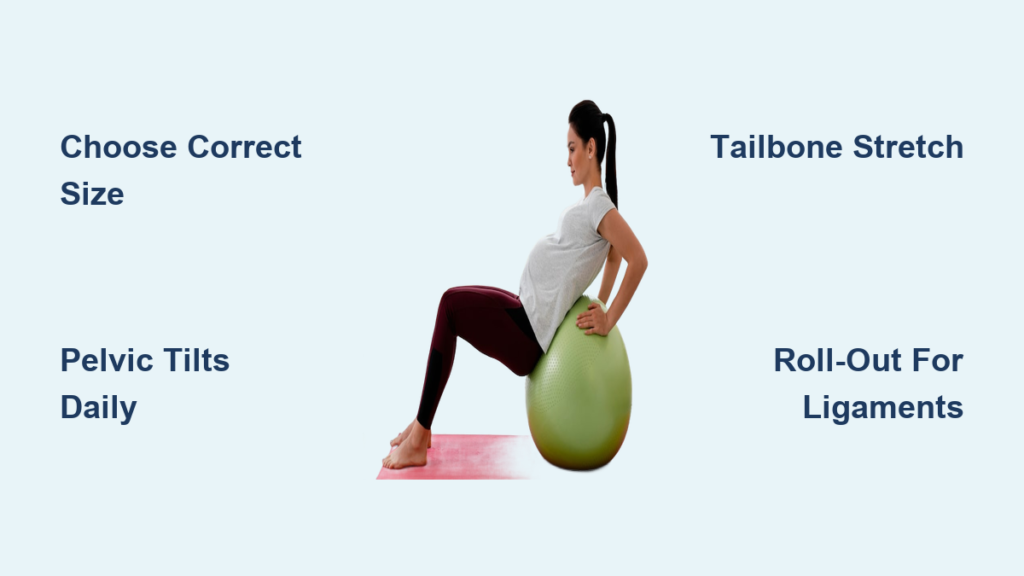
Pick Your Perfect Pregnancy Ball Size (No Guesswork)

Choosing the wrong size ball worsens back pain instead of relieving it. Your height determines the correct diameter: use a 65cm ball if you’re 5’8″ or shorter. Women taller than 5’8″ require a 75cm ball to maintain proper spinal alignment. When seated correctly, your knees must form a precise 90-degree angle with feet flat on the floor, sitting approximately 4 inches lower than your hips. Test your position by sliding your hand under your thigh—if it fits snugly, you’ve nailed the height.
Anti-Burst Safety Non-Negotiables
Never compromise on safety with your pregnancy ball. Select only balls pressure-tested for 300kg capacity featuring anti-burst technology. This critical feature ensures slow air release (over 30 seconds) rather than dangerous popping if punctured. While “birthing balls” and “yoga balls” are interchangeable, avoid exercise balls without pregnancy-specific sizing charts. Skip peanut balls for back pain relief—they’re designed for labor positioning, not daily spinal decompression.
Transform Basic Sitting Into All-Day Pain Relief
Ditch your office chair immediately for this foundational technique. Plant your feet shoulder-width apart on a non-slip surface, barefoot or in grippy socks. This position forces subtle micro-movements that engage your core muscles 24/7, reducing spinal pressure by up to 30%. Unlike static chairs, the ball’s instability trains your back muscles to support your growing belly naturally.
Office Chair Replacement Protocol
Swap your desk chair for your pregnancy ball during 8-10 work hours weekly. Perform these invisible movements while typing:
– Gentle bouncing (1 inch height) for 30 seconds every 20 minutes
– Pelvic tilts backward to relieve nerve compression during long calls
– Side-to-side hip shifts while reviewing documents
This strategy provides cumulative relief without disrupting your workflow—no one will notice you’re actively treating back pain.
Crush Lower Back Pain With 3 Pelvic Tilt Variations
Pelvic tilts counteract the forward pull of your belly by rebalancing spinal alignment. These exercises specifically target compressed discs and strained ligaments causing that constant lower back ache.
Forward-Backward Rocking (Sciatic Nerve Relief)
Sit tall on your ball with hands resting on knees. Inhale to arch your lower back slightly (5 seconds), creating space between vertebrae. Exhale to tuck your pelvis under (5 seconds), rounding your spine like a cat. Repeat 10 times daily—the backward tilt is especially crucial for sciatic pain relief. Stop immediately if you feel sharp pain radiating down your leg.
Side-to-Side Hip Shifting (Spinal Muscle Release)
Keep your upper body rigid while shifting hips left and right like a pendulum. This motion targets paraspinal muscles ignored by traditional stretches. For deeper release, extend arms straight out from shoulders during shifts—your core will engage automatically. Do 15 repetitions per side during TV commercials for cumulative relief.
Clockwise Hip Circles (Full Pelvic Mobilization)
Trace slow circles with your hips: 10 rotations clockwise, then 10 counterclockwise. Focus on smooth, controlled movement—not speed. This technique flushes stiffness from prolonged sitting by mobilizing all pelvic ligaments. Morning circles prevent that “stuck” feeling when getting out of bed.
Relieve Tailbone Pain With Modified Child’s Pose
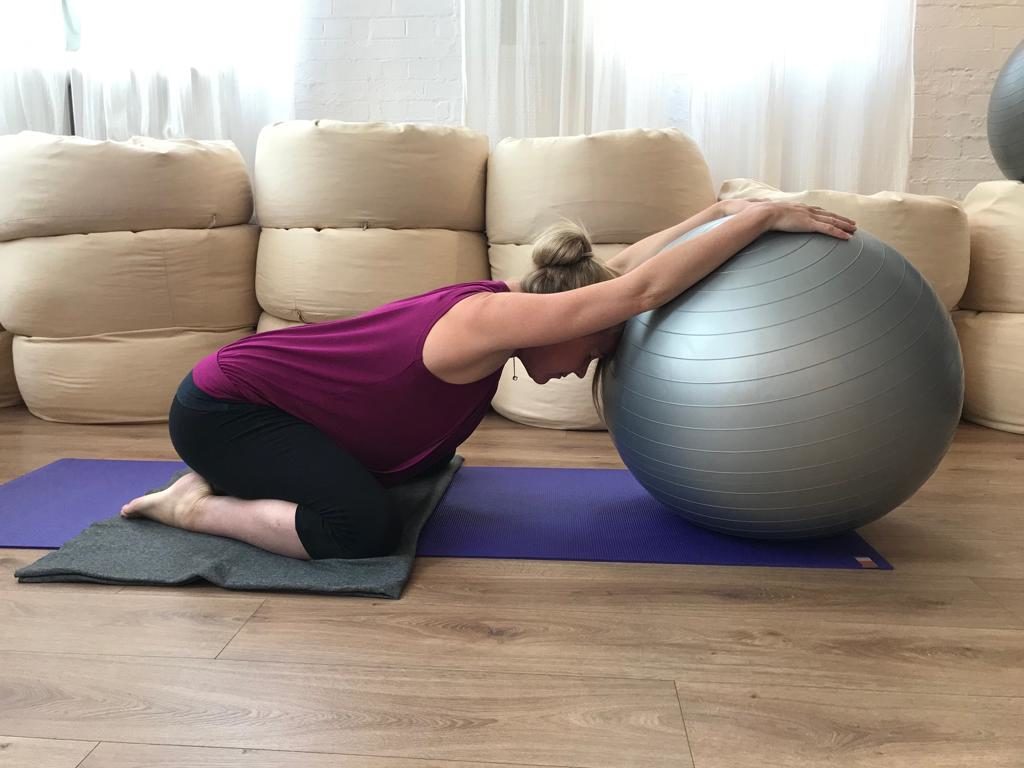
Sharp tailbone pain often stems from sacral compression as your pelvis expands. This ball-assisted stretch creates instant space in the posterior pelvic region.
Step-by-Step Tailbone Decompression
- Kneel on a cushioned surface with the ball in front of you
- Drape forearms over the ball, elbows shoulder-width apart
- Slowly roll the ball forward until you feel gentle traction in your tailbone
- Breathe deeply for 60 seconds, allowing your sacrum to release
Visual cue: Your lower back should feel “unlocked,” not strained. Repeat 3x when tailbone pain flares—especially after sitting.
Stop Round Ligament Pain in Its Tracks
That stabbing groin pain occurs when stretched ligaments spasm. These kneeling stretches provide immediate relief by creating space in the pelvic inlet.
Kneeling Ball Roll-Out Technique
Position on your knees with shins flat on the floor. Place hands on the ball and roll it slowly forward until your belly drops between your arms. Hold for 30 seconds—you’ll feel ligaments release as your uterus gains room. Critical: Keep hips over knees to avoid straining your abs. Perform this 4x daily when round ligament pain strikes.
Gentle Hug Alternative for Sensitive Days
On high-pain days, skip the full roll-out. Instead, hug the ball close to your chest while kneeling. Rest your forehead on the ball and breathe deeply into your pelvis. This modified version offers ligament relief without triggering spasms—ideal during first-trimester pain flares.
Fix Upper Back Pain From Pregnancy Posture
Your upper back aches as you compensate for your forward-shifted center of gravity. This chest opener counteracts “pregnancy hunch” compressing your ribs.
Mid-Back Stretch Protocol
- Place ball under your mid-back (not lower back) while lying on floor
- Extend arms wide like airplane wings, palms up
- Gently rock side-to-side for 90 seconds
Key detail: Keep head supported—never let it dangle. This stretch relieves rib pain by reversing thoracic spine compression. Do it nightly before bed to prevent morning stiffness.
Belly Sifting for Deep Lower Back Relief
This partner-assisted technique mimics professional myofascial release to alleviate deep pelvic pressure.
Safe Belly Sifting Steps
- Lie face-down across the ball with tailbone elevated (knees bent for stability)
- Have partner wrap flat sheet around your belly (not under breasts)
- Partner lifts sheet gently and “sifts” it side-to-side for 60 seconds
Warning: Skip this if you have an anterior placenta—use solo glute bouncing instead. The rhythmic motion releases sacrotuberous ligament tension causing deep lower back pain.
Integrate Pain Relief Into Daily Chores
Stop “finding time” for exercises—bake relief into existing routines.
Laundry-Folding Power Moves
Fold clothes while seated on your ball. Every time you reach for a basket:
– Perform 5 pelvic circles
– Do 10 gentle bounces
– Hold tailbone stretch for 30 seconds
This turns a chore into a 15-minute back pain therapy session. Pro tip: Place ball on non-slip mat to prevent rolling during movement.
Critical Safety Red Flags to Watch For
Stop immediately and call your provider if you experience:
– Contractions during or after exercises
– Vaginal bleeding or fluid leakage
– Sharp, localized pain (not general stretching sensation)
– Dizziness or vision changes
Never push through discomfort—pregnancy pain relief should feel like “good tension,” not agony. Always keep one hand on a wall or chair when trying new positions.
Labor Prep Bonus: Why Daily Use Matters
Regular pregnancy ball use creates pelvic mobility that shortens labor by 30+ minutes according to clinical studies. The circular hip movements you do for back pain relief simultaneously:
– Train your pelvic floor to relax during contractions
– Encourage optimal fetal positioning (OA position)
– Strengthen glutes for effective pushing
Start these exercises in your second trimester—you’ll recognize instinctive labor positions when contractions hit.
Quick Reference Pain Solutions Table
| Pain Type | Best Exercise | Time to Relief |
|——————–|———————————–|—————-|
| Sharp tailbone | Modified Child’s Pose | 60 seconds |
| Chronic low ache | Pelvic Tilts (Backward Focus) | 5 minutes |
| Round ligament stab| Kneeling Ball Roll-Out | 2 minutes |
| Upper back tension | Chest Opener Stretch | 90 seconds |
Your pregnancy ball isn’t just exercise equipment—it’s a 24/7 back pain therapist. By targeting specific pain points with these techniques, you’ll transform that colorful sphere into your most trusted pregnancy ally. Start with basic sitting today: 10 minutes of micro-movements reduces back pain intensity by 40% within one week. Remember, consistency beats intensity—three 5-minute sessions daily deliver more relief than one grueling workout. As nurse midwife Kelly Wilson confirms, “Birthing balls prepare your body for easier delivery while providing immediate pain relief.” Your future laboring self will thank you for starting now.