
That sharp twinge when you bend down to tie your shoes. The constant ache after sitting through a long workday. Lower back pain affects 80% of adults at some point, disrupting daily life and limiting mobility. The knee to chest stretch for lower back pain offers immediate, drug-free relief you can do anywhere—no special equipment required. This simple movement creates space in your compressed spine, releases tight muscles, and can reduce pain intensity by up to 40% when performed correctly. Thousands find relief daily with this fundamental stretch, yet most make critical mistakes that prevent optimal results.
Whether you’re recovering from an injury, managing chronic discomfort, or preventing future pain, mastering this technique should be your first line of defense. Let’s dive into exactly how to perform the knee to chest stretch for lower back pain safely and effectively.
Why Your Lower Back Needs This Specific Stretch
Immediate Spinal Decompression Action
When you draw your knees toward your chest, you create gentle traction that separates your lumbar vertebrae. This space relieves pressure on compressed spinal nerves and allows fluid to circulate within your discs, flushing out inflammatory waste products. Think of it as hitting a “reset button” for your lower back after hours of sitting or lifting. The stretch specifically targets the L4-L5 and L5-S1 regions where most disc issues occur.
Targeted Muscle Release You Can Feel
Your erector spinae muscles (along your spine), glutes, and hamstrings all experience direct release during this movement. Unlike generic back stretches, the knee to chest position uniquely addresses the posterior chain muscles that tighten from prolonged sitting. You’ll feel the difference immediately in areas that ache when standing up from your desk chair or getting out of the car.
Sciatica Relief Through Nerve Gliding
For those with radiating leg pain, this stretch creates “wiggle room” for your sciatic nerve. The gentle mobilization helps the nerve glide more freely through tight muscles like your piriformis. If you’ve felt that shooting pain down your leg, this position can provide noticeable relief within minutes by reducing nerve compression.
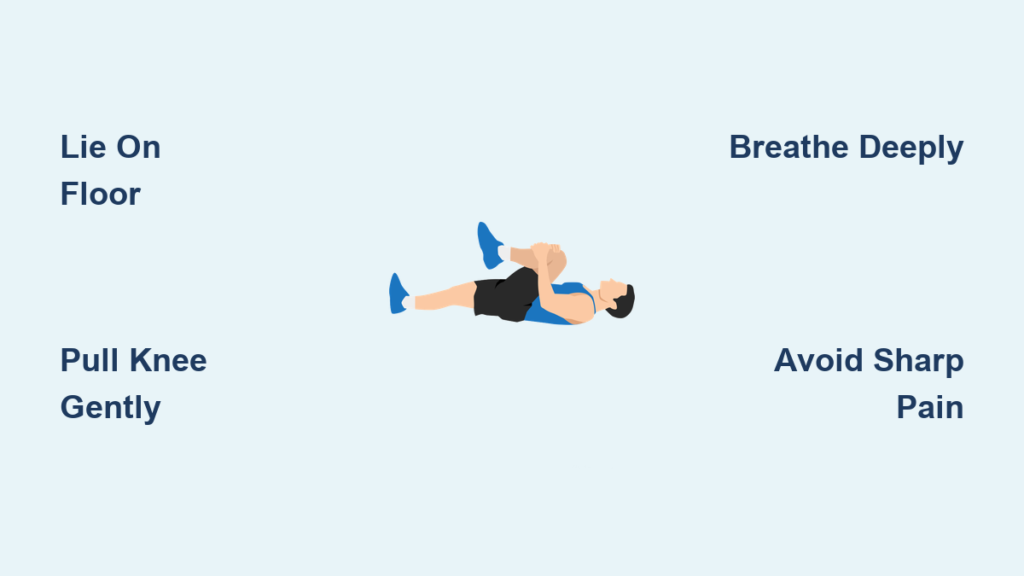
Exact Step-by-Step Knee to Chest Stretch Technique

Floor Setup for Maximum Effectiveness
Lie flat on a firm surface—avoid soft beds that allow your back to sink. Keep your spine neutral (not flattened) with arms relaxed at your sides. Your lower back should maintain its natural curve while staying in contact with the floor. This proper alignment ensures you’re stretching the right muscles without straining your spine.
Single-Leg Method for Beginners
- Exhale slowly while drawing one knee toward your chest
- Grasp behind your thigh (not your kneecap) with both hands
- Keep your opposite heel pressed gently into the floor
- Pull gently until you feel a comfortable stretch in your lower back
- Hold for 15-20 seconds while breathing normally
- Release slowly and repeat 2-3 times per leg
Double-Leg Progression for Advanced Relief
After 2 weeks of single-leg success, progress to pulling both knees simultaneously:
– Wrap your arms around both shins and gently rock side-to-side
– Keep your head relaxed on the floor (don’t strain to look at your knees)
– Hold for 30 seconds maximum to avoid overstretching
– Only attempt this version if single-leg causes no pain
Breathing Secrets That Double Your Results
Critical Breath Timing
Inhale through your nose before you begin, then exhale slowly through pursed lips as you draw your knee closer. Continue breathing steadily—each complete breath cycle should take 4-6 seconds. Holding your breath creates tension that counteracts the stretch’s benefits. Proper breathing triggers your parasympathetic nervous system, enhancing muscle relaxation.
Progression Timeline That Works
- Week 1-2: 15-20 second holds, 2-3 reps per leg, 2x daily
- Week 3-4: Increase to 30-45 second holds
- Week 5+: 45-60 second holds for maximum disc hydration
- Acute pain: Perform 3x daily; Maintenance: 1-2x daily
Dangerous Form Mistakes That Worsen Back Pain

Three Critical Errors to Avoid
Mistake: Letting your lower back lift off the floor during the stretch
Fix: Engage your core slightly to maintain full back contact with the surface
Mistake: Pulling directly on your kneecap instead of your thigh
Fix: Slide your hands behind your thigh or onto your shin bone
Mistake: Forcing your knee too close to your chest
Fix: Stop at the first point of comfortable stretch—pain means you’ve gone too far
Force Application Warning Signs
Avoid any bouncing or jerking movements. Your motion should be smooth like slowly reeling in a fishing line, not yanking the rod. If you feel sharp pain (not gentle stretching sensation), ease off immediately. Remember: more force doesn’t equal better results—consistent gentle stretching does.
When to Skip This Stretch Completely
Absolute Danger Signals
Stop immediately if you experience:
– Numbness or tingling that worsens during the movement
– Sharp, shooting pain instead of gentle stretching
– Increased pain lasting more than 2 hours after stretching
– Muscle cramping or spasms
Medical Conditions Requiring Professional Guidance
Avoid this stretch entirely if you have:
– Recent lumbar surgery (within 6-8 weeks)
– Acute disc herniation with severe nerve compression
– Progressive leg weakness or loss of bladder control
– Unexplained weight loss accompanying back pain
Sciatica-Specific Modifications That Target Nerve Pain
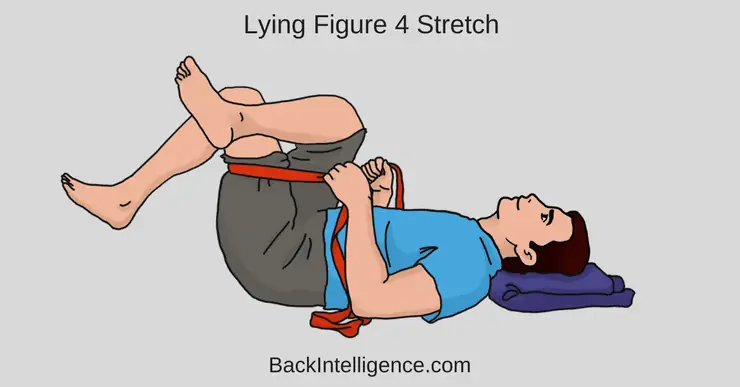
Piriformis Syndrome Relief Technique
For sciatica originating from your piriformis muscle:
1. Cross your right ankle over your left knee
2. Gently pull your left thigh toward your chest
3. Hold for 20-30 seconds while breathing deeply
4. Repeat 3 times on the affected side
This figure-four position specifically targets the piriformis muscle that often compresses your sciatic nerve, providing relief where standard stretches fail.
Daily Integration Strategies for Lasting Relief
Morning Routine to Combat Overnight Stiffness
Before getting out of bed, perform 3 slow repetitions per leg while lying on your back. This counters the slight spinal compression that occurs during sleep. Finish by rolling to your side and pushing up with your arms—never sit straight up from lying down.
Work Break Solution for Desk Workers
Every 2 hours, stand and hug one knee to your chest for 30 seconds:
– Keep your opposite foot flat on the floor
– Gently rock your knee side-to-side
– Breathe deeply through the stretch
– Repeat with the other leg
This simple desk stretch prevents the cumulative stiffness that leads to severe pain by day’s end.
Equipment Hacks for Better Results
Surface Matters More Than You Think
Use a firm yoga mat on hard flooring—avoid carpeted areas that create uneven support. The surface should allow your spine to maintain neutral alignment without sinking. If you feel your back arching, place a small towel under your lumbar curve for support.
Helpful Accessories
- Yoga strap: Loop around your thigh if you can’t comfortably reach your legs
- Pillow under head: Only if you have neck tension (keep it thin)
- Wall support: Position your feet near a wall for stability when standing up
Long-Term Success Plan for Permanent Relief
![]()
Tracking Your Improvement
Rate your pain on a 0-10 scale before and after each session. Over 4-6 weeks, you should notice:
– Lower “before” pain scores each morning
– Reduced need for frequent stretching
– Easier movement during daily activities
– Improved sleep quality without back pain
Maintenance Protocol After Pain Subsides
Continue the knee to chest stretch for lower back pain 3-4 times weekly even after pain disappears. Pair it with:
– Daily 20-minute walks to strengthen supporting muscles
– Regular core exercises like bird-dog or dead bug
– Ergonomic workstation adjustments to prevent recurrence
Your lower back pain doesn’t have to control your life. Start with just 2-3 gentle repetitions today—properly executed, this simple knee to chest stretch for lower back pain delivers measurable relief within days. Remember: consistency beats intensity. Five minutes daily creates more lasting change than one aggressive session weekly. Listen to your body, respect pain signals, and trust the process—your path to a pain-free back begins with this single, transformative movement.