
Lower back pain strikes 80% of adults at some point, transforming simple tasks like tying shoes into daily battles. Whether you’re nursing a recent twinge or managing chronic discomfort, the right lower back pain workout routine can transform your pain into progress. This guide delivers evidence-based exercises that strengthen your core, improve flexibility, and prevent future flare-ups—all without expensive equipment. Most adults experience low back pain within any three-month period, and it remains the world’s leading cause of disability. But here’s the crucial insight: movement is medicine. Your spine thrives on controlled motion, and this targeted workout rebuilds the strength and flexibility your back desperately needs.
Why Most Back Workouts Fail
Exercising Through Dangerous Pain Signals
Sharp, shooting pain during movement means stop immediately—it’s your body protecting injured tissue. The resource document confirms mild muscle soreness after exercises is normal and indicates progress. Learn to distinguish between productive discomfort (a dull ache in working muscles) and harmful pain (sharp, localized, or radiating sensations). Continuing through sharp pain worsens inflammation and delays healing. Your lower back pain workout must respect these critical warning signs to avoid setbacks.
Breaking the Sedentary Vicious Cycle
Prolonged sitting weakens core muscles, creating perfect conditions for back pain. Your spine relies on strong abdominal and glute muscles for support, but desk jobs turn these muscles into couch potatoes. The resource data shows deconditioning and poor body mechanics as primary contributors to low back pain. This workout specifically targets these weaknesses by rebuilding the muscular corset around your spine. Without addressing this core weakness, any lower back pain workout becomes temporary relief rather than lasting solution.
Warning Signs: When to Skip Workouts Immediately
Stop all exercise and consult a doctor if you experience pain radiating down one or both legs, numbness or tingling in legs, changes in bladder or bowel control, pain lasting longer than one week, or inability to perform daily activities. These indicate potential nerve compression or serious conditions requiring medical intervention before starting any lower back pain workout. Never push through these red flags—your safety depends on recognizing when movement becomes dangerous.
Essential Equipment for Home Relief

Basic Setup Under $50
You need minimal gear for effective back pain relief: a yoga mat or carpeted surface, firm chair without arms, light weights (water bottles work perfectly), resistance bands, and wall space for balance support. The resource emphasizes using everyday items—canned goods substitute for weights, while doorways enable hamstring stretches. This accessibility ensures your lower back pain workout stays consistent without gym commitments.
Daily Warm-up Routine (5 Minutes)
Chair-Based Rotation for Spinal Mobility
Sit tall in your firm chair. Place your right hand on your left knee and gently twist right, looking over your shoulder. Hold 5 seconds while breathing deeply. Repeat left side. Complete 5 rotations each direction. This seated trunk rotation lubricates spinal joints and prepares your discs for movement—critical for preventing strain during your lower back pain workout.
Standing Side Bends for Muscle Engagement
Stand with feet shoulder-width apart. Reach your right arm overhead, bending left while keeping hips stable. Hold 10 seconds, feeling the stretch along your right side. Switch sides. Complete 3 rounds each direction. This activates your obliques and quadratus lumborum muscles that stabilize your lower back during functional movements.
Core Strengthening Sequence
Beginner Bridge Progression for Spinal Support
Lie supine with knees bent, feet flat on floor. Tighten your abs as if “crushing a can” in your belly—this is abdominal bracing from the resource. Lift hips until your body forms a straight line from shoulders to knees. Hold 5 seconds, lower slowly. Repeat 10 times. This supine bridge rebuilds foundational strength in your glutes and hamstrings that take pressure off your lumbar spine.
Pro tip: Place hands on hips to ensure level alignment—prevents compensatory twisting that strains discs.
Bird Dog for Dynamic Stability
Position yourself on hands and knees. Extend your right arm forward and left leg back simultaneously. Hold 5 seconds while keeping your back flat like a tabletop. Return to start and repeat opposite side. Perform 10 repetitions each side. This bird dog exercise develops anti-rotation strength—exactly what prevents everyday movements from triggering back pain.
Flexibility Exercises for Immediate Relief

Double Knee-to-Chest Stretch for Disc Decompression
Lie on your back. Hug both knees to your chest, keeping your head on the floor. Hold 20-30 seconds while relaxing your lower back into the mat. Focus on deep belly breathing to enhance the stretch. Repeat 3 times. This double knee-to-chest movement gently separates vertebrae, reducing pressure on irritated nerves—a key component in any effective lower back pain workout.
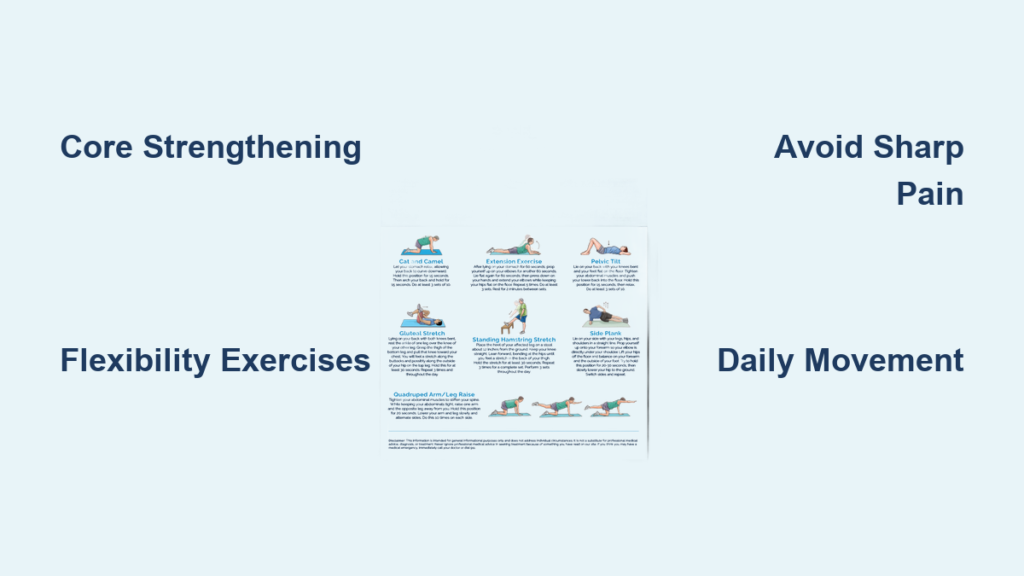
Cat-Camel Mobility for Fluid Spinal Movement
Start on all fours. Arch your back up like an angry cat (cat position), then let it sag down while lifting your head (camel position). Move slowly through 10 complete cycles. This cat-cow sequence hydrates spinal discs and improves segmental motion—addressing the stiffness that often worsens back pain during transitions like standing up.
Progressive Exercise Plans
Week 1-2: Foundation Building (15 Minutes)
- Cat-camel: 10 repetitions
- Double knee-to-chest: 3×30 seconds
- Basic bridge: 10 repetitions
- Seated trunk rotations: 10 each direction
Perform every other day. The resource stresses starting gently—begin with 10 repetitions per exercise and gradually increase as tolerance improves. This phased approach prevents overexertion while rebuilding critical stability.
Month 2+: Advanced Integration for Resilience
Incorporate functional movements:
– Romanian deadlift: 3×8-12 with light weights
– Plank with arm lifts: 3×10 each arm
– Superman: 3×15
– Kettlebell swings: 30-second intervals
These advanced exercises develop dynamic strength for real-world activities. The resource confirms progressive overload—adding one new exercise every 2-3 weeks—builds resilient strength without re-injury risk.
Disc-Specific Modifications

Herniated Disc Protocol
Avoid: Forward bends, toe touching
Focus: Extension-based movements
Key exercises: Press-up on elbows (progressing to standing lumbar extensions) and gentle walking throughout the day. Skip floor exercises if dizziness occurs. This modification prevents aggravating disc protrusions while promoting healing through controlled extension.
Spinal Stenosis Approach
Avoid: Backward bending/extension
Emphasize: Flexion-based stretches
Key exercises: Knee-to-chest variations and seated forward bends. Use pillows for support during sitting. This tailored approach reduces nerve compression in narrowed spinal canals—proving why personalized adjustments matter in your lower back pain workout.
Daily Movement Habits
Walking: Your Secret Pain Reliever
Research shows walking improves back pain better than most interventions. Start with 10-minute walks twice daily. Focus on tall posture and engage your core as you walk. The resource identifies walking as “most therapeutic activity for back pain”—boosting circulation to spinal tissues while maintaining joint mobility.
Sleep Position Optimization
Sleep on your side in fetal position with a pillow between your knees. This maintains spinal alignment and reduces morning stiffness by preventing pelvic rotation. Avoid stomach sleeping, which forces unnatural spinal twisting. Quality sleep positions complement your lower back pain workout by allowing tissue recovery.
Common Mistakes to Avoid
Overdoing Exercise Volume
More isn’t better. Follow the 10-repetition rule initially. Progress by adding one stretch and one strengthening exercise at a time. The resource warns that overexertion triggers inflammation—exactly why gradual progression prevents 90% of workout-related setbacks. Track pain levels 1-10 before/after sessions to guide safe advancement.
Ignoring Core Engagement During Lifts
Every movement requires abdominal bracing. Pull your belly button toward your spine before lifting objects or performing exercises. This “crush the can” technique protects your spine during daily activities. Without this, even simple tasks like picking up groceries can undo your lower back pain workout progress.
Professional Support Timeline
Week 3-4 Physical Therapy Consultation
Seek professional guidance if progress plateaus, pain patterns change, or form questions arise. The resource confirms tailored instruction yields greater, longer-lasting benefits than generalized programs. One-on-one assessment identifies hidden movement flaws that could sabotage your lower back pain workout.
Long-term Success Strategies
Consistency as Prevention
Treat these exercises as daily hygiene—not temporary treatment. The resource states consistency prevents recurrence better than any single intervention. Your future self will thank you for 15 minutes of daily maintenance. Pair this with walking breaks every 30 minutes and proper lifting technique (bending knees, not back) for comprehensive protection.
Your Next Steps
Start with the Week 1-2 foundation routine today. Film yourself performing bridges and bird dogs to check form—many miss the critical “flat back” position in bird dogs. Track your pain levels 1-10 before and after workouts; this data guides safe progression. Most report improvement within 2-3 weeks of consistent practice, proving your spine responds faster than you think. Remember: Your lower back pain workout isn’t about quick fixes—it’s about building a resilient foundation so back pain never controls your life again. Stand up right now and perform one set of cat-camel stretches. That’s how recovery begins.