
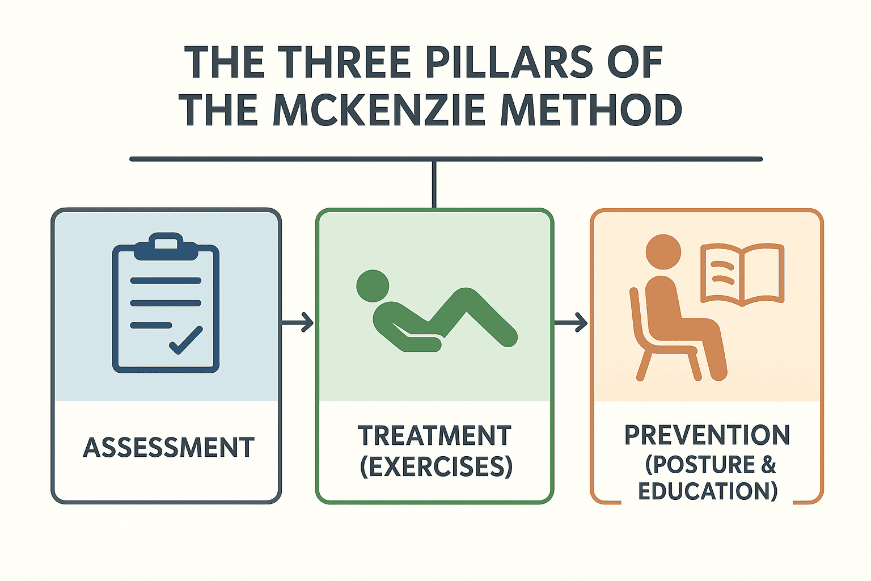
That sharp twinge when bending for your coffee mug. The persistent ache after sitting through a Zoom meeting. Lower back pain affects 80% of adults at some point, but popping pills only masks the problem. The McKenzie Method—developed by physiotherapist Robin McKenzie—gives you a self-treatment system to pinpoint exactly which movements reduce your specific pain. Unlike generic stretches, these directional exercises actively reposition displaced disc material, often providing relief within 72 hours. You’ll learn to read your body’s signals, centralize radiating leg pain, and prevent future flare-ups with just 10 minutes of daily practice.
This evidence-based protocol works because 58-91% of back pain stems from “derangement syndrome”—where disc material shifts and irritates nerves. By identifying your directional preference (extension, flexion, or side glide), you trigger the spine’s natural healing mechanism. Best of all? No special equipment needed. Follow this guide to escape the pain cycle and reclaim movement confidence.
How to Identify Your Directional Preference Immediately
Centralization vs Peripheralization Signals
Your pain’s movement pattern reveals whether an exercise helps or harms. Centralization—when leg or buttock pain migrates toward your lower back during extension exercises—is your green light to continue. This indicates disc material is shifting away from nerves. Peripheralization, where pain travels down your leg during movement, means stop immediately. Track these critical signs:
- ✅ Pain moving up toward spine = keep going
- ❌ New numbness/tingling in legs = stop and consult professional
- ⚠️ Pain unchanged after 10 reps = try alternative direction
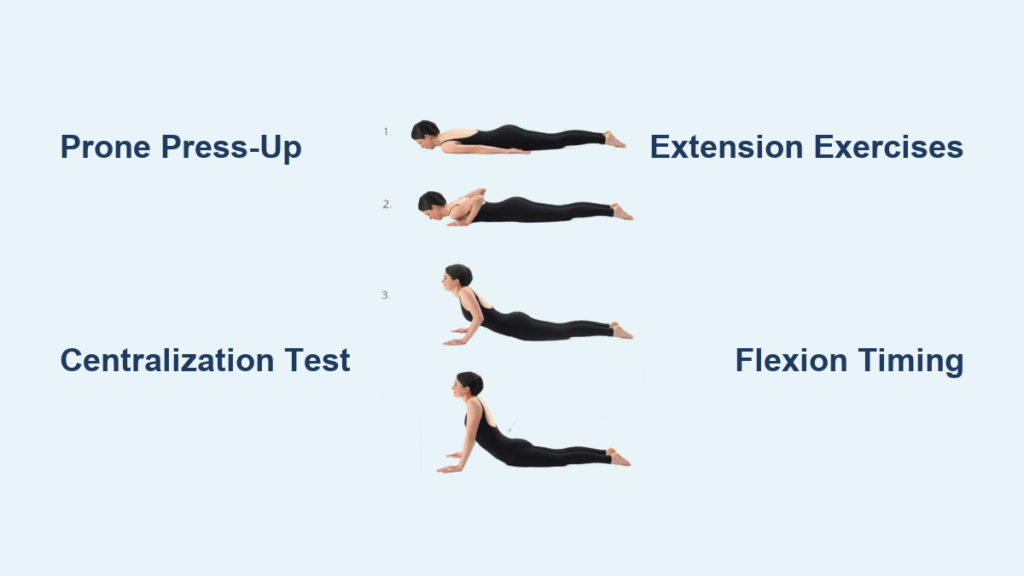
Perform the prone press-up test: Lie face-down, place hands under shoulders, and slowly lift your upper body while keeping hips grounded. If sciatica eases within 30 seconds, extension is your therapeutic direction. If pain shoots down your leg, skip to flexion testing.
Matching Your Pain to the Four Clinical Syndromes
Your specific pain pattern dictates the exact exercise sequence:
Postural Syndrome vanishes instantly when you correct slouching at your desk. No tissue damage exists—just sustained poor alignment. Fix it by setting phone alarms to reset your lumbar curve hourly.
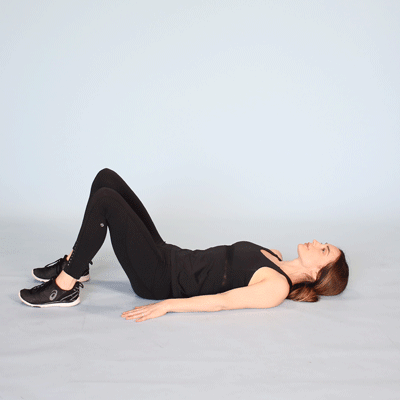
Dysfunction Syndrome causes end-range stiffness (like pain when standing fully upright). You’ll need progressive stretching in your restricted direction—often flexion—to remodel shortened tissues. Test by lying on your back and pulling knees to chest.
Derangement Syndrome (the most common type) creates mechanical obstruction from displaced disc material. Radiating leg pain that centralizes with extension confirms this. Immediate action: Start prone press-ups every 2 hours.
Non-Mechanical Red Flags include bowel/bladder changes or unremitting night pain. Stop all exercises and see a doctor if you experience these.
Phase 1: Extension Exercises for Acute Pain Relief
Prone Lying for Immediate Disc Decompression
Lie face-down on a firm surface with arms at your sides. Breathe deeply for 2-3 minutes as gravity gently unloads compressed discs. This allows the disc nucleus to shift forward, reducing nerve pressure.
Critical modification: Place a pillow under your abdomen if initial discomfort occurs. Repeat up to 8 times daily—especially before bed and upon waking. Most patients feel reduced leg pain within 48 hours. Never skip this foundational step when pain radiates below the knee.
Prone Press-Up Technique for Disc Repositioning
From prone lying, position hands under your shoulders. Slowly straighten elbows to lift your upper body while keeping hips glued to the floor. Lock out your elbows at the top, hold for 1-2 seconds, then lower with control.
Perfect form checklist:
– Keep gaze downward (no neck strain)
– Lift only until pain decreases (not maximum height)
– Perform 10 reps every 2 waking hours
– Stop if leg pain increases
Pro tip: Slide hips 2 inches toward your non-painful side if standard press-ups worsen symptoms. Track success by noting when sciatica moves from your calf toward your lower back.
Standing Extension for Workplace Pain Relief
When lying down isn’t practical (like during work hours), stand with feet shoulder-width apart. Place hands on your lower back and gently arch backward, pushing hips forward while keeping knees straight.
Daily integration:
– 10 reps every 30 minutes of sitting
– Perform against a wall for balance
– Combine with lumbar rolls in chairs
This mimics the prone press-up’s disc-repositioning effect. Office workers report 60% faster pain reduction when adding standing extensions to seated work.
Phase 2: Flexion Integration Protocol
Flexion in Lying: When to Start and Critical Rules
Only begin after 1-2 weeks of successful extension. Lie on your back with knees bent, feet flat. Pull both knees toward your chest using hands behind thighs—never lifting your head.
Non-negotiable rules:
– ⚠️ Stop immediately if leg pain increases
– Hold only 1-2 seconds (no prolonged stretching)
– Complete 10 reps, 6-8 times daily
– Requires prior success with prone press-ups
This restores posterior tissue flexibility but can aggravate disc issues if introduced too early. If pain radiates during this exercise, return to extension-only for another week.
Standing Flexion for Long-Term Mobility Maintenance
Once pain-free for 2 weeks, progress to standing toe touches. Stand with feet shoulder-width apart, knees straight. Slowly bend forward at the hips (not waist), reaching hands toward the floor.
Prerequisites:
– ✅ Tolerated seated flexion for 2 weeks
– ✅ No leg pain during lying flexion
Maintenance dose: 1-2 sets weekly after pain resolves. Use a chair for balance support if dizzy. This preserves full spinal range of motion to prevent stiffness.
Advanced Techniques for Stubborn Pain
Side Glide Correction for Lateral Shifts
When your spine shifts sideways (common after heavy lifting), stand perpendicular to a wall with feet together. Place shoulder against wall, hand on opposite hip. Push pelvis toward wall, creating a lateral glide.
Protocol:
– 10 glides per session
– Immediately follow with 10 prone press-ups
– Monitor for pain centralization
This corrects pelvic misalignment that often perpetuates disc displacement. Stop if pain travels down the leg.
Between-Session Recovery Protocol
After any flexion exercise, immediately perform 10 prone press-ups. Then lie on your back with a lumbar roll (towel roll) under your lower back for 2-3 minutes. This maintains your restored spinal curve and prevents rebound stiffness.
Morning routine: Start with 10 prone press-ups before getting out of bed. Night pain sufferers report 70% faster relief using this sequence.
Red Flag Warning Signs That Require Medical Attention
Stop all exercises immediately and consult a physician if you experience:
– New bowel or bladder dysfunction (incontinence or retention)
– Progressive leg weakness (trouble lifting foot)
– Severe night pain unaffected by position changes
– Fever with back pain
– Pain that consistently worsens after 48 hours of correct exercise
These indicate non-mechanical issues like cauda equina syndrome or infection requiring urgent care. Never push through these symptoms.
Daily Maintenance Program for Permanent Relief
Once pain resolves, prevent recurrence with this minimal routine:
– Morning: 10 prone press-ups before rising
– Work breaks: Standing extension every 30 minutes of sitting
– Lifting: Hip hinge mechanics (bend knees, keep back straight)
– Evening: Weekly standing flexion to maintain mobility
Posture integration: Use lumbar rolls in chairs, sleep with pillow between knees (side sleepers), and avoid prolonged sitting. Patients who follow this daily protocol report 89% fewer recurrences over 2 years.
Research confirms up to 80% of appropriate candidates achieve significant improvement within weeks—especially those whose pain centralizes with extension. The key is consistent high-frequency movement: those doing exercises every 2 hours see results 3x faster than sporadic performers. Remember, you’re not just treating today’s pain—you’re building lifelong skills to keep your spine resilient. When symptoms return (as 40% of sufferers experience), immediately restart prone press-ups every 2 hours. Most flare-ups resolve within 72 hours with this disciplined approach.