

Lower back spasms can strike without warning, leaving you immobilized and searching desperately for relief. When your muscles lock up from lifting something heavy or wake you up at 3 AM with sharp, shooting pain, a TENS unit could be your fast-acting solution—if you know precisely where to place the electrodes. This guide delivers the exact placement patterns, settings, and safety protocols that transform your TENS unit from confusing gadget to targeted pain relief tool. You’ll learn how to position electrodes for immediate spasm relief without medication, backed by clinical guidelines and proven techniques.
Why Your TENS Unit Fails to Stop Lower Back Spasms
Most people waste their TENS unit’s potential by placing electrodes incorrectly. The electrical impulses must target specific nerve pathways to interrupt pain signals effectively. When pads sit directly on your spine or too far from the pain zone, the current bypasses the affected nerves entirely. Proper placement creates a circuit that blocks pain transmission to your brain while encouraging natural endorphin release. For lower back spasms specifically, electrodes must flank the painful area—not sit directly on bone—to deliver impulses deep into the muscle tissue where spasms originate.
Exact Two-Pad Placement for One-Sided Lower Back Spasms
Single-Side Pain Targeting Technique
When spasms hit only your right or left lower back, precision matters more than ever. Place your first electrode directly at the highest point of pain, then position the second electrode vertically below it—exactly 1 inch apart. This vertical alignment creates a current flow that penetrates deep into the affected muscle fibers without crossing bony areas that block electrical conduction.
Critical placement rules:
– Never place pads directly on vertebrae (always target soft tissue)
– Maintain minimum 1-inch spacing between electrodes
– Position pads parallel to your spine, not perpendicular
– Avoid areas with visible bruising or recent injury
Visual Placement Guide
Imagine drawing a line from your lowest rib to your hip bone—this marks your ideal placement zone. Stay within 2-3 inches of this line for maximum effectiveness. If you’re unsure, gently press the painful area; where your finger causes the most intense sensation is where your top electrode should sit.
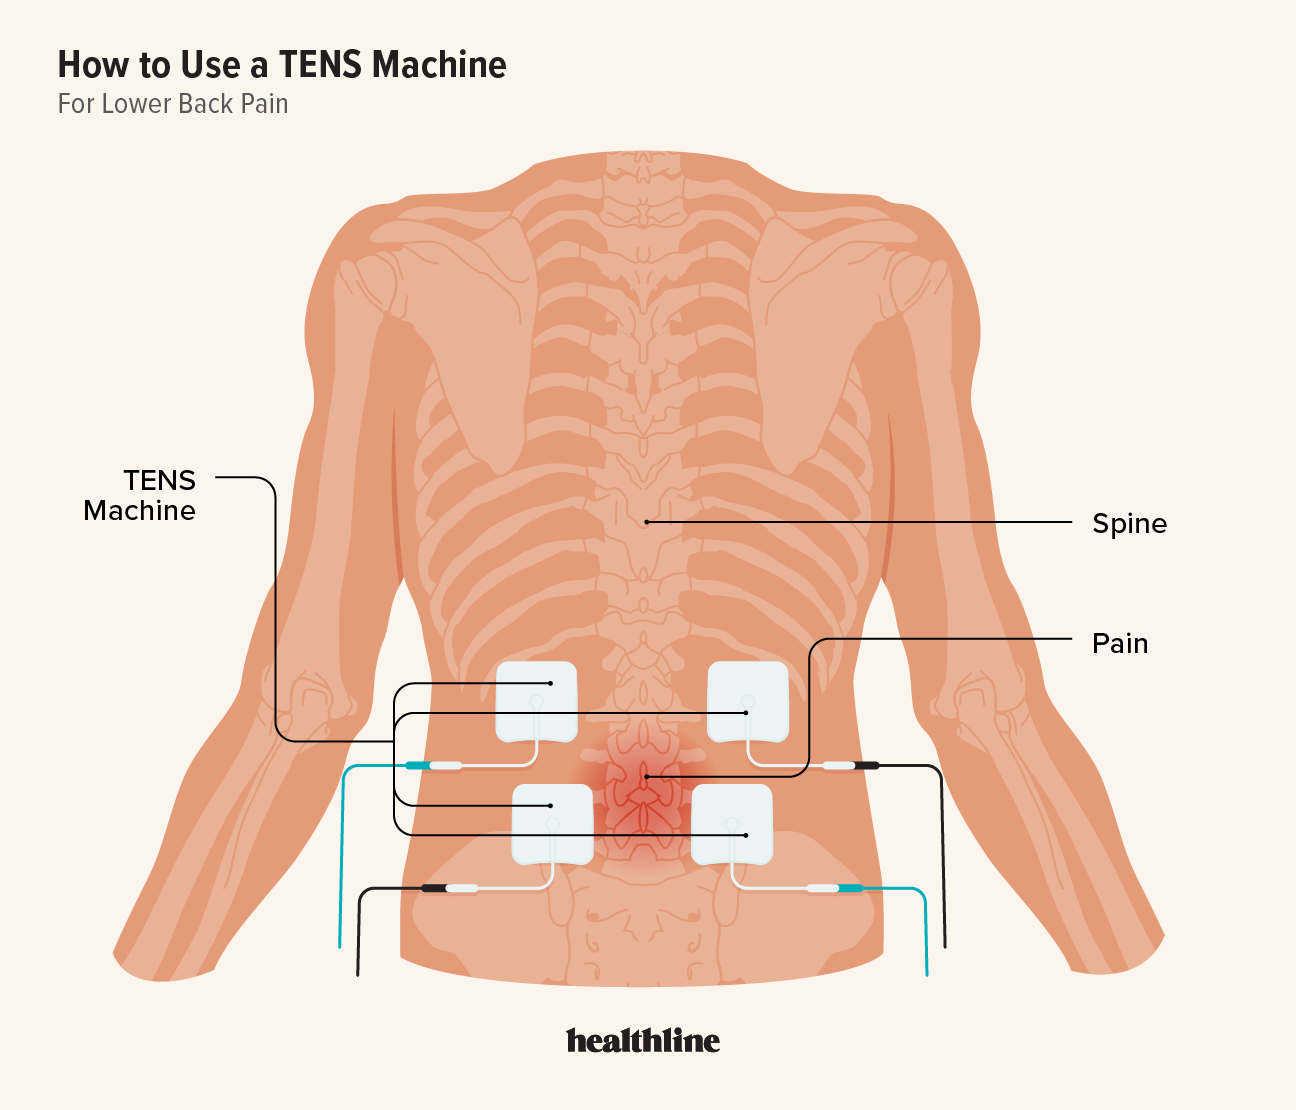
Four-Pad Square Pattern for Whole Lower Back Spasms
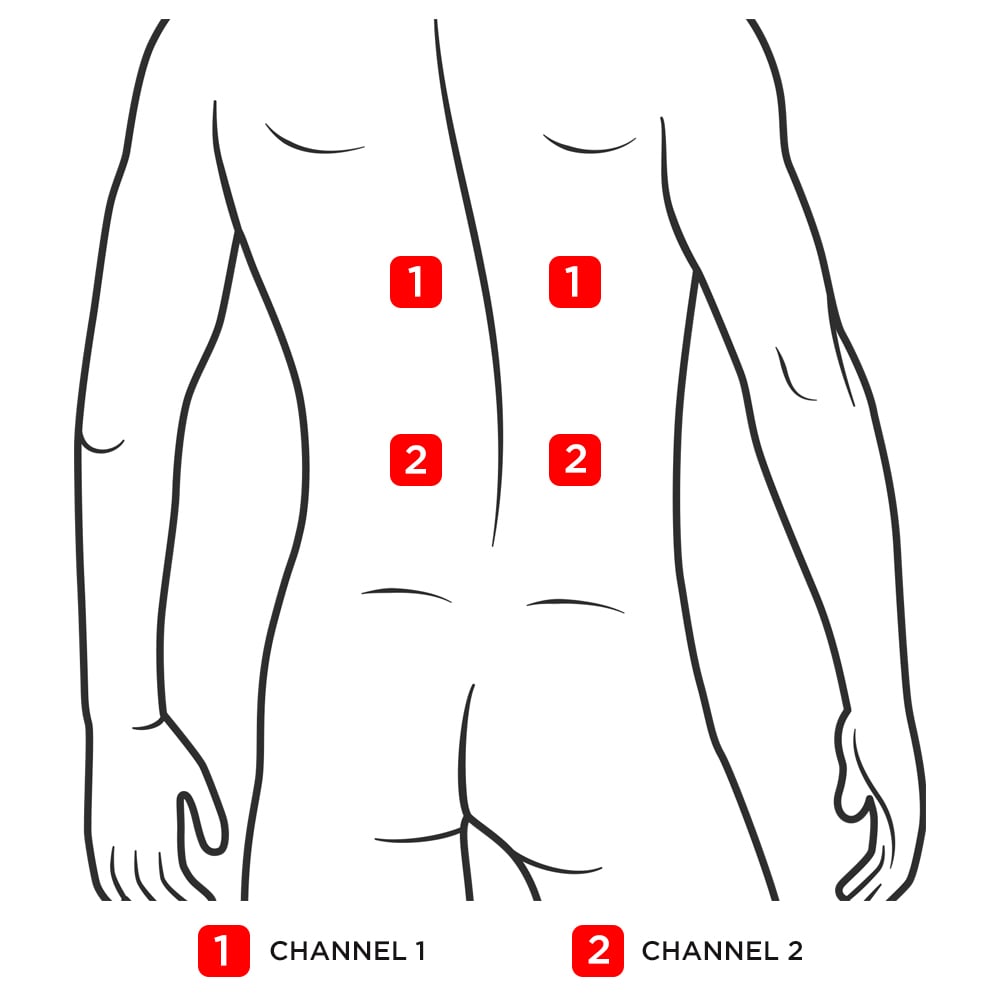
Bilateral Spasm Coverage Method
For spasms spanning both sides of your lower back or radiating pain, the four-pad square configuration delivers comprehensive coverage. Position two electrodes on each side of your spine—1 inch away from the vertebrae at the top of your pain zone. Place the bottom two electrodes 2-3 inches directly below, creating a rectangular pattern that surrounds the painful area.
Step-by-step placement sequence:
1. Identify the exact center of your pain
2. Measure 1 inch left and right of your spine
3. Place top electrodes at these points
4. Position bottom electrodes directly below, maintaining square formation
Large Area Strategy
When pain covers your entire lower back (common after heavy lifting), use larger 5cmx9cm electrodes. This broader coverage treats multiple muscle groups simultaneously, preventing the “island effect” where untreated areas continue spasming. The square pattern ensures current flows through the entire affected region, not just isolated spots.
Frequency Settings That Stop Acute Lower Back Spasms

Immediate Relief Settings
For sudden, sharp spasms, set your TENS unit to 70-120 Hz with 175-200 microsecond pulse width. This high-frequency setting creates a sensory-level blockade that interrupts pain signals within 5-10 minutes. The tingling sensation effectively distracts your nervous system while relaxing tight muscle fibers.
Acute spasm protocol:
– Start at 70 Hz, gradually increasing to 100 Hz
– Set pulse width to 180 μS
– Increase intensity until strong tingling (never pain)
– Use “Continue” mode for uninterrupted relief
Chronic Pain Mode
If your lower back spasms persist for weeks, switch to 2-10 Hz to stimulate natural endorphin production. This low-frequency setting takes 20-30 minutes to work but provides longer-lasting relief—sometimes up to 24 hours. Use “Modulation” mode to prevent your nerves from adapting to the stimulation.
30-Minute TENS Protocol for Immediate Spasm Relief
Session Timing That Works
Start with precisely 30-minute sessions when spasms strike. Set a timer—never exceed 45 minutes to prevent skin irritation. New users should begin with 20 minutes to assess tolerance before progressing to full sessions. After treatment, gently stretch while the tingling sensation fades; this combination often breaks the spasm cycle completely.
Daily usage limits:
– Acute spasms: Use up to 4 times daily as needed
– Chronic pain: Limit to 2-3 treatments daily
– Minimum 1-hour break between sessions
– For ongoing issues: Use every other day to prevent tolerance
Critical Safety Zones You Must Avoid with TENS Units
Absolute Danger Areas
Never place electrodes directly on your spine or across your chest and back simultaneously. This creates dangerous current pathways that could interfere with heart rhythm or nervous system function. Other prohibited zones include broken skin, varicose veins, and areas with reduced sensation where you might not feel burns developing.
Skin preparation checklist:
– Clean area with rubbing alcohol before application
– Ensure skin is completely dry
– Remove all lotions and oils
– Shave excessive hair for better adhesion
– Check for rashes or irritation
Medical Red Flags
Stop using your TENS unit immediately if you have a pacemaker, epilepsy, or are pregnant. Consult your physician before use if you have heart conditions, cancer in the treatment area, or unexplained back pain. These conditions require professional evaluation before attempting electrical stimulation therapy.
7-Step TENS Unit Setup for Lower Back Spasm Relief
Pre-Treatment Checklist
- Clean skin thoroughly with alcohol wipe
- Select appropriate pads (use larger pads for broad pain)
- Position yourself lying down or sitting comfortably
- Power off unit before pad placement
- Prepare medical tape for security if needed
- Check electrode adhesion before starting
- Set initial parameters to lowest settings
Operation Sequence
Turn on the unit only after pads are positioned and wires connected. Start at the lowest intensity, gradually increasing until you feel strong tingling without discomfort. If spasms worsen, reduce intensity immediately—this indicates incorrect placement or excessive current.
Why Your TENS Unit Isn’t Working for Back Spasms (And How to Fix It)
Common Failure Points
Electrodes won’t stick? Ensure skin is completely dry and free of oils. Replace pads when adhesion decreases, typically after 10-15 uses. For persistent issues, secure pads with medical tape around the edges.
No relief after 15 minutes? Verify placement matches your exact pain location—not just “somewhere on your back.” Increase intensity gradually, or switch from low to high frequency (70-120 Hz) for acute spasms. Check that electrodes maintain minimum 1-inch spacing.
Skin irritation developing? Reduce session duration to 20 minutes, lower intensity, or rotate placement sites. Discontinue use if redness persists beyond 30 minutes after treatment.
Best TENS Units for Lower Back Spasm Pain in 2023
Feature Checklist
Prioritize units with dual-channel capability (for four-pad configurations), clear intensity displays, and multiple preset programs. Belt clips and long battery life matter for mobility—many users continue treatment while performing gentle movements that aid recovery. Avoid ultra-cheap models under $30 that often lack proper intensity control.
Price-to-performance guide:
– Budget ($25-50): Basic units with manual controls
– Mid-range ($50-100): Multiple programs, digital display
– Professional ($100+): Precise parameter control, longer warranties
Replacement electrodes cost $10-20 per set—factor this into your long-term budget. Standard 5cmx5cm pads work for most lower back spasms, but larger 5cmx9cm pads provide better coverage for broad pain areas.
5 Red Flags That Mean Stop Using Your TENS Unit Immediately
Warning Signs Requiring Medical Attention
Discontinue TENS use and contact your healthcare provider if:
– Pain intensifies during or after treatment
– Numbness or weakness develops in legs
– Spasms persist longer than 48 hours
– Fever accompanies your back pain
– Pain radiates down both legs simultaneously
These symptoms indicate possible nerve compression or other serious conditions requiring professional evaluation. While TENS units provide excellent temporary relief for muscle spasms, they shouldn’t mask symptoms of more severe underlying issues.
TENS units offer drug-free, immediate relief for lower back spasms when used with precise placement and appropriate settings. Start conservatively with 20-minute sessions at low intensity, then adjust based on your response. Remember that electrode positioning is more critical than device quality—proper placement on either side of the spine, targeting muscle tissue rather than bone, makes all the difference. Millions find significant relief with this approach, making TENS a worthwhile option for your spasm management toolkit. For persistent issues, consult a physical therapist who can demonstrate optimal placement for your specific pain pattern and integrate TENS into a comprehensive treatment plan.