
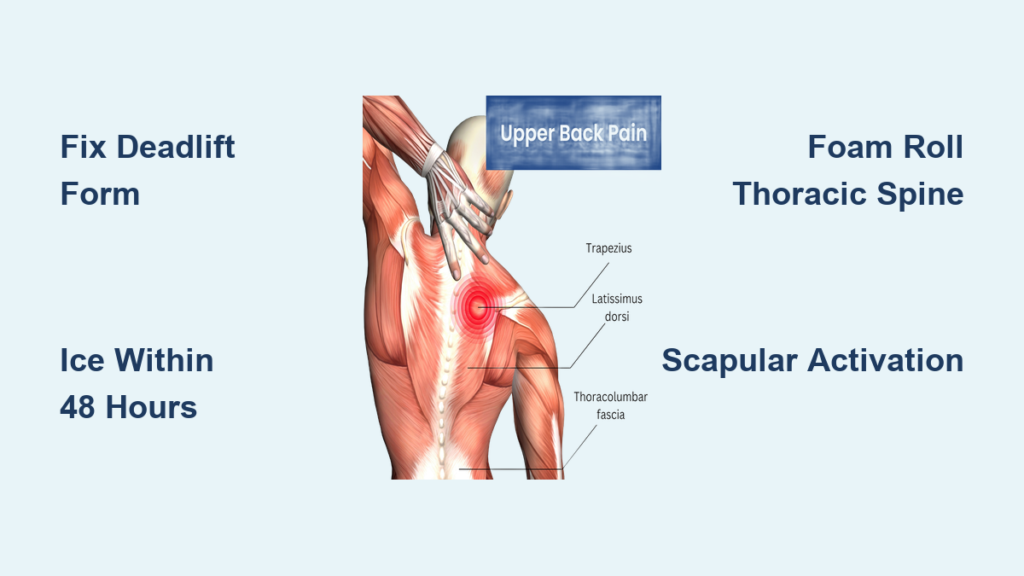
That sharp ache between your shoulder blades after deadlifts isn’t just “good pain”—it’s your thoracic spine screaming for help. Whether you’re wincing while turning your head post-rowing session or struggling to stand tall after overhead presses, upper back pain after workout sessions strikes 65% of lifters at some point. This isn’t normal soreness; it’s your body flagging movement errors that could become chronic if ignored. The good news? Most cases stem from fixable issues like rounded shoulders during heavy lifts or desk-job muscle imbalances—not serious injury.
Ignoring these warning signs turns temporary discomfort into training derailment. You’ll learn exactly why your mid-back rebels after specific exercises (hint: it’s not just “tight muscles”), and get a science-backed protocol to eliminate pain while building bulletproof strength. By the end, you’ll know how to distinguish harmless DOMS from danger signals, deploy immediate relief tactics, and implement our 5-minute daily prevention routine—so your next workout leaves you stronger, not sore.
Deadlift Rounding and Push-Up Sagging: Top Causes of Post-Workout Upper Back Pain
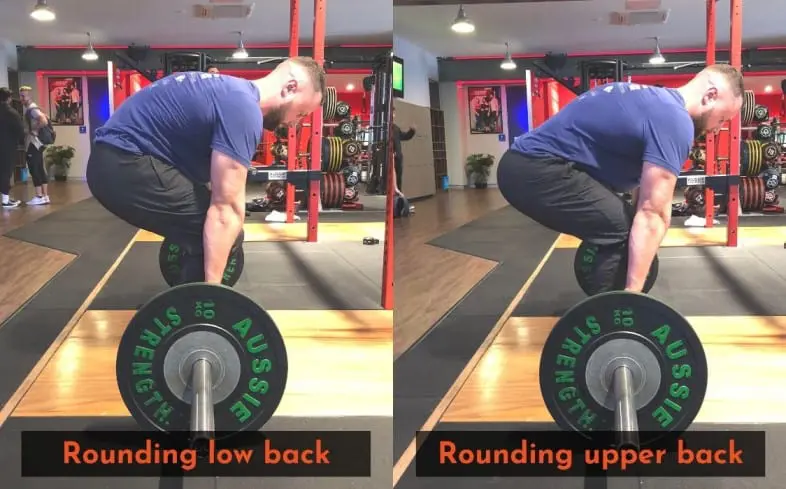
Your upper back pays the price when technique collapses under load. Rounded shoulders during deadlifts create dangerous shear forces on thoracic vertebrae—imagine bending a paperclip repeatedly until it snaps. Similarly, hip sagging in push-ups compresses spinal joints like a closing vise. These aren’t minor errors; they’re mechanical time bombs triggering pain 24-72 hours later.
Critical exercise faults that ignite upper back pain:
– Deadlift drift: Bar pulling forward forces thoracic spine into flexion
– Overhead press compensation: Excessive lumbar arch transferring load upward
– Squat torso collapse: Forward lean overworking upper back stabilizers
– Push-up scapular winging: Shoulder blades flaring outward under strain
Modern desk lifestyles worsen this through muscle imbalances. Tight pecs from screen time overpower weak rhomboids, creating forward-head posture that amplifies workout stress. You’ll feel this as burning traps screaming for relief while underactive serratus fails to stabilize your shoulder blades during presses.
DOMS vs. Injury: Spotting Dangerous Upper Back Pain After Exercise
Not all pain requires panic. True Delayed Onset Muscle Soreness (DOMS) feels like a diffuse, bilateral ache peaking 24-72 hours post-workout that eases with light movement. It’s your muscles adapting to new stress—productive but uncomfortable. But here’s the critical distinction: DOMS improves daily and resolves within 7 days.
Stop exercising immediately if you experience these red flags:
– Sharp, stabbing pain during lifts (not dull ache)
– Focal pain on one side lasting over 7 days
– Numbness/tingling radiating into arms or fingers
– Morning stiffness persisting beyond 30 minutes
– Pain worsening with rest (not movement)
These indicate potential nerve compression, facet joint irritation, or muscle tears needing professional evaluation. Ignoring them risks chronic issues—like that runner whose “minor” post-rowing pain evolved into constant discomfort after months of pushing through.
24-Hour Ice and Contrast Therapy Protocol for Acute Pain
When pain flares within 48 hours of lifting, stop aggravating movements immediately but don’t immobilize completely. Light walking maintains blood flow without stressing healing tissues—think 5-10 minute walks hourly.
First 24 hours: Combat inflammation
Apply ice packs for 15-20 minutes every 2-3 hours directly over the painful area (wrap in thin towel to prevent frostbite). This constricts blood vessels, reducing swelling from micro-tears. Avoid heat—it increases inflammation during this acute phase.
After 48 hours: Flush out waste products
Switch to contrast therapy: Alternate 3 minutes heat (heating pad at medium setting) with 1 minute cold for three cycles. This “pump” pushes fresh blood into damaged tissues while flushing inflammatory byproducts. Pair this with self-massage techniques:
– Lacrosse ball on upper traps: Roll slowly for 30-60 seconds per tender spot
– Foam roller thoracic extensions: 10 slow reps over T1-T8 vertebrae
– Wall rhomboid release: Press tennis ball between wall and shoulder blade
3 Foam Roller Drills to Unlock Stiff Thoracic Spine Pain
Stiffness in your mid-back is often the root cause—not weakness. These drills restore rotation and extension lost from desk work, taking pressure off strained muscles.
Thread the Needle Mobility Fix
Get on hands and knees. Slide one arm under your torso, palm up, rotating your rib cage toward the ceiling. Keep hips stacked—this isolates thoracic movement. Hold 20-30 seconds per side for 2-3 sets. You’ll feel trapped tension release between shoulder blades.
Foam Roller Thoracic Extensions
Position roller horizontally under upper back (T1-T8 level). Clasp hands behind head to support neck. Slowly arch backward over roller, keeping lower back neutral. Perform 10 controlled reps. Stop if you feel lumbar pinching—this targets ONLY your mid-back.
Chair Thoracic Rotations
Sit forward on chair, feet flat. Place hands behind head. Rotate rib cage to one side while keeping hips square. Hold 5 seconds for 5 reps per side. This unlocks rotational stiffness that causes pain during rows.
Scapular Squeezes and Band Rows: Fix Weak Rhomboids Causing Pain

Weak mid-back muscles let shoulders collapse during lifts, overloading your upper traps. Start with activation before adding resistance.
Phase 1: Scapular Activation (Pain-Free Movement)
Stand against wall, arms at sides. Squeeze shoulder blades together and down (not up toward ears). Hold 3-5 seconds for 3 sets of 10-15 reps. You should feel this between shoulder blades—not in neck. Pro tip: Imagine pinching a pencil between rhomboids.
Phase 2: Banded Rows (Rebuild Strength)
Anchor resistance band at chest height. Step back for tension. Pull elbows backward while squeezing shoulder blades, keeping ribs down. Use slow 2-2 tempo (2 seconds pull, 2 seconds release) for 3 sets of 10-12 reps. Stop if you feel upper traps dominating.
Phase 3: Wall Slides (Integrate Function)
Stand with back against wall, arms bent 90 degrees (“goalpost position”). Slide arms upward while maintaining contact at wrists, elbows, and head. Perform 2-3 sets of 12 reps. This trains serratus anterior to stabilize shoulders during overhead lifts.
Phase 1: How to Safely Resume Lifting After Upper Back Pain
.jpg)
Rushing back guarantees reinjury. Follow this phased return protocol—progress only when pain-free for 48 hours.
Week 1: Foundation Building
– Use bodyweight or light bands only
– Focus on perfect form in 12-15 rep ranges
– Pain must stay below 3/10 during/after sessions
– Example: Banded rows instead of barbell rows
Week 2: Sub-Maximal Loading
– Lift at 50-60% of pre-injury weights
– High-rep sets (12-15) build tissue tolerance
– Monitor symptoms for 24 hours post-workout
– Example: Trap bar deadlifts at reduced weight
Week 3+: Progressive Overload
– Add 5-10% weight weekly ONLY if pain-free
– Any pain spike >24 hours = regress to previous phase
– Reintroduce overhead lifts LAST after clearing all phases
Daily 5-Minute Mobility Routine to Prevent Next Workout’s Pain
Prevention beats rehabilitation every time. This micro-session counters desk-job stiffness before it triggers pain.
Every morning or pre-workout:
1. Brugger relief position: Sit tall, roll shoulders back/down, chin slightly tucked (30 seconds x 3 sets)
2. Chair rotations: 5 reps per side holding 5 seconds (as described earlier)
3. Doorway pec stretch: 30 seconds per side to counter tight chest muscles
Non-negotiable recovery habits:
– Sleep 7-9 hours: Critical for tissue repair
– Hydrate 2L daily: Dehydration amplifies muscle cramping
– Post-workout protein: 1.2-1.6g/kg bodyweight within 45 minutes
– Weekly volume control: Never increase sets/reps by >10% weekly
Red Flags: When Upper Back Pain After Workout Needs a Doctor
Most cases resolve with self-care, but don’t gamble with these symptoms. Contact a healthcare provider immediately if you experience:
- Pain radiating to chest or left arm (rule out cardiac issues)
- Progressive weakness in arms or hands
- Bowel/bladder changes or saddle numbness
- Pain persisting beyond 7 days despite following this protocol
Physical therapists provide targeted solutions like manual joint mobilization or dry needling for stubborn trigger points. Imaging (X-ray/MRI) may be needed if fracture or disc involvement is suspected—especially after trauma like a heavy barbell drop.
Pre-Workout Pain Prevention Checklist
☐ Complete 5-minute thoracic warm-up (foam roller + rotations)
☐ Film heavy lifts for form analysis (check shoulder alignment)
☐ Log pain levels 0-10 pre/post session
☐ Hydrate with 500ml water 30 minutes pre-lift
☐ Verify weekly volume increase ≤10%
Upper back pain after workout sessions isn’t a badge of honor—it’s a preventable signal your movement patterns need tuning. By fixing deadlift rounding, addressing desk-job imbalances, and respecting phased recovery, you’ll transform aching reps into pain-free progress. Start today with the 5-minute mobility routine; your future self will lift heavier without wincing.