
That sharp twinge when you stand up from your desk chair. The stiffness that greets you every morning like an unwelcome guest. If you’re battling lower back pain and hip discomfort simultaneously, you’re part of an 80% club—nearly everyone experiences debilitating back pain at some point. Modern life traps us in chairs that shorten hip flexors, weaken core muscles, and tilt our pelvises forward like a tipped bucket. But yoga for lower back pain and hip pain offers a scientifically backed path to relief without pills or expensive treatments. This guide delivers precise poses that target your specific pain points, clear safety boundaries for injured bodies, and a realistic timeline for regaining fluid movement. You’ll learn to distinguish therapeutic stretching from dangerous strain, use household items as effective props, and build a sustainable routine that prevents flare-ups before they start.
Why Your Back and Hips Hurt Together
Your spine and hips operate as a single kinetic chain—tightness in one area inevitably strains the other. When you sit for hours, your hip flexors shorten like coiled springs, yanking your pelvis forward and forcing your lower back into an exaggerated arch. This misalignment compresses lumbar discs while simultaneously weakening glutes that should stabilize your pelvis. The result? Every movement—from tying shoes to reaching for a coffee cup—becomes a pain trigger.
The Sitting-Induced Pain Cycle:
– Hip flexors contract after 30+ minutes of sitting, pulling pelvis forward
– Glutes deactivate (“dead butt syndrome”), failing to support spinal alignment
– Lumbar discs bear 3x normal pressure from collapsed posture
– Compensatory muscles (like hamstrings) overwork to stabilize your frame
Common culprits include desk jobs with poor ergonomics, sudden twisting motions, or underlying conditions like sciatica. But here’s the hopeful truth: targeted yoga poses can reverse this damage by restoring muscle balance and spinal space.
Red Flags: When to Skip Home Practice
Stop immediately and consult a doctor if you experience:
– Radiating leg pain with numbness or tingling (signaling nerve compression)
– Bladder/bowel control issues (indicating cauda equina syndrome)
– Unrelenting pain lasting beyond 72 hours without improvement
– Trauma-related pain following falls or accidents
For existing conditions like herniated discs or scoliosis, work with a physiotherapist before attempting any poses. Never push through sharp, stabbing sensations—these signal tissue damage. Therapeutic discomfort should feel like a “good stretch” that eases within 10 minutes post-practice. If pain persists or worsens, modify or skip the pose entirely.
Essential Lower Back Relief Poses

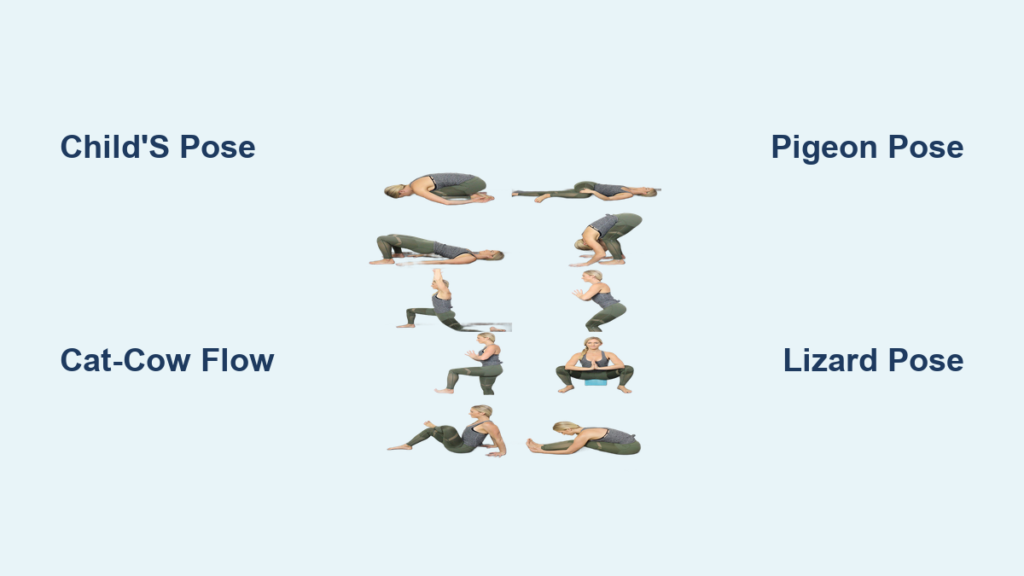
Child’s Pose Spinal Decompression
This foundational pose creates critical space between compressed vertebrae while calming your nervous system. Kneel with big toes touching and knees hip-width apart. Sit back toward heels (place a pillow between calves and hamstrings if tight). Walk hands forward until arms extend fully, forehead resting on the mat. Key action: Draw ribs away from your tailbone to lengthen your spine—not just your arms. Feel your lower back widening with each inhale.
Duration: Start with 30-second holds, building to 3 minutes
Pro tip: Press palms firmly into the floor to engage shoulder blades and deepen spinal traction
Warning: Sharp knee pain? Place a rolled towel behind knees or practice reclined
Cat-Cow Spinal Mobilization
This dynamic duo lubricates spinal joints and identifies movement restrictions. Begin on hands and knees (wrists under shoulders, knees under hips). Inhale: Drop belly toward floor while lifting chest and tailbone (Cow). Exhale: Round spine toward ceiling like a Halloween cat, tucking chin and pelvis (Cat). Move slowly, vertebra by vertebra.
Repetitions: 5-10 cycles
Troubleshooting: If Cow pose pinches your lower back, reduce arch depth and engage your core
Visual cue: Imagine pouring water over your spine—the flow should be smooth, not jagged
Sphinx Gentle Backbend
Unlike deeper backbends that strain compromised spines, Sphinx creates natural lumbar curvature safely. Lie face-down with elbows under shoulders and forearms parallel. Press hips firmly into the mat while lifting your chest just 2-3 inches. Critical detail: Keep shoulders away from ears and engage lower abs to prevent over-arching.
Hold: 30 seconds (max 1 minute)
Stop immediately if you feel pinching—this pose isn’t for acute disc injuries
Pro modification: Place a folded towel under pelvis for sensitive spines
Hip Flexibility and Pain Relief Sequence
Pigeon Pose Deep Hip Opener
This hip-reviving pose targets the piriformis muscle that often irritates sciatic nerves. From Downward Dog, bring right knee behind right wrist. Angle shin diagonally forward while extending left leg straight back. Square hips toward the front of your mat (imagine a shelf on your pelvis staying level).
Beginner version: Reclined Figure-Four stretch on your back
Hold: 30 seconds minimum—pain relief requires sustained release
Visual cue: If your right hip hovers high, place a block under it to prevent strain
Pro tip: Flex front foot to protect the knee joint
Lizard Pose for Hip Flexors
Step right foot outside right hand from plank position. Drop left knee down, curling toes under. Walk right foot wider than hip-width, lowering onto forearms (use blocks if needed). Key action: Keep hips parallel to the mat—don’t let right hip collapse toward floor. Feel the stretch along your left hip flexor and right inner thigh.
Breath count: 8 slow inhales/exhales per side
Troubleshooting: Knee discomfort? Place blanket under left knee or stay on hands instead of forearms
Warning: Sharp knee pain means stop immediately—never force rotation
Fire Log Pose for Glutes
Sit upright with spine tall. Stack legs like logs: right ankle on left knee, right knee over left ankle. Flex both feet strongly. Critical detail: If knees stack high off the floor, sit on a folded blanket to keep sit bones grounded. Only fold forward when hips release naturally.
Duration: 8-10 breaths per side
Pro modification: Place blocks under knees for sensitive joints
Visual cue: Your top knee should point toward the floor, not the ceiling
Prop Hacks Using Household Items

No yoga props? Transform everyday objects:
– Books as blocks: Stack hardcovers under hands in Lizard Pose
– Towels as straps: Loop bathrobe belt around foot in reclined stretches
– Pillows as bolsters: Place under hips in Pigeon Pose to reduce intensity
– Chairs for stability: Use seat height for modified Downward Dog
Blanket multipurpose uses:
1. Fold under sit bones in seated poses to tilt pelvis forward
2. Cushion knees in kneeling poses
3. Support head in twists to avoid neck strain
Weekly Practice Blueprint

Week 1-2: Foundation Building
- Frequency: 3x weekly (15 minutes max)
- Core poses: Child’s Pose, Cat-Cow, Sphinx, Knees-to-Chest
- Critical focus: Perfecting alignment over duration—stop at 10 seconds if form breaks
- Red flag check: Pain should decrease within 24 hours of practice
Week 3-4: Adding Depth
- Add: Pigeon Pose (reclined version first), Bridge Pose, Reclined Twists
- Hold times: Increase to 60 seconds as body adapts
- Frequency: 4-5x weekly
- Track progress: Note which activities become pain-free (e.g., bending to tie shoes)
Month 2+: Maintenance Mode
- Daily: 5-minute morning/evening sequences (Cat-Cow + Child’s Pose)
- Weekly: One 30-minute deep session
- Prevention: Every 60 minutes of sitting, do Seated Figure-Four stretch
- Pro tip: Pair yoga with walking—20 minutes daily boosts circulation for faster healing
Morning Pain-Prevention Routine
The 5-Minute Wake-Up Sequence:
1. Knees-to-Chest Rocking: 30 seconds (massage spine with gentle motion)
2. Reclined Twists: 30 seconds/side (keep shoulders grounded)
3. Happy Baby Pose: 1 minute (grip feet, rock side-to-side)
4. Cat-Cow Flow: 10 cycles (focus on spinal articulation)
5. Child’s Pose: 1 minute (deep breathing to reset nervous system)
Office Rescue Moves:
– Seated Figure-Four: Press right ankle to left knee while sitting—hold 30 seconds
– Hip Circles: Stand and rotate hips clockwise/counter-clockwise 10x
– Goddess Squat: Hold desk edge, sink into wide stance for 5 breaths
Long-Term Results Timeline
Week 1: Noticeable reduction in morning stiffness; sleep quality improves
Month 1: Pain during daily tasks (driving, lifting groceries) decreases by 50%
Month 3: Most activities become pain-free; core strength visibly supports posture
6 Months: Preventive habits become automatic—pain episodes rare and short-lived
Success indicators you’ll experience:
– Sitting tolerance increases from 20 to 60+ minutes without discomfort
– Pain-free walking distance doubles within 8 weeks
– Spontaneous “ouch” moments vanish during routine movements
– Reduced reliance on pain medication
Your spine and hips didn’t develop these patterns overnight, and consistent yoga for lower back pain and hip pain won’t deliver miracles in a day. But within weeks, you’ll reclaim movements you thought were lost—reaching for high shelves without wincing, playing with kids without bracing for pain, sleeping through the night. Start today with just three minutes of Child’s Pose and Cat-Cow. That small investment builds the foundation for pain-free mornings, productive workdays, and a body that moves with ease instead of agony. Your future self is waiting on the other side of this practice—every breath you take in these poses brings them closer.